
功能验证:CX-N交换机与部分国产RoCE网卡组网的HPC场景测试
1 目标与物理网络拓扑
本文主要描述如何在光润通国产100G RoCEv2网卡(以下简称GRT)和飞迈瑞克国产100G RoCEv2网卡(以下简称Femrice)搭建的网络上针对HPC场景进行性能/时延测试,具体方案如下:
- E2E转发测试
测试两款国产网卡在相同拓扑E2E(End to End)的转发时延和带宽,本次方案测试点采用Perftest通信测试工具包进行发包,测试过程遍历2~8388608字节。
- HPC应用测试
本次测试方案在相同场景下运行HPC应用,比较GTP和Femrice两款国产网卡的运行速度(时间更短)。
1.1 GRT物理拓扑
如上解决方案的IB交换机物理拓扑,如图1所示:

图1:GRT网卡物理网络拓扑
1.2 Femrice物理拓扑
如上解决方案的Femrice物理拓扑,如图2所示:

图2:Femrice网卡物理网络拓扑
1.3 管理口IP规划
测试过程中涉及到设备的管理网口和业务口的的IP地址如表1所示:
| 设备名称 | 接口 | IP地址 | 备注 |
| Server1 | 管理口 | 192.168.4.144 | / |
| 业务口ens1f0 | 100.0.1.10 | GRT网卡RoCEv2模式直连 | |
| 业务口ens1f1 | 100.0.2.10 | Femrice网卡RoCEv2模式直连 | |
| Server2 | 管理口 | 192.168.4.145 | / |
| 业务口ens1f0 | 100.0.1.11 | GRT网卡RoCEv2模式直连 | |
| 业务口ens1f1 | 100.0.2.11 | Femrice网卡RoCEv2模式直连 |
2 硬件与软件环境
部署环境中涉及到的硬件和软件如表2和表3所示:
| 名称 | 型号 | 硬件指标 | 数量 | 备注 |
| 服务器 | x86 | Intel(R) Xeon(R) CPU E5-2678 v3 @ 2.50GHz,48核 内存:128G | 2 | 需安装100G网卡 |
| 光模块 | 100G | QSFP28 | 4 | 无 |
| 光纤 | 多模 | 100G适用 | 2 | 无 |
| Femrice网卡 | FM- E810CAM2-QF2 | Interl E810-C | 2 | / |
| GRT | F1102E-v4.0 | Interl E810-C | 2 | / |
| 名称 | 版本 | 备注 |
| 操作系统 | CentOS Linux release 7.8.2003 (Core) | 无 |
| 内核 | 3.10.0-1127.18.2.el7.x86_64 | 无 |
| Intel网卡驱动 | ice-1.9.11 | https://www.intel.cn/ |
| RDMA网卡驱动 | irdma-1.11.16.6 | https://www.intel.cn/ |
| WRF | WRFV4.0 | https://www2.mmm.ucar.edu |
| LAMMPS | LAMMPS(3 Mar 2020) | https://github.com/lammps/lammps/ |
| Perftest | V4.5-0.20 | https://github.com/linux-rdma/perftest |
3 测试环境部署
在两台Server服务器上,安装部署HPC两种测试场景所需的基础环境。
补充说明:以”[root@server ~]#”为开头的命令表示两台服务器都要执行。
3.1 网卡驱动部署
在两台Server服务器上安装网卡所需的ice和irdma驱动程序以及Perftest测试工具集,网卡驱动安装完成之后检查网卡及驱动状态,确保网卡可以正常使用。
3.1.1 网卡ice驱动程序安装
[root@Server ~]# wget https://downloadmirror.intel.com/763930/ice-1.9.11.tar.gz
[root@Server ~]# tar zxf  ice-1.9.11.tar.gz
[root@Server ~]# cd ice-1.9.11/src/
[root@Server src]# make install
[root@Server src]# modinfo ice
[root@Server src]# modprobe ice
[root@Server src]# ethtool -i ens1f0
driver: ice
version: 1.9.11
firmware-version: 3.20 0x8000d84c 1.3146.0
expansion-rom-version:
bus-info: 0000:02:00.0
supports-statistics: yes
supports-test: yes
supports-eeprom-access: yes
supports-register-dump: yes
supports-priv-flags: yes
3.1.2 网卡irdma驱动程序安装
[root@Server ~]# wget https://downloadmirror.intel.com/763932/irdma-1.11.16.6.tgz
[root@Server ~]# tar zxf  irdma-1.11.16.6.tgz
[root@Server ~]# cd irdma-1.11.16.6/
[root@Server irdma-1.11.16.6]# ./build
[root@Server irdma-1.11.16.6]# modprobe irdma
[root@Server ~]# wget https://github.com/linux-rdma/rdma-core/release/download/v42.0/rdma-core-42.0.tar.gz
[root@Server ~]# tar -xzvf rdma-core-42.0.tar.gz
[root@Server ~]# cd rdma-core-42.0/
[root@Server rdma-core-42.0]# patch -p2 < /root/ ice-1.9.11/libirdma-42.0.patch
[root@Server rdma-core-42.0]# cd ..
[root@Server ~]# chgrp -R root rdma-core-42.0/redhat
[root@Server ~]# chgrp -R root rdma-core-42.0/redhat
[root@Server ~]# mkdir -p ~/rpmbuild/SOURCES
[root@Server ~]# mkdir -p ~/rpmbuild/SPECS
[root@Server ~]# cp rdma-core-42.0.tgz ~/rpmbuild/SOURCES/
[root@Server SOURCES]# cd ~/rpmbuild/SOURCES
[root@Server SOURCES]# tar -xzvf rdma-core-42.0.tgz
[root@Server SOURCES]# cp ~/rpmbuild/SOURCES/rdma-core-42.0/redhat/rdma-core.spec ~/rpmbuild/SPECS/
[root@Server SPECS]# cd ~/rpmbuild/SPECS/
[root@Server SPECS]# rpmbuild -ba rdma-core.spec
[root@Server SPECS]# cd ~/rpmbuild/RPMS/x86_64
[root@Server x86_64]# yum install *42.0*.rpm
3.1.2.1 Perfest性能测试工具集
[root@Server ~]# git clone https://github.com/linux-rdma/perftest.git
[root@Server ~]# cd perftest
[root@Server perftest]# ./autogen.sh
[root@Server perftest]# ./configure
[root@Server perftest]# make
[root@Server perftest]# make install
4 WRF运行环境部署
4.1 安装环境准备
4.1.1 创建文件目录
[root@Server1 ~]# cd /data/home/wrf01/202302test/
[root@Server1 202302test]# mkdir Build_WRF
[root@Server1 202302test]# mkdir TESTS
4.1.2 安装编译器
[root@Server1 ~]# yum -y install gcc cpp gcc-gfortran gcc-g++ m4 make csh4.1.3 添加环境变量
[root@Server1 ~]# vi ~/.bashrc
export DIR=/data/home/wrf01/202302test/Build_WRF/LIBRARIES
export CC=gcc
export CXX=g++
export FC=gfortran
export CFLAGS='-m64'
export F77=gfortran
export FFLAGS='-m64'
export PATH=$DIR/mpich/bin:$PATH
export PATH=$DIR/netcdf/bin:$PATH
export NETCDF=$DIR/netcdf
export JASPERLIB=$DIR/grib2/lib
export JASPERINC=$DIR/grib2/include
export LDFLAGS=-L$DIR/grib2/lib
export CPPFLAGS=-I$DIR/grib2/include
export LD_LIBRARY_PATH=$DIR/grib2/lib:$LD_LIBRARY_PATH
[root@Server1 ~]# source ~/.bashrc
4.2 安装三方依赖库
4.2.1 创建文件目录
[root@Server1 ~]# cd /data/home/wrf01/202302test/Build_WRF
[root@Server1 Build_WRF]# mkdir LIBRARIES
4.2.2 下载第三方库
[root@Server1 Build_WRF]# wget \ https://www2.mmm.ucar.edu/wrf/OnLineTutorial/compile_tutorial/tar_files/zlib-1.2.7.tar.gz
[root@Server1 Build_WRF]# wget \ https://www2.mmm.ucar.edu/wrf/OnLineTutorial/compile_tutorial/tar_files/mpich-3.0.4.tar.gz
[root@Server1 Build_WRF]# wget \ https://www2.mmm.ucar.edu/wrf/OnLineTutorial/compile_tutorial/tar_files/netcdf-4.1.3.tar.gz
[root@Server1 Build_WRF]# wget \ https://www2.mmm.ucar.edu/wrf/OnLineTutorial/compile_tutorial/tar_files/jasper-1.900.1.tar.gz
[root@Server1 Build_WRF]# wget \ https://www2.mmm.ucar.edu/wrf/OnLineTutorial/compile_tutorial/tar_files/libpng-1.2.50.tar.gz
4.2.3 编译安装zlib
[root@Server1 Build_WRF]# tar xzvf zlib-1.2.7.tar.gz
[root@Server1 Build_WRF]# cd zlib-1.2.7
[root@Server1 zlib-1.2.7]# ./configure --prefix=$DIR/grib2
[root@Server1 zlib-1.2.7]# make
[root@Server1 zlib-1.2.7]# make install
4.2.4 编译安装libpng
[root@Server1 Build_WRF]# tar xzvf libpng-1.2.50.tar.gz
[root@Server1 Build_WRF]# cd  libpng-1.2.50
[root@Server1 libpng-1.2.50]# ./configure --prefix=$DIR/grib2
[root@Server1 libpng-1.2.50]# make
[root@Server1 libpng-1.2.50]# make install
4.2.5 编译安装mpich
[root@Server1 Build_WRF]# tar xzvf mpich-3.0.4.tar.gz
[root@Server1 Build_WRF]# cd  mpich-3.0.4
[root@Server1 mpich-3.0.4]# ./configure --prefix=$DIR/mpich
[root@Server1 mpich-3.0.4]# make
[root@Server1 mpich-3.0.4]# make install
4.2.6 编译安装jasper
[root@Server1 Build_WRF]# tar xzvf jasper-1.900.1.tar.gz
[root@Server1 Build_WRF]# cd  jasper-1.900.1
[root@Server1 jasper-1.900.1]# ./configure --prefix=$DIR/grib2
[root@Server1 jasper-1.900.1]# make
[root@Server1 jasper-1.900.1]# make install
4.2.7 编译安装netcdf
[root@Server1 Build_WRF]# tar xzvf netcdf-4.1.3.tar.gz
[root@Server1 Build_WRF]# cd  netcdf-4.1.3
[root@Server1 netcdf-4.1.3]# ./configure --prefix=$DIR/netcdf \
--disable-dap --disable-netcdf-4 --disable-shared
[root@Server1 netcdf-4.1.3]# make
[root@Server1 netcdf-4.1.3]# make install
4.2.8 依赖库测试
[root@Server1 Build_WRF]# cd TESTS
[root@Server1 TESTS]# wget \ https://www2.mmm.ucar.edu/wrf/OnLineTutorial/compile_tutorial/tar_files/Fortran_C_NETCDF_MPI_tests.tar
[root@Server1 TESTS]# tar -xf Fortran_C_NETCDF_MPI_tests.tar

测试Fortran+C+NetCDF:
[root@Server1 TESTS]# cp ${NETCDF}/include/netcdf.inc .
[root@Server1 TESTS]# gfortran -c 01_fortran+c+netcdf_f.f
[root@Server1 TESTS]# gcc -c 01_fortran+c+netcdf_c.c
[root@Server1 TESTS]# gfortran 01_fortran+c+netcdf_f.o \  01_fortran+c+netcdf_c.o \-L${NETCDF}/lib -lnetcdff -lnetcdf
[root@Server1 TESTS]# ./a.out

测试Fortran+C+NetCDF+MPI:
[root@Server1 TESTS]# cp ${NETCDF}/include/netcdf.inc .
[root@Server1 TESTS]# mpif90 -c 02_fortran+c+netcdf+mpi_f.f
[root@Server1 TESTS]# mpicc -c 02_fortran+c+netcdf+mpi_c.c
[root@Server1 TESTS]# mpif90 02_fortran+c+netcdf+mpi_f.o 02_fortran+c+netcdf+mpi_c.o -L${NETCDF}/lib -lnetcdff -lnetcdf
[root@Server1 TESTS]# mpirun ./a.out
4.3 安装WRF
4.3.1 下载WRFV4.0
[root@Server1 ~]# cd /data/home/wrf01/202302test/Build_WRF
[root@Server1 Build_WRF]# wget \ https://www2.mmm.ucar.edu/wrf/src/WRFV4.0.TAR.gz
[root@Server1 Build_WRF]# tar xzvf WRFV4.0.TAR.gz
[root@Server1 Build_WRF]# cd WRF
4.3.2 安装WRF
[root@Server1 WRF]# ./configure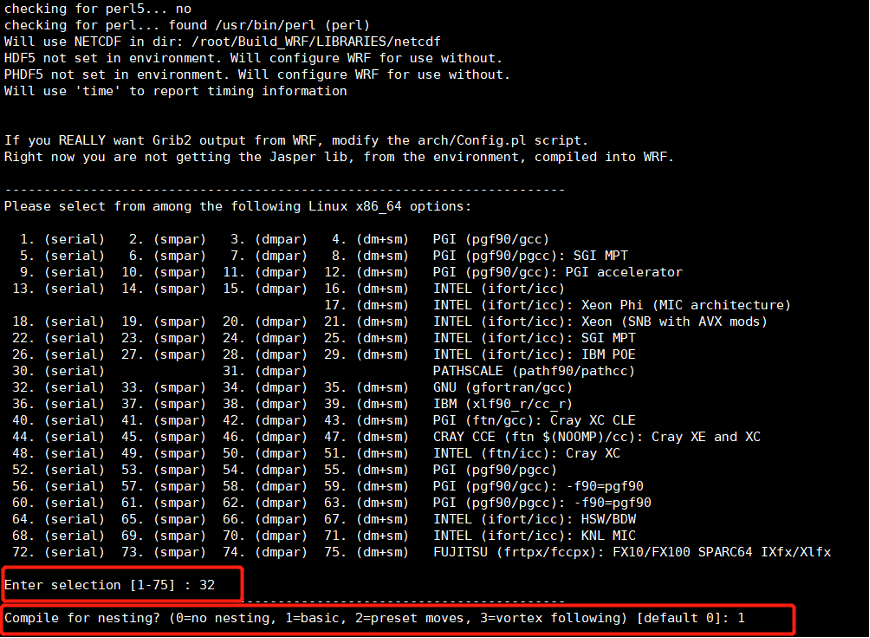
[root@Server1 WRF]# ./compile
[root@Server1 WRF]# ls -ls main/*.exe
4.4 安装WPS
4.4.1 下载WPSV4.0
[root@Server1 ~]# cd /data/home/wrf01/202302test/Build_WRF
[root@Server1 Build_WRF]# wget \
https://www2.mmm.ucar.edu/wrf/src/WPSV4.0.TAR.gz
[root@Server1 Build_WRF]# tar xzvf WRFV4.0.TAR.gz
[root@Server1 Build_WRF]# cd WPS
[root@Server1 WPS]# ./clean
4.4.2 修改intmath.f文件
[root@Server1 WPS]# cat ./ungrib/src/ngl/g2/intmath.f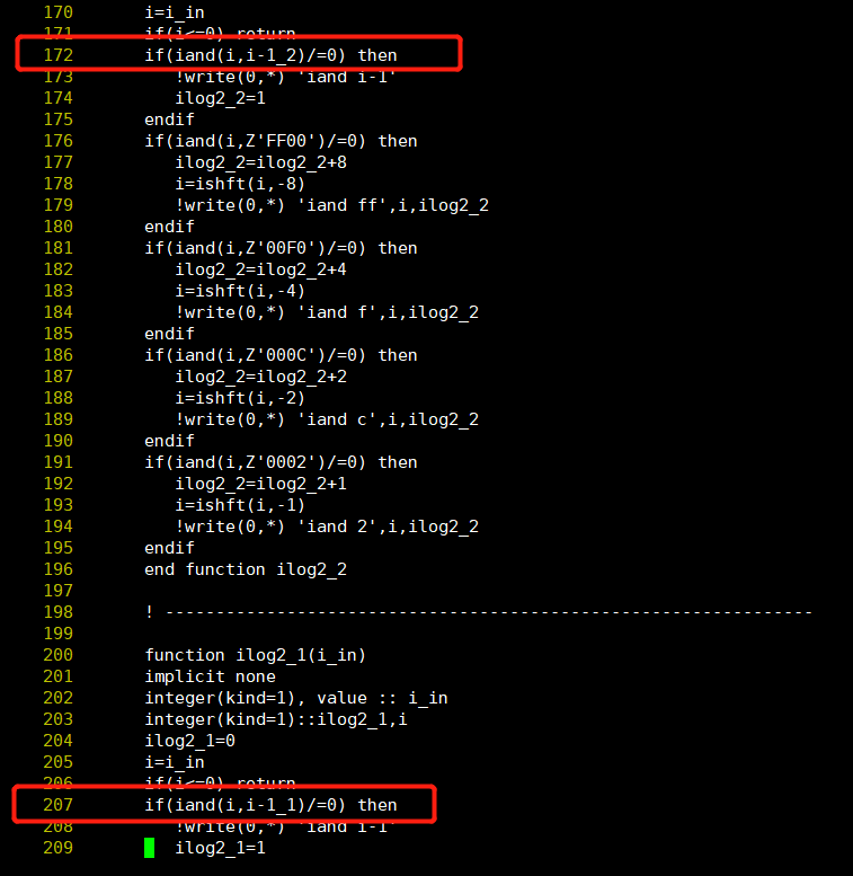
4.4.3 安装WPS
[root@Server1 WPS]# ./configure
Enter selection [1-40] : 1
[root@Server1 WPS]# ./compile
[root@Server1 WPS]# ls -las *.exe
max_dom = 1,
 start_date = '2000-01-24_12:00:00',
 end_date   = '2000-01-26_00:00:00',
 interval_seconds = 21600
 io_form_geogrid = 2,
/

&geogrid
 parent_id         =   1,   1,
 parent_grid_ratio =   1,   3,
 i_parent_start    =   1,  31,
 j_parent_start    =   1,  17,
 e_we              =  104, 142,
 e_sn              =  61,  97,
geog_data_res = '10m','2m',
 dx = 30000,
 dy = 30000,
 map_proj = 'lambert',
 ref_lat   =  34.83,
 ref_lon   = -81.03,
 truelat1  =  30.0,
 truelat2  =  60.0,
 stand_lon = -98.0,
 geog_data_path = '/data/home/wrf01/202302test/Build_WRF/WPS_GEOG/WPS_GEOG/'
/

&ungrib
 out_format = 'WPS',
 prefix = 'FILE',
/

&metgrid
 fg_name = 'FILE'
 io_form_metgrid = 2,
/
4.4.4 下载静态地理数据
[root@Server1 ~]# cd /data/home/wrf01/202302test/Build_WRF
[root@Server1 Build_WRF]# mkdir WPS_GEOG
下载链接:https://www2.mmm.ucar.edu/wrf/users/download/get_sources_wps_geog.html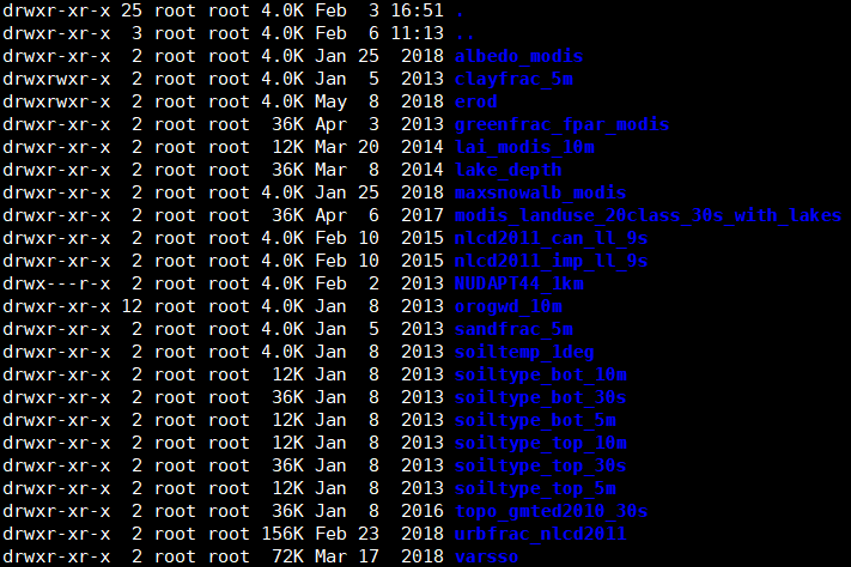
4.5 WRF可执行文件
4.5.1 下载WPSV4.0
[root@Server1 ~]# cd /data/home/wrf01/202302test/Build_WRF
[root@Server1 Build_WRF]# mkdir DATA
[root@Server1 Build_WRF]# vi WRF/test/em_real/namelist.input
&time_control
 run_days                            = 0,
 run_hours                           = 36,
 run_minutes                         = 0,
 run_seconds                         = 0,
 start_year                          = 2000, 2000, 2000,
 start_month                         = 01,   01,   01,
 start_day                           = 24,   24,   24,
 start_hour                          = 12,   12,   12,
 end_year                            = 2000, 2000, 2000,
 end_month                           = 01,   01,   01,
 end_day                             = 26,   25,   25,
 end_hour                            = 00,   12,   12,
 interval_seconds                    = 21600
 input_from_file                     = .true.,.true.,.true.,
 history_interval                    = 180,  60,   60,
 frames_per_outfile                  = 1000, 1000, 1000,
 restart                             = .false.,
 restart_interval                    = 5000,
 io_form_history                     = 2
 io_form_restart                     = 2
 io_form_input                       = 2
 io_form_boundary                    = 2
 /

 &domains
 time_step                           = 180,
 time_step_fract_num                 = 0,
 time_step_fract_den                 = 1,
 max_dom                             = 1,
 e_we                                = 104,    142,   94,
 e_sn                                = 61,    97,    91,
 e_vert                              = 34,    34,    34,
 p_top_requested                     = 4500,
 num_metgrid_levels                  = 27,
 num_metgrid_soil_levels             = 2,
 dx                                  = 30000, 10000,  3333.33,
 dy                                  = 30000, 10000,  3333.33,
 grid_id                             = 1,     2,     3,
 parent_id                           = 0,     1,     2,
 i_parent_start                      = 1,     31,    30,
 j_parent_start                      = 1,     17,    30,
 parent_grid_ratio                   = 1,     3,     3,
 parent_time_step_ratio              = 1,     3,     3,
 feedback                            = 1,
 smooth_option                       = 0
 /

 &physics
 physics_suite                       = 'CONUS'
 mp_physics                          = -1,    -1,    -1,
 cu_physics                          = -1,    -1,     0,
 ra_lw_physics                       = -1,    -1,    -1,
 ra_sw_physics                       = -1,    -1,    -1,
 bl_pbl_physics                      = -1,    -1,    -1,
 sf_sfclay_physics                   = -1,    -1,    -1,
 sf_surface_physics                  = -1,    -1,    -1,
 radt                                = 30,    30,    30,
 bldt                                = 0,     0,     0,
 cudt                                = 5,     5,     5,
 icloud                              = 1,
 num_land_cat                        = 21,
 sf_urban_physics                    = 0,     0,     0,
 /

 &fdda
 /

 &dynamics
 hybrid_opt                          = 2,
 w_damping                           = 0,
 diff_opt                            = 1,      1,      1,
 km_opt                              = 4,      4,      4,
 diff_6th_opt                        = 0,      0,      0,
 diff_6th_factor                     = 0.12,   0.12,   0.12,
 base_temp                           = 290.
 damp_opt                            = 3,
 zdamp                               = 5000.,  5000.,  5000.,
 dampcoef                            = 0.2,    0.2,    0.2
 khdif                               = 0,      0,      0,
 kvdif                               = 0,      0,      0,
 non_hydrostatic                     = .true., .true., .true.,
 moist_adv_opt                       = 1,      1,      1,
 scalar_adv_opt                      = 1,      1,      1,
 gwd_opt                             = 1,
 /

 &bdy_control
 spec_bdy_width                      = 5,
 specified                           = .true.
 /

 &grib2
 /

 &namelist_quilt
 nio_tasks_per_group = 0,
 nio_groups = 1,
 /
4.5.2 生成地理数据
[root@Server1 WPS]# ./geogrid.exe
[root@Server1 WPS]# ls -lah geo_em.d01.nc
4.5.3 下载并链接气象数据
气象数据下载网址:https://rda.ucar.edu/。
[root@Server1 Build_WRF]# mkdir DATA
[root@Server1 Build_WRF]# ls -lah ./DATA/JAN00/fnl*
[root@Server1 Build_WRF]# cd WPS
[root@Server1 WPS]# ./link_grib.csh ../DATA/JAN00/fnl
[root@Server1 WPS]# ln -sf ungrib/Variable_Tables/Vtable.GFS Vtable
[root@Server1 WPS]# ./ungrib.exe
[root@Server1 WPS]# ls -lah FILE*
4.5.4 融合气象和地理数据
[root@Server1 WPS]# ./metgrid.exe4.5.5 链接WPS到WRF
[root@Server1 WPS]#  cd ../WRF/test/em_real/
[root@Server1 em_real]# ln -sf ~/Build_WRF/WPS/met_em* .
[root@Server1 em_real]# mpirun -np 1 ./real.exe
[root@Server1 em_real]# ls -alh wrfbdy_d01 wrfinput_d01
5 GRT国产100G RoCEv2网卡
5.1 E2E转发测试
配置网卡工作模式RoCEv2,使用ib_read_lat和ib_read_bw工具在服务器Server1上建立发包服务端,在Server2上建立发包客户端,测试GRT网卡直连情况下的带宽和时延。
5.1.1 基础配置
[root@Server ~]# rmmod irdma
[root@Server ~]# modprobe irdma roce_ena=1
[root@Server ~]# ibv_devices
    device          	   node GUID
    ------          	----------------
    rdmap2s0f0      	5a53c0fffe790004
irdma1          	5a53c0fffe790005
[root@Server ~]# ibv_devinfo rdmap2s0f0

[root@Server1 ~]# ifconfig ens1f0 100.0.1.10 up
[root@Server2 ~]# ifconfig ens1f0 100.0.1.11 up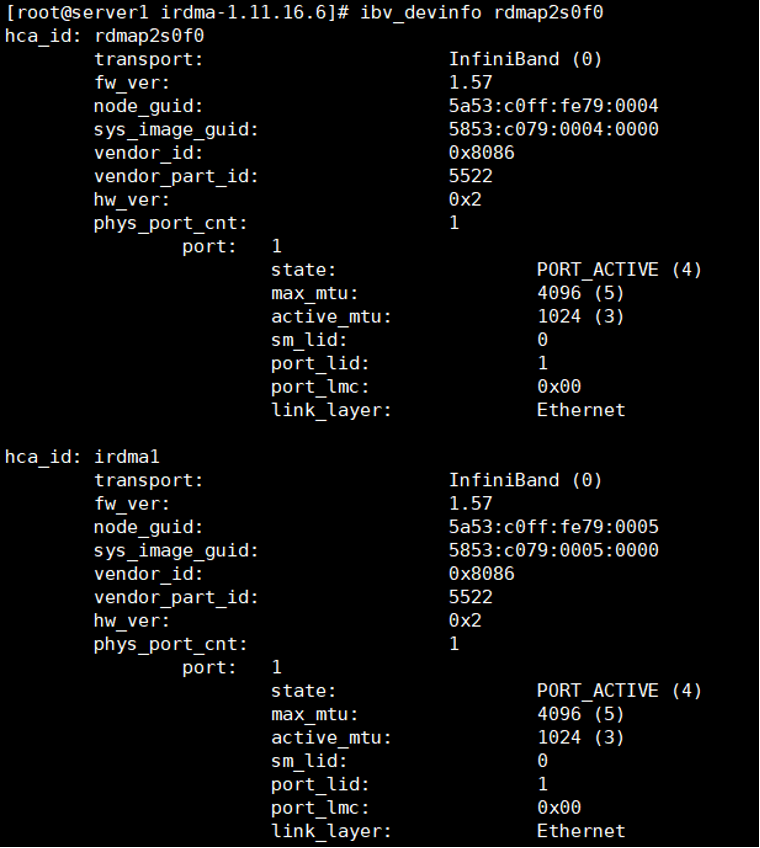
[root@Server1 ~]# ifconfig ens1f0 100.0.1.10 up
[root@Server2 ~]# ifconfig ens1f0 100.0.1.11 up
5.1.2 GRT网卡直连
[root@Server1 ~]# ib_read_lat -R -d rdmap2s0f0 -F --report_gbits -a
[root@Server2 ~]# ib_read_lat -a -R -x 5 -d rdmap2s0f0 -F -f 2 100.0.1.10
[root@Server1 ~]# ib_read_bw -R -d rdmap2s0f0 -F --report_gbits -a
[root@Server2 ~]# ib_read_bw -a -R -x 5 -d rdmap2s0f0 -F -f 2 100.0.1.10
5.2 HPC应用测试
在两台服务器上使用WRF开源气象模拟软件和LAMMPS高分子计算进行数据测试,测试GTR国产网卡完成并行计算运行所需时间。
5.2.1 WRF
使用两台服务器每台12个核心总计24个核心并发运行WRF应用,服务器之间GRT网卡RoCEv2模式直连。
[root@Server1 em_real]# time /usr/mpi/gcc/openmpi-4.1.5a1/bin/mpirun -np 24 -oversubscribe --allow-run-as-root \
--host 100.0.1.10,100.0.1.11  ./wrf.exe
5.2.2 LAMMPS
使用两台服务器每台12个核心总计24个核心并发运行LAMMPS应用,服务器之间GRT网卡RoCEv2模式直连。
[root@Server1 ~]# cd ~/lammps/lammps-stable_3Mar2020/examples/shear
[root@server1 ~]# time /usr/mpi/gcc/openmpi-4.1.5a1/bin/mpirun --allow-run-as-root -np 24 –oversubscribe \
--host 100.0.1.10,100.0.1.11 lmp_mpi \
< /root/lammps/lammps-3Mar20/examples/shear/in.shear
6 Femrice国产100G RoCEv2网卡
6.1 E2E转发测试
配置网卡工作模式RoCEv2,使用ib_read_lat和ib_read_bw工具在服务器Server1上建立发包服务端,在Server2上建立发包客户端,测试GRT网卡直连情况下的带宽和时延。
6.1.1 基础配置
[root@Server ~]# rmmod irdma
[root@Server ~]# modprobe irdma roce_ena=1
[root@Server ~]# ibv_devices
    device          	   node GUID
    ------          	----------------
    rdmap3s0f0      	5a53c0fffe7608ea
rdmap3s0f1      	5a53c0fffe7608eb
[root@Server ~]# ibv_devinfo rdmap3s0f0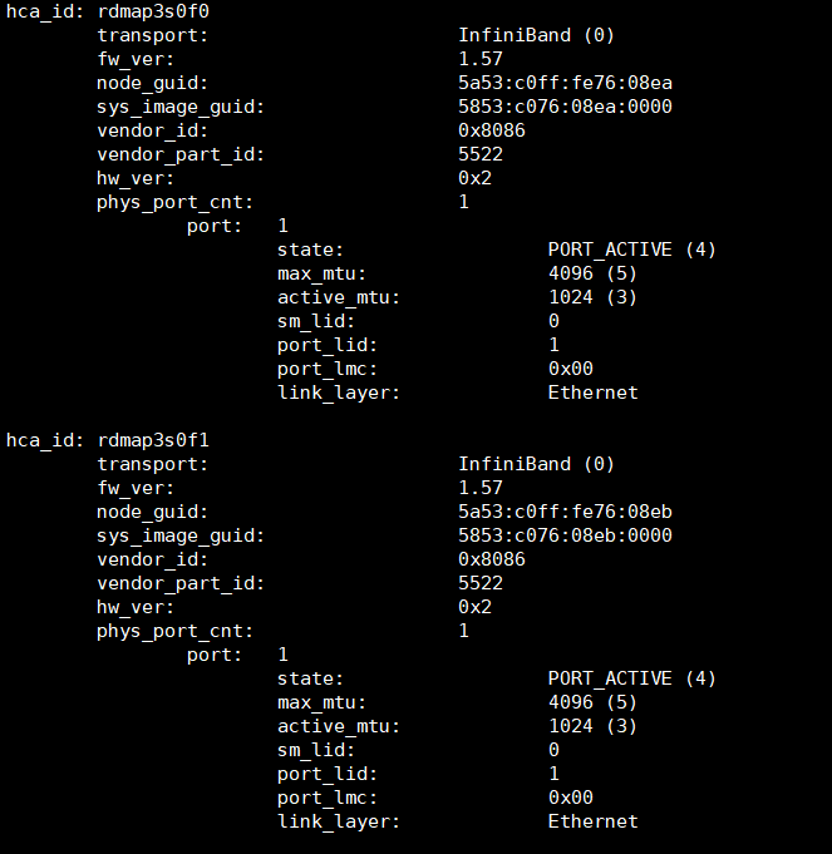
[root@Server1 ~]# ifconfig ens1f1 100.0.2.10 up
[root@Server2 ~]# ifconfig ens1f1 100.0.2.11 up
6.1.2 GRT网卡直连
[root@Server1 ~]# ib_read_lat -R -d rdmap2s0f0 -F --report_gbits -a
[root@Server2 ~]# ib_read_lat -a -R -x 5 -d rdmap3s0f0 -F -f 2 100.0.2.10
[root@Server1 ~]# ib_read_bw -R -d rdmap2s0f0 -F --report_gbits -a
[root@Server2 ~]# ib_read_bw -a -R -x 5 -d rdmap3s0f0 -F -f 2 100.0.2.10
6.2 HPC应用测试
在两台服务器上使用WRF开源气象模拟软件和LAMMPS高分子计算软件进行数据测试,测试Femrice国产网卡完成并行计算运行所需时间。
6.2.1 LAMMPS
使用两台服务器每台12个核心总计24个核心并发运行LAMMPS应用,服务器之间Femrice网卡RoCEv2模式直连。
[root@Server1 ~]# cd ~/lammps/lammps-stable_3Mar2020/examples/shear
[root@server1 ~]# mpirun --allow-run-as-root -np 24 –oversubscribe \
-host 100.0.1.10,100.0.1.11 lmp_mpi \
< /root/lammps/lammps-3Mar20/examples/shear/in.shear
6.2.2 WRF
使用两台服务器每台12个核心总计24个核心并发运行WRF应用,服务器之间Fmerice网卡RoCEv2模式直连。
[root@Server1 em_real]# time /usr/mpi/gcc/openmpi-4.1.5a1/bin/mpirun -np 24 -oversubscribe --allow-run-as-root \
--host 100.0.1.10,100.0.1.11  ./wrf.exe
7 测试结果
7.1 E2E转发测试
本次E2E场景测试方案,测试结果如图3、图4所示:
Mellanox X-4 100G网卡,网卡时延1.74us。
Femrice Intel E810-C网卡,带宽4723.19MB/s,网卡时延8.59us。
GRT Intel E810-C网卡带宽4794.26MB/s,网卡时延9.02us。
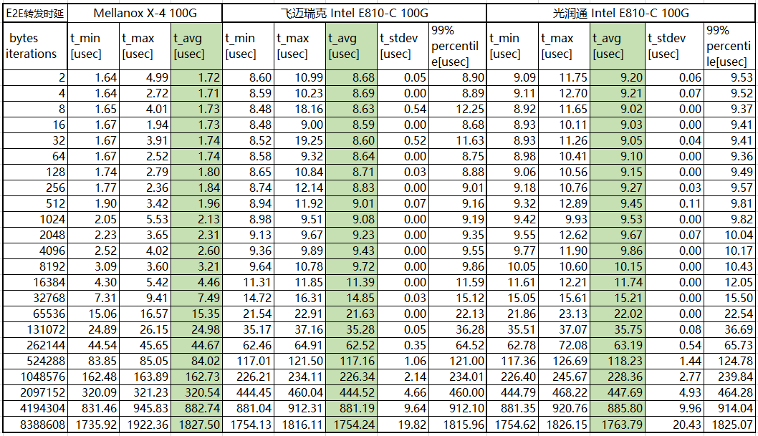
图3:国产网卡时延数据
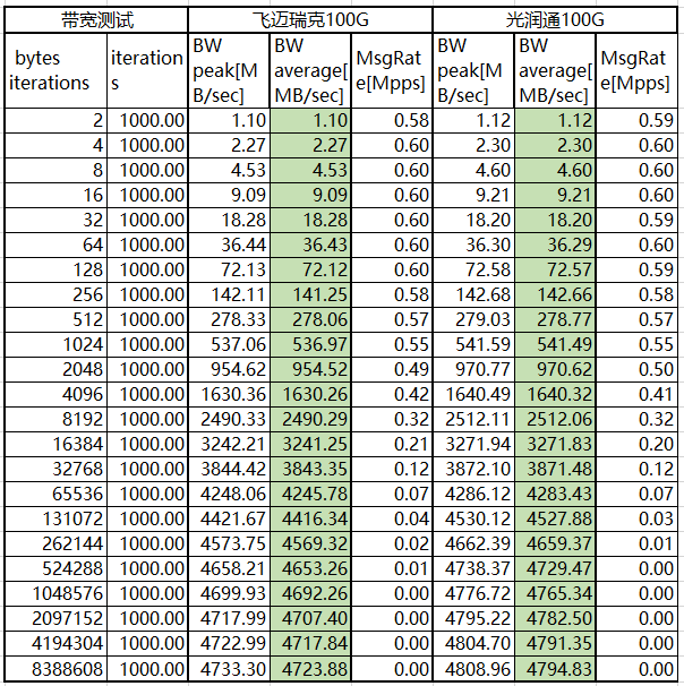
图4:国产网卡带宽数据
7.2 HPC应用测试
本次HPC应用WRF和LAMMPS测试方案经过多次测试,测试结果3款网卡通过相同应用配置并行计算,国产100G网卡性能低约10%。
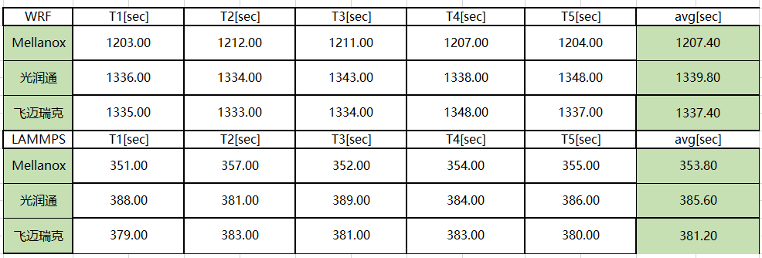
图5:CX-N和IB交换机跑HPC应用时间
更多相关文章:
