配置指导:CX-M交换机的PXE环境部署 —以UEFI启动为例
1 目的
该文档旨在以CX-M设备完成PXE预启动执行环境的搭建,从而进行计算终端操作系统的自动化部署安装工作。
2 PXE介绍
PXE(Pre-boot Execution Environment)预启动执行环境是一种网络引导协议,它规范描述了一种标准化的Client/Server环境,允许终端在没有本地存储设备(如硬盘)或操作系统的情况下,通过网络连接到服务器并获取所需的启动文件来启动操作系统。
2.1 工作原理
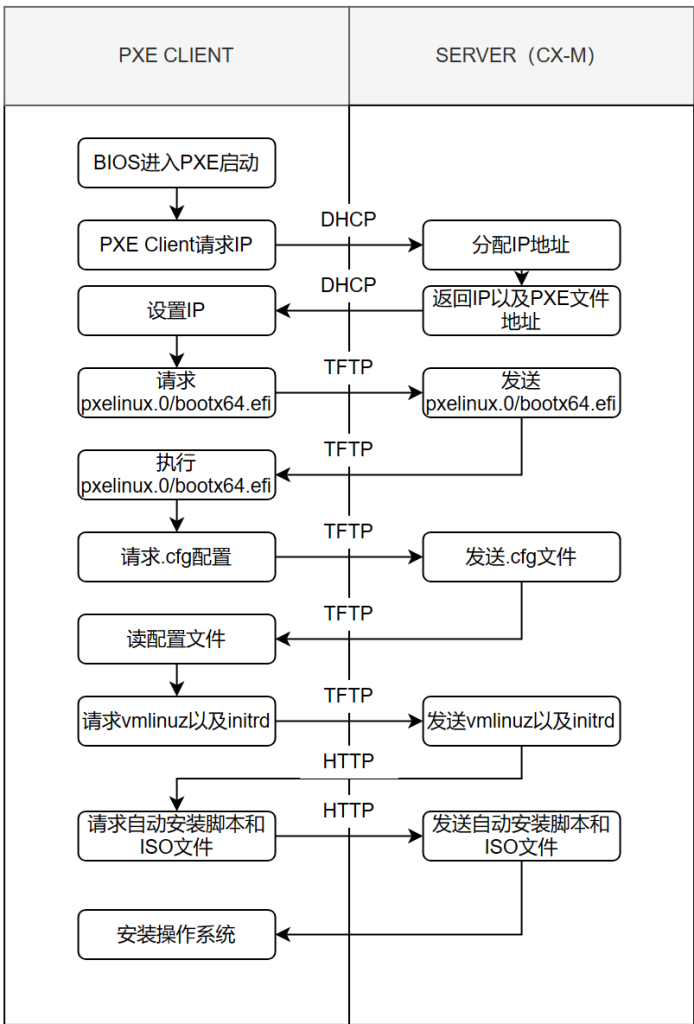
- PXE启动:当终端进入网卡启动时,会发送一个特殊的PXE启动请求到本地网络上的DHCP服务器。
- DHCP服务:DHCP服务器收到PXE启动请求后,会向计算机发送DHCP响应,DHCP响应包含了计算的网络配置信息,以及PXE引导服务器的IP地址——TFTP Server(Trivial File Transfer Protocol)。
- TFTP传输:计算机收到DHCP相应后,会使用TFTP从Server下载引导文件——pxelinux.0或者bootx64.efi。
- 加载引导文件:计算机加载并执行从TFTP下载的引导文件。引导文件通常是一个小型的Linux内核,能够连接到PXE服务器并获取操作系统镜像。
- 获取配置信息:引导文件连接到PXE服务器后,会通过TFTP发送请求以获取更多的配置信息。
- 获取操作系统镜像:PXE服务器根据计算机的请求,将系统镜像发送给计算机。
- 操作系统加载:一旦操作系统镜像文件下载完成,计算机会加载并执行该镜像文件。此时,计算机将完全从网络上运行操作系统,而无需本地硬盘上的安装。

图1.1:PXE启动流程
注:
- 网卡支持PXE,目前新出的网卡基本都支持,同时需要完成BIOS的启动项配置。
- 传统启动模式(Legacy)下,PXE客户端会请求pxelinux.0;UEFI启动会请求bootx64.efi。
- 也可以采用nfsboot方式,该流程采用的时ISO镜像下载再安装的方式。
3 具体配置
PXE Server所需的组件全部部署在CX-M上,即一台CX-M设备即可满足PXE的需求。
3.1 安装配置TFTP
mkdir /home/admin/tftp
sudo apt install tftpd-hpa

sudo vi /etc/default/tftpd-hpa
TFTP_USERNAME=”tftp”
TFTP_DIRECTORY=”/home/admin/tftp”
TFTP_ADDRESS=”0.0.0.0:69”
TFTP_OPTIONS=”—secure -c”

admin@ASW-06:~$ sudo systemctl restart tftpd-hpa
注:如果上传下载TFTP报权限相关问题,需要通过chown tftp:tftp /home/admin/tftp/以及在配置文件中的TFTP_OPTIONS加入 -c后重启服务来解决。
测试输出如下信息即可用:
C:\Users\honghao>TFTP host 10.110.0.10 get /install.log install.log
传输成功: 1 秒 9090 字节,9090 字节/秒
3.2 准备启动文件
完整目录结构如下所示:
/home/admin/tftp/
├── boot
│   └── live-server
│       ├── initrd
│       └── vmlinuz
├── grub
│   ├── bootx64.efi
│   ├── font.pf2
│   └── grub.cfg
└── grubx64.efi
3.2.1 创建目录
mkdir /home/admin/tftp/grub
mkdir /home/admin/tftp/boot
mkdir /home/admin/tftp/boot/live-server
3.2.2 获取引导文件
apt-get download shim.signed
apt-get download grub-efi-amd64-signed
dpkg -x shim.signed shim
dpkg -x grub-efi-amd64-signed grub
cp ./grub/usr/lib/grub/x86_64-efi-signed/grubnetx64.efi.signed  /home/admin/tftp/grubx64.efi
cp ./shim/usr/lib/shim/shimx64.efi.signed  /home/admin/tftp/grub/bootx64.efi
注:
- 如果报文件不存在错误,可通过shim.signed以及grub-efi-amd64-signed来手动下载。
- bootx64.efi文件是UEFI系统的启动管理器,它会在计算机启动时被加载到内存中,然后启动操作系统的安装程序或引导管理器。这个文件通常位于Linux ISO image的EFI目录下,它可以被用来启动UEFI系统安装程序或启动其他操作系统的引导管理器。
- grubx64.efi是GNU GRUB(GRand Unified Bootloader)引导管理器的UEFI版本,它是一种常用的引导程序,被广泛应用于Linux系统中。当计算机使用UEFI启动时,UEFI固件会查找EFI目录下的grubx64.efi文件,并将其加载到内存中。然后,grubx64.efi将会显示一个菜单,列出可用的操作系统和内核,允许用户选择要启动的操作系统或内核。在Linux ISO image中,grubx64.efi文件通常被用作引导管理器,用于启动Linux操作系统的安装程序。
3.2.3 获取内核镜像文件
3.2.3.1 下载镜像文件
直接从官网进行下载,以ubuntu-20.04.6-live-server-amd64.iso为例。只有live版镜像支持subiquity——Ubuntu Server安装程序,使用cloud-init进行自动安装。
3.2.3.2 复制镜像文件
sudo mount ubuntu-20.04.6-live-server-amd64.iso /media
cp /media/casper/initrd       /home/admin/tftp/boot/live-server
cp /media/casper/vmlinuz      /home/admin/tftp/boot/live-server
注:vmlinuz(可引导的、压缩的内核),initrd(系统引导过程中挂载的一个临时根文件系统)。
3.2.3.3 复制配置文件
cp /media/grub/font.pf2       /home/admin/tftp/grub
cp /media/grub/grub.cfg       /home/admin/tftp/grub
注:font.p2为grub字体文件,grub.cfg为启动配置文件。
3.3 配置HTTP Server
mkdir -p /home/admin/http/autoinstall
mkdir -p /home/admin/http/iso
touch / home/admin/http/autoinstall/user-data
touch / home/admin/http/autoinstall/meta-data
mv ubuntu-20.04.6-live-server-amd64.iso /home/admin/http/iso/
sudo nohup python -m SimpleHTTPServer 8000  &
注:
- autoinstall 目录存放参数自动配置文件,user-data、meta-data 是cloud-init 要求的文件名。
- iso 目录存放操作系统镜像文件。
3.4 配置启动文件
3.4.1 配置grub.cfg
vi /home/admin/tftp/grub/grub.cfg
if loadfont /boot/grub/font.pf2 ; then
	set gfxmode=auto
	insmod efi_gop
	insmod efi_uga
	insmod gfxterm
	terminal_output gfxterm
fi

set menu_color_normal=white/black
set menu_color_highlight=black/light-gray

set timeout=5
menuentry "Install Ubuntu Server" {
	set gfxpayload=keep
	linux  /boot/live-server/vmlinuz root=/dev/ram0 ramdisk_size=1500000 ip=dhcp url='http://10.230.2.200:8000/iso/ubuntu-20.04.6-live-server-amd64.iso' autoinstall ds=nocloud-net\;s=http://10.230.2.200:8000/autoinstall/ ---
	initrd	/boot/live-server/initrd
}- 指定镜像文件相对于tftp根目录的路径 /boot/live-server/initrd。
- ip=dhcp指定内核镜像挂载后使用DHCP获取IP地址。
- url=指定ISO文件的网络存放路径。
- autoinstall ds=nocloud-net\;s=http://10.230.2.200:8000/autoinstall/ — 该配置指明参数自动填写,并指明配置文件所在路径。
3.4.2 配置cloud-init
在准备cloud.init config前。建议先手动安装一次ubuntu 20.04.6,在/var/log/installer/目录下会生成一个autoinstall-user-data,这是基于当前的系统的应答文件,我们可以以它作为基础,根据实际情况进行修改。
vi /home/admin/http/autoinstall/user-data
#cloud-config
autoinstall:
  apt:
    mirror-selection:
      primary:
      - country-mirror
      - arches: &id001
        - amd64
        - i386
        uri: http://archive.ubuntu.com/ubuntu/
      - arches: &id002
        - s390x
        - arm64
        - armhf
        - powerpc
        - ppc64el
        - riscv64
        uri: http://ports.ubuntu.com/ubuntu-ports
    preserve_sources_list: false
    security:
    - arches: *id001
      uri: http://security.ubuntu.com/ubuntu/
    - arches: *id002
      uri: http://ports.ubuntu.com/ubuntu-ports
  identity:
    hostname: ubuntu_server
    password: $6$wbUXmGdjvH5WdLtl$kF0FOfiYaAJgo1uHMH.7pcsR8VEYgeaO6F6ORn2QRVMnnBws18DbBRbDgv6uWrBrO7oGTgI7EWiznJM4osSpy1
    realname: honghao
    username: howie
  kernel:
    package: linux-generic
  keyboard:
    layout: us
    toggle: null
    variant: ''
  locale: en_US.UTF-8
  network:
    ethernets:
      enp3s0:
        dhcp4: true
    version: 2
    wifis: {}
  oem:
    install: auto
  source:
    id: ubuntu-server
    search_drivers: false
  ssh:
    allow-pw: true
    authorized-keys: []
    install-server: true
  storage:
    config:
    - ptable: gpt
      path: /dev/nvme0n1
      wipe: superblock-recursive
      preserve: false
      name: ''
      grub_device: false
      id: disk-nvme0n1
      type: disk
    - device: disk-nvme0n1
      size: 1127219200
      wipe: superblock
      flag: boot
      number: 1
      preserve: false
      grub_device: true
      offset: 1048576
      path: /dev/nvme0n1p1
      id: partition-0
      type: partition
    - fstype: fat32
      volume: partition-0
      preserve: false
      id: format-0
      type: format
    - device: disk-nvme0n1
      size: 2147483648
      wipe: superblock
      number: 2
      preserve: false
      grub_device: false
      offset: 1128267776
      path: /dev/nvme0n1p2
      id: partition-1
      type: partition
    - fstype: ext4
      volume: partition-1
      preserve: false
      id: format-1
      type: format
    - device: disk-nvme0n1
      size: 252783362048
      wipe: superblock
      number: 3
      preserve: false
      grub_device: false
      offset: 3275751424
      path: /dev/nvme0n1p3
      id: partition-2
      type: partition
    - name: ubuntu-vg
      devices:
      - partition-2
      preserve: false
      id: lvm_volgroup-0
      type: lvm_volgroup
    - name: ubuntu-lv
      volgroup: lvm_volgroup-0
      size: 107374182400B
      wipe: superblock
      preserve: false
      path: /dev/ubuntu-vg/ubuntu-lv
      id: lvm_partition-0
      type: lvm_partition
    - fstype: ext4
      volume: lvm_partition-0
      preserve: false
      id: format-2
      type: format
    - path: /
      device: format-2
      id: mount-2
      type: mount
    - path: /boot
      device: format-1
      id: mount-1
      type: mount
    - path: /boot/efi
      device: format-0
      id: mount-0
      type: mount
  updates: security
  version: 1
注:
- 密码需要加密,可以先用工具对密码进行加密后填入。
- 磁盘分区配置要注意,配置不对会导致自动安装走不下去,提示 crash。
- 安装过程日志在 /var/log/installer/。
3.5 安装配置DHCP Server
3.5.1 配置CX-M接口IP
ASW-06# configure terminal
ASW-06(config)# interface ethernet 1
ASW-06(config-if-1)# ip address 10.230.2.200/24
3.5.2 配置DHCP
sudo apt install isc-dhcp-server

sudo vi /etc/default/isc-dhcp-server
INTERFACEsv4=”Ethernet1”
#INTERFACESv6=””

sudo vi /etc/dhcp/dhcpd.conf
subnet 10.230.2.0  netmask 255.255.255.0 {
range 10.230.2.202  10.230.2.210;
option routers 10.230.2.200;
option broadcast-address 10.230.2.255;
default-lease-time 21600;
max-lease-time 43200;
allow leasequery;
next-server 10.230.2.200;
filename "bootx64.efi";
}
sudo systemctl restart isc-dhcp-server
4 验证
本次验证以DELL笔记本终端作为验证设备。
- 配置PXE启动
启动logo界面按F12进入启动项,选择Onboard NIC启动。

图4.1:PXE启动
- 显示执行过程
PXE自动化安装过程如下所示:

图4.2:PXE启动-2

图4.3:PXE启动-3

图4.4:PXE启动-4
最终安装完成后,计算机会自动重启。
