配置指导:CX-N系列交换机部署BGP-EVPN-VXLAN
1 目标与物理网络拓扑
本文主要描述如何在Asterfusion CX308P-N和CX532P-N(以下简称CX308和CX532)搭建的网络上部署如下解决方案:
- BGP EVPN和VXLAN
在网络上承载VXLAN网络,将原本在服务器上进行的封装、去封装全部从Server端卸载到CX308内的VTEP上,并且在网络上启动BGP EVPN,自动化地创建VXLAN隧道、传递虚拟网络路由。
如上解决方案共用一个物理拓扑,如图1所示:
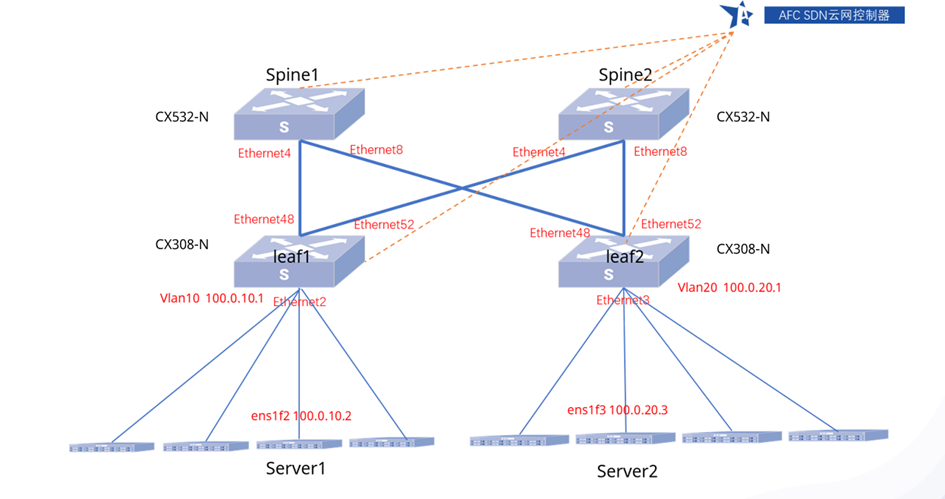
部署过程中所涉及到的设备、接口及管理网口的IP地址如下表1所示:
| 设备名称 | 设备型号 | IP地址 | 备注 |
| Spine1 | CX532-N | 10.230.1.7 | |
| Spine2 | CX532-N | 10.230.1.8 | |
| Leaf1 | CX308-N | 10.230.1.18 | |
| Leaf2 | CX308-N | 10.230.1.19 | |
| Servrr1 | X86 | 10.230.1.11 | 互联网口ens1f2 |
| Server2 | X86 | 10.230.1.12 | 互联网口ens1f3 |
2 硬件与软件环境
部署环境中涉及到的硬件和软件如表2和表3所示:
| 名称 | 型号 | 硬件指标 | 数量 | 备注 |
| 交换机 | CX532-N | 【参见产品彩页】 | 2 | 无 |
| 交换机 | CX308-N | 【参见产品彩页】 | 2 | 无 |
| 服务器 | X86 | 无 | 2 | 本方案采用10G网卡 |
| 光模块 | 10G | SFP+ | 4 | 无 |
| 光模块 | 100G | QSFP28 | 12 | 无 |
| 光纤 | 多模 | 100G适用 | 6 | 无 |
| 光纤 | 多模 | 10G/25G适用 | 2 | 无 |
| 名称 | 版本 | 备注 |
| AFC | V5.0.0 | 无 |
| 服务器系统 | CentOS Linux 7.9.2009 | 无 |
| 服务器内核 | 3.10.0-1127.18.2.el7 | 无 |
3 解决方案:BGP EVPN和VXLAN
3.1 逻辑组网与配置思路

配置思路:
1)配置各交换机的端口IP信息
2)配置Leaf1和Leaf2的VLAN信息
3)配置各交换机的BGP
4)配置Leaf1和Leaf2使能EVPN
5)Leaf1和Leaf2创建Vnet,绑定VLAN
6)Leaf1和Leaf2配置二层和三层VXLAN映射
7)配置Server1和Server2的IP和路由信息
8)测试Server1和Server2的连通性
9)查看Leaf1的路由信息
10)查看Leaf2的路由信息
3.2 配置步骤
3.2.1 配置各交换机的端口IP信息
Spine1:
Spine1# configure terminal
Spine1(config)# interface ethernet 0/4
Spine1(config-if-0/4)# ip address 10.0.10.2/24
Spine1(config)# interface ethernet 0/8
Spine1(config-if-0/8)# ip address 10.0.11.2/24

Spine2:
Spine2# configure terminal
Spine2(config)# interface ethernet 0/4
Spine2(config-if-0/4)# ip address 10.1.10.2/24
Spine2(config)# interface ethernet 0/8
Spine2(config-if-0/8)# ip address 10.1.11.2/24

Leaf1:
Leaf1# configure terminal
Leaf1(config)# interface ethernet 0/48
Leaf1(config-if-0/4)# ip address 10.0.10.1/24
Leaf1(config)# interface ethernet 0/52
Leaf1(config-if-0/8)# ip address 10.1.10.1/24

Leaf2:
Leaf2# configure terminal
Leaf2(config)# interface ethernet 0/48
Leaf2(config-if-0/4)# ip address 10.0.11.1/24
Leaf2(config)# interface ethernet 0/52
Leaf2(config-if-0/8)# ip address 10.1.11.1/24
sudo config interface ip add Ethernet52 10.1.11.1/24
3.2.2 配置Leaf1和Leaf2的VLAN信息并配置好网口速率
Leaf1:
Leaf1# configure terminal
Leaf1(config)# vlan 10
Leaf1(config)# interface vlan 10
Leaf1(config-vlanif-10)# ip address 100.0.10.1/24
Leaf1(config-vlanif-10)# mac-address 18:17:25:55:17:69
Leaf1(config)# interface ethernet 0/2
Leaf1(config-if-0/2)# switchport access vlan 10
Leaf1(config-if-0/2)# speed 10000

Leaf2:
Leaf2# configure terminal
Leaf2(config)# vlan 20
Leaf2(config)# interface vlan 20
Leaf2(config-vlanif-20)# ip address 100.0.20.1/24
Leaf2(config-vlanif-20)# mac-address 18:17:25:55:17:71
Leaf2(config)# interface ethernet 0/3
Leaf2(config-if-0/3)# switchport access vlan 20
Leaf2(config-if-0/3)# speed 10000
3.2.3 配置各交换机的BGP
Spine1:
Spine1# configure terminal
Spine1(config)# router bgp 65228
Spine1(config-router)# bgp router-id 10.10.0.100
Spine1(config)# interface loopback 0
Spine1(config-loif-0)# ip address 10.10.0.100/32
Loopback ip will be used as bgp router-id in frr
Spine1(config)# router bgp 65228
Spine1(config-router)# no bgp ebgp-requires-policy
Spine1(config-router)# neighbor 10.0.10.1 remote-as 65230
Spine1(config-router)# neighbor 10.0.11.1 remote-as 65231
Spine1(config-router)# address-family ipv4 unicast
Spine1(config-router)# address-family l2vpn evpn
Spine1(config-router-af)# neighbor 10.0.10.1 activate
Spine1(config-router-af)# neighbor 10.0.11.1 activate
Spine1(config-router-af)# advertise-all-vni

Spine2:
Spine1# configure terminal
Spine1(config)# router bgp 65229
Spine1(config-router)# bgp router-id 10.10.0.110
Spine1(config)# interface loopback 0
Spine1(config-loif-0)# ip address 10.10.0.110/32
Loopback ip will be used as bgp router-id in frr
Spine1(config)# router bgp 65229
Spine1(config-router)# no bgp ebgp-requires-policy
Spine1(config-router)# neighbor 10.1.10.1 remote-as 65230
Spine1(config-router)# neighbor 10.1.11.1 remote-as 65231
Spine1(config-router)# address-family ipv4 unicast
Spine1(config-router)# address-family l2vpn evpn
Spine1(config-router-af)# neighbor 10.1.10.1 activate
Spine1(config-router-af)# neighbor 10.1.11.1 activate
Spine1(config-router-af)# advertise-all-vni

Leaf1:
Leaf1# configure terminal
Leaf1(config)# router bgp 65230
Leaf1(config-router)# bgp router-id 10.10.0.120
Leaf1(config)# interface loopback 0
Leaf1(config-loif-0)# ip address 10.10.0.120/32
Change Loopback0 ip from 10.1.0.1/32 to 10.10.0.120/32
Loopback ip will be used as bgp router-id in frr
Leaf1(config)# router bgp 65230
Leaf1(config-router)# no bgp ebgp-requires-policy
Leaf1(config-router)# neighbor 10.0.10.2 remote-as 65228
Leaf1(config-router)# neighbor 10.1.10.2 remote-as 65229
Leaf1(config-router)# address-family ipv4 unicast
Leaf1(config-router)# network 10.10.0.120/32
Leaf1(config-router)# address-family l2vpn evpn
Leaf1(config-router-af)# neighbor 10.0.10.2 activate
Leaf1(config-router-af)# neighbor 10.1.10.2 activate
Leaf1(config-router-af)# advertise-all-vni

Leaf2:
Leaf2# configure terminal
Leaf2(config)# router bgp 65231
Leaf2(config-router)# bgp router-id 10.10.0.130
Leaf2(config)# interface loopback 0
Leaf2(config-loif-0)# ip address 10.10.0.130/32
Change Loopback0 ip from 10.1.0.1/32 to 10.10.0.130/32
Loopback ip will be used as bgp router-id in frr
Leaf2(config)# router bgp 65231
Leaf2(config-router)# no bgp ebgp-requires-policy
Leaf2(config-router)# neighbor 10.0.11.2 remote-as 65228
Leaf2(config-router)# neighbor 10.1.11.2 remote-as 65229
Leaf2(config-router)# address-family ipv4 unicast
Leaf2(config-router)# network 10.10.0.130/32
Leaf2(config-router)# address-family l2vpn evpn
Leaf2(config-router-af)# neighbor 10.0.11.2 activate
Leaf2(config-router-af)# neighbor 10.1.11.2 activate
Leaf2(config-router-af)# advertise-all-vni
3.2.4 配置Leaf1和Leaf2使能EPVN
Leaf1:
Leaf1# configure terminal
Leaf1(config)# interface vxlan 0
Leaf1(config-vxlanif-0)# source 10.10.0.120
Leaf1(config)# evpn-overlay enable

Leaf2:
Leaf2# configure terminal
Leaf2(config)# interface vxlan 0
Leaf2(config-vxlanif-0)# source 10.10.0.130
Leaf2(config)# evpn-overlay enable
3.2.5 Leaf1和Leaf2创建Vnet,绑定VLAN
Leaf1:
Leaf1(config)# vrf 123
Leaf1(config-vrf)# mac 18:17:25:55:17:69
Leaf1(config-vrf)# interface vlan 10
Leaf1(config-vlanif-10)# vrf 123

Leaf2:
Leaf2(config)# vrf 456
Leaf2(config-vrf)# mac 18:17:25:55:17:71
Leaf2(config-vrf)# interface vlan 20
Leaf2(config-vlanif-20)# vrf 456
3.2.6 Leaf1和Leaf2配置二层和三层VXLAN映射
Leaf1:
Leaf1(config)# vlan 10
Leaf1(config-vlan-10)# vni 10
Leaf1(config)# vrf 123
Leaf1(config-vrf)# vni 1000

Leaf2:
Leaf2(config)# vlan 20
Leaf2(config-vlan-20)# vni 20
Leaf2(config)# vrf 456
Leaf2(config-vrf)# vni 1000
3.2.7 保存配置并重新加载
sonic# write
sonic# reload
3.2.8 配置Server1和Server2的IP和路由信息
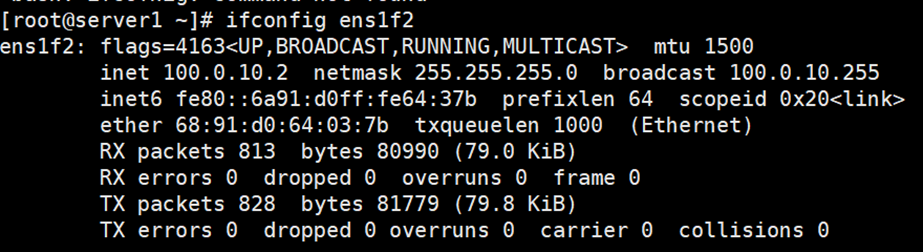
Server1:
[root@server1 ~]# ifconfig ens1f2
[root@server1 ~]# route add -net 100.0.20.0 netmask 255.255.255.0 gw 100.0.10.1 dev ens1f2Server2:
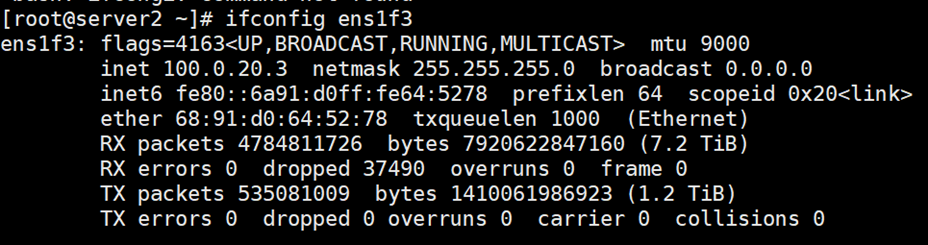
[root@server1 ~]# route add -net 100.0.10.0 netmask 255.255.255.0 gw 100.0.20.1 dev ens1f33.2.9 测试Server1和Server2的连通性
[root@server1 ~]# ping 100.0.20.3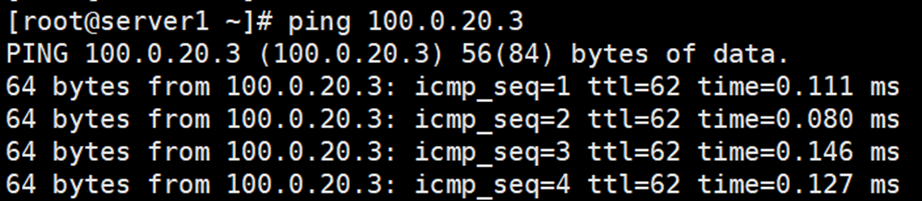
[root@server1 ~]# ping 100.0.10.2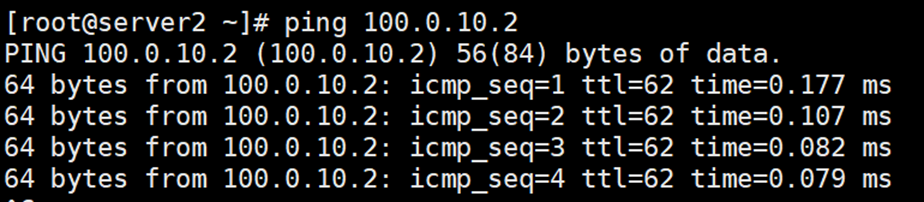
3.2.10 查看Leaf1的路由信息
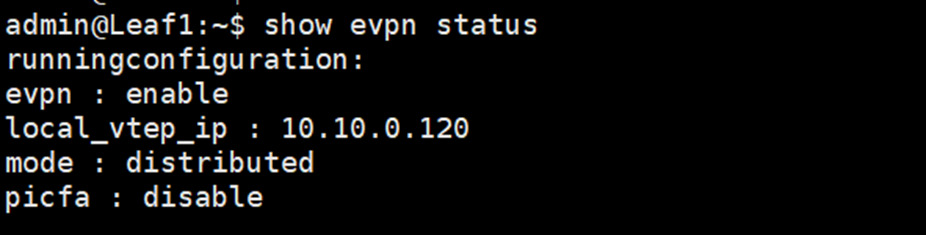
查看VTEP信息
admin@Leaf1:~$ show evpn status
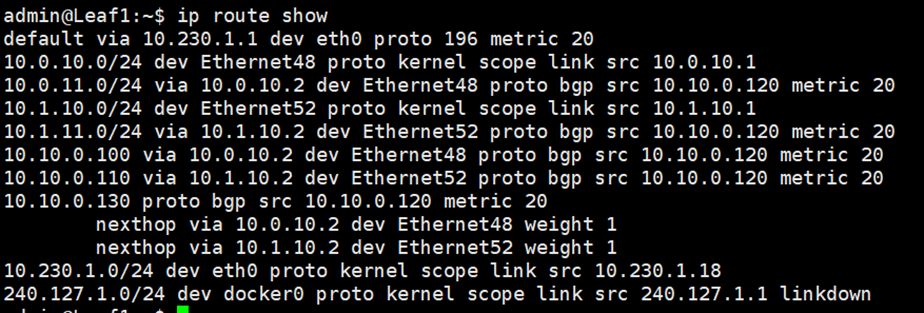
交换机路由信息
admin@Leaf1:~$ ip route show
下面信息显示Server2的路由转发到了Leaf1
admin@Leaf1:~$ ip neigh show nud all | grep Vlan

admin@Leaf1:~$ sudo bridge fdb |grep vxlan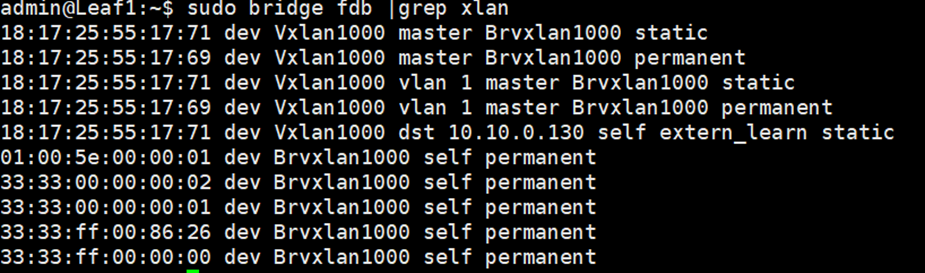
admin@Leaf1:~$ show ip route vrf Vnet123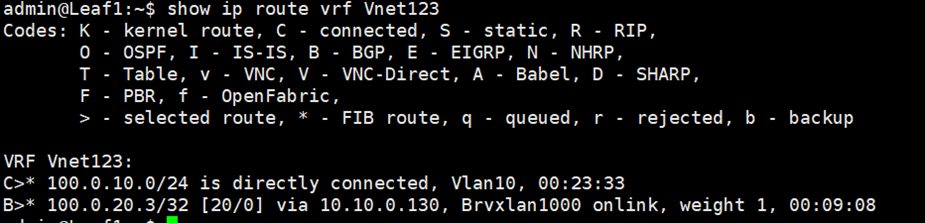
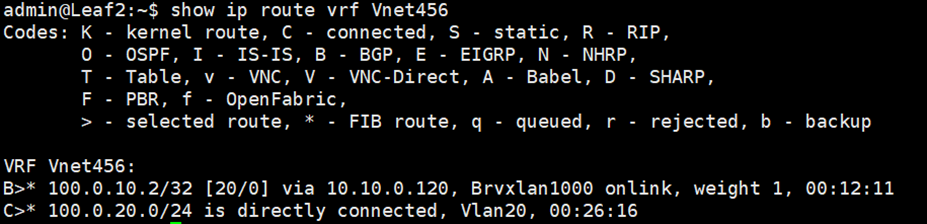
3.2.11 查看Leaf2的路由信息
查看VTEP信息
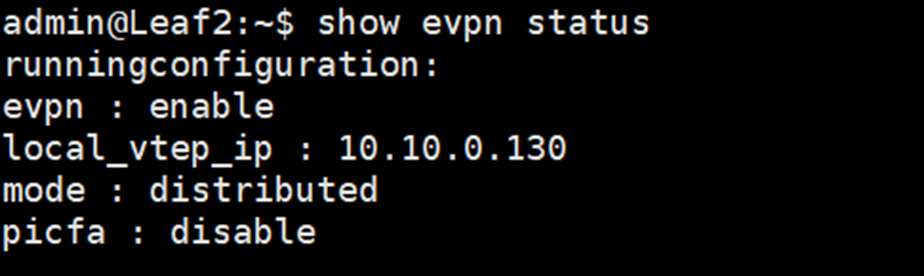
admin@Leaf2:~$ show evpn status
交换机路由信息
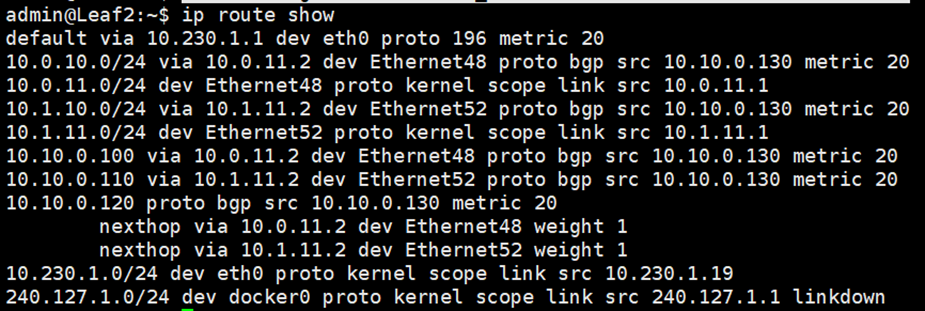
admin@Leaf2:~$ ip route show
下面信息显示Server2的路由转发到了Leaf1
admin@Leaf2:~$ ip neigh show nud all | grep Vlan

admin@Leaf2:~$ sudo bridge fdb |grep vxlan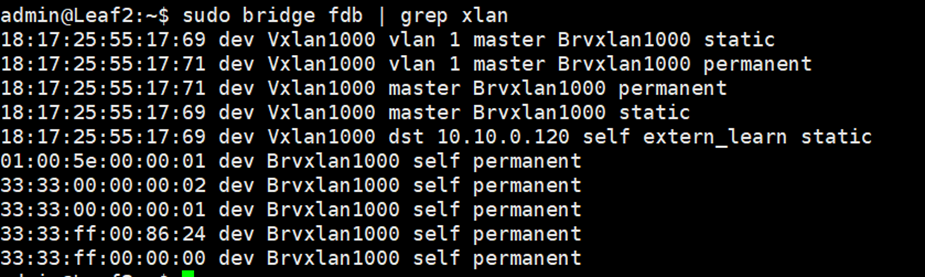
admin@Leaf2:~$ show ip route vrf Vnet123