
配置指导:安装OTP动态口令
OTP动态口令部署验证方案
1 OTP简介
OTP:One-Time Password Algorithm又称一次性密码,是使用密码技术实现的在客户端和服务器之间通过共享秘密的一种认证技术,是一种强认证技术,是增强目前静态口令认证的一种非常方便技术手段,是一种重要的双因素认证技术,动态口令认证技术包括客户端用于生成口令产生器的,动态令牌,是一个硬件设备,和用于管理令牌及口令认证的后台动态口令认证系统组成。
2 OTP三种实现方式
OTP从技术上分为三种形实现式:时间同步、事件同步、挑战应答。
- 时间同步:原理是基于动态令牌和动态口令验证服务器的时间比对,基于 时间同步的 令牌,一般每60秒产生一个新口令,要求服务器能够十分精确的保持正确的时钟,同时对其令牌的晶振频率有严格的要求,这种技术对应的终端是硬件令牌。
- 事件同步:基于事件同步的令牌,其原理是通过某一特定的事件次序及相同的种子值作为输入,通过HASH算法中运算出一致的密码。
- 挑战应答:常用于的网上业务,在网站上输入下发的挑战码,动态令牌输入该挑战码,通过内置的算法上生成一个6/8位的随机数字,口令一次有效,这种技术目前应用最为普遍,包括刮刮卡、短信密码、动态令牌也有挑战/应答形式。
3 基于时间的OTP动态口令
使用阿里云身份证宝或者Google Authenticator谷歌动态口令验证器可以实现基于时间的OTP动态口令。是一种基于时间同步的OTP计算方式,是通过客户端和服务器持有相同的密钥并基于时间基数,服务端和客户端采用相同的Hash算法,计算出长度为六位的验证码。当客户端和服务端计算出的验证码相同,则验证通过。
4 CenOS部署
在CentOS上安装Google身份验证器服务器端组件,安装之前需要启用EPEL库。
4.1 启用EPEL库
[root@TOTP  ~]# wget \
https://dl.fedoraproject.org/pub/epel/7/x86_64/Packages/e/epel-release-7-14.noarch.rpm
[root@TOTP  ~]# rpm -ivh epel-release-7-14.noarch.rpm
[root@TOTP  ~]# yum clean all && yum makecache
[root@TOTP  ~]# yum repolist

4.2 安装服务器端组件
服务器端安装组件可以通过yum安装和编译安装两种方式实现。
yum安装:
[root@TOTP  ~]# yum install google-authenticator
编译安装:
[root@TOTP  ~]# git clone https://github.com/google/google-authenticator.git
[root@TOTP  ~]# cd google-authenticator/libpam/
[root@TOTP  ~]# ./bootstrap.sh
[root@TOTP  ~]# ./configure
[root@TOTP  ~]# make && make install
[root@TOTP  ~]# cp .libs/pam_google_authenticator.so /lib64/security/
4.3 修改配置文件
安装完成之后添加谷歌身份验证器PAM模块,并且配置密码认证。
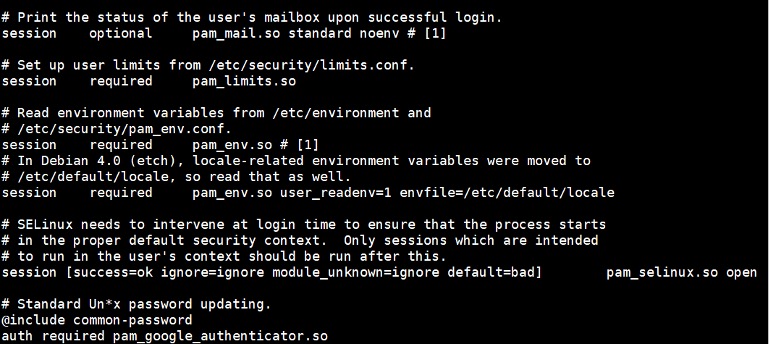
[root@TOTP  ~]# echo "auth required pam_google_authenticator.so nullok" >>/etc/pam.d/sshd
[root@TOTP  ~]# cat /etc/pam.d/sshd
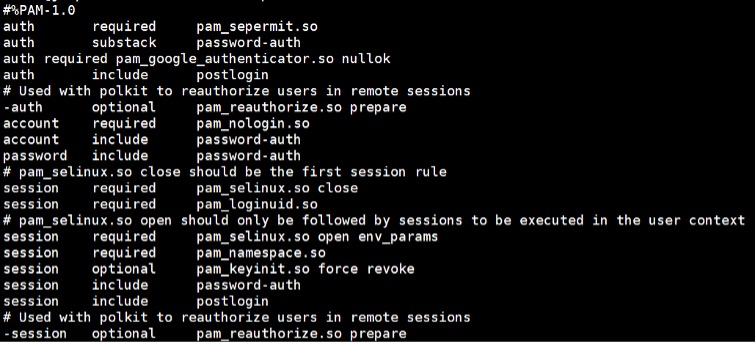
[root@TOTP  ~]# vi /etc/ssh/sshd_config
ChallengeResponseAuthentication yes
[root@TOTP  ~]# systemctl restart sshd
5 Ubuntu部署
在Ubuntu上安装Google身份验证器服务器端组件。
5.1 安装服务器端组件
服务器端安装组件可以通过apt安装和编译安装两种方式实现。
apt安装:
[root@TOTP  ~]# apt-get install libpam-google-authenticator
编译安装:
[root@TOTP  ~]# git clone https://github.com/google/google-authenticator.git
[root@TOTP  ~]# cd google-authenticator/libpam/
[root@TOTP  ~]# ./bootstrap.sh
[root@TOTP  ~]# ./configure
[root@TOTP  ~]# make && make install
[root@TOTP  ~]# cp .libs/pam_google_authenticator.so /lib64/security/
5.2 修改配置文件
安装完成之后添加谷歌身份验证器PAM模块,并且配置密码认证。
[root@TOTP  ~]# echo "auth required pam_google_authenticator.so" >>/etc/pam.d/sshd
[root@TOTP  ~]# cat /etc/pam.d/sshd
[root@TOTP  ~]# vi /etc/ssh/sshd_config
ChallengeResponseAuthentication yes
[root@TOTP  ~]# /etc/init.d/ssh restart
6 配置认证信息
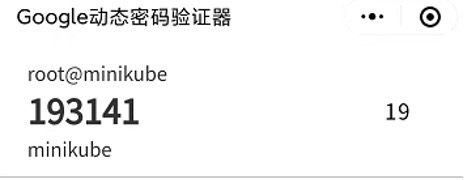
手机安装google authenticator,在软件中扫描服务器二维码,或者手动添加生成的密钥。配置认证信息。生成的一次性验证码可临时使用。
6.1 生成密钥
生成密钥,并保存输出的二维码和密钥信息,以及一次性密钥。
[root@TOTP  ~]# google-authenticator
Your new secret key is: MNYOJT7NJ5NGE5WPT3CDRJ5XOI
Your verification code is 840082
Your emergency scratch codes are:
  77957928
  71596997
  46394232
  61882336
  25041580
6.2 配置认证信息
使用手机软件google authenticator,扫描服务器二维码,生成服务器6位验证码。
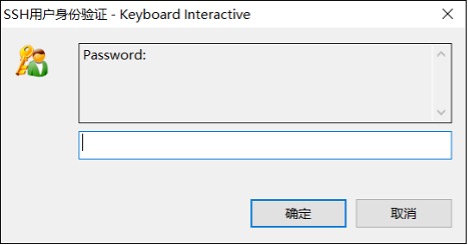
6.3 登录服务器
登录服务器选择Keyboard Interactive登录。
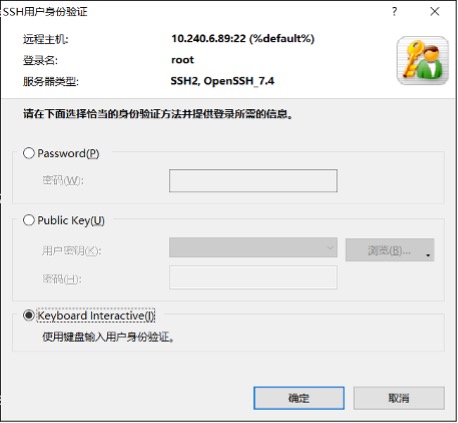
输入密码和6位验证码后,登录成功。
7 参考资料
如有其它问题,请填写右侧需求表单联系我们。www.asterfusion.com
更多产品信息:AsterNOS
