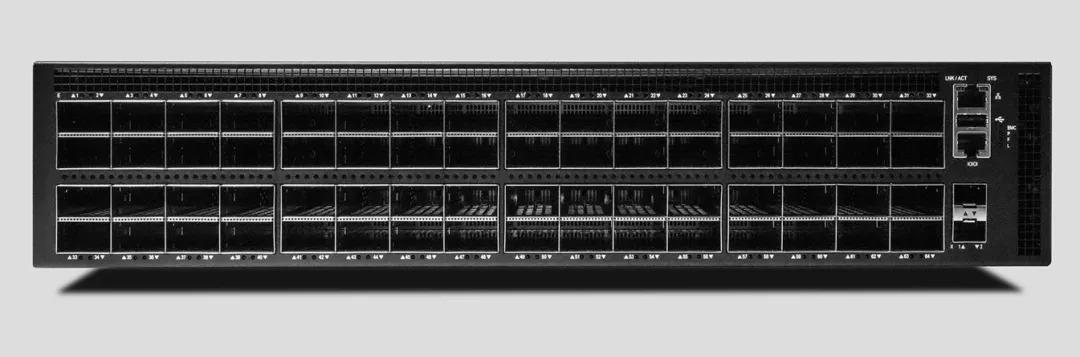
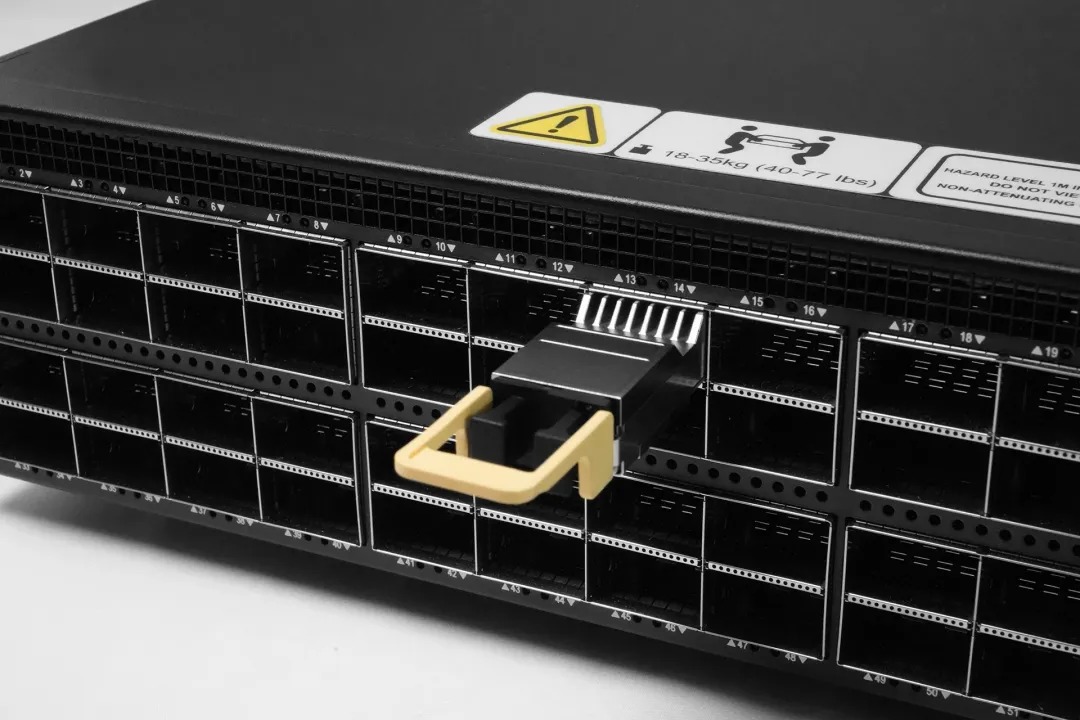
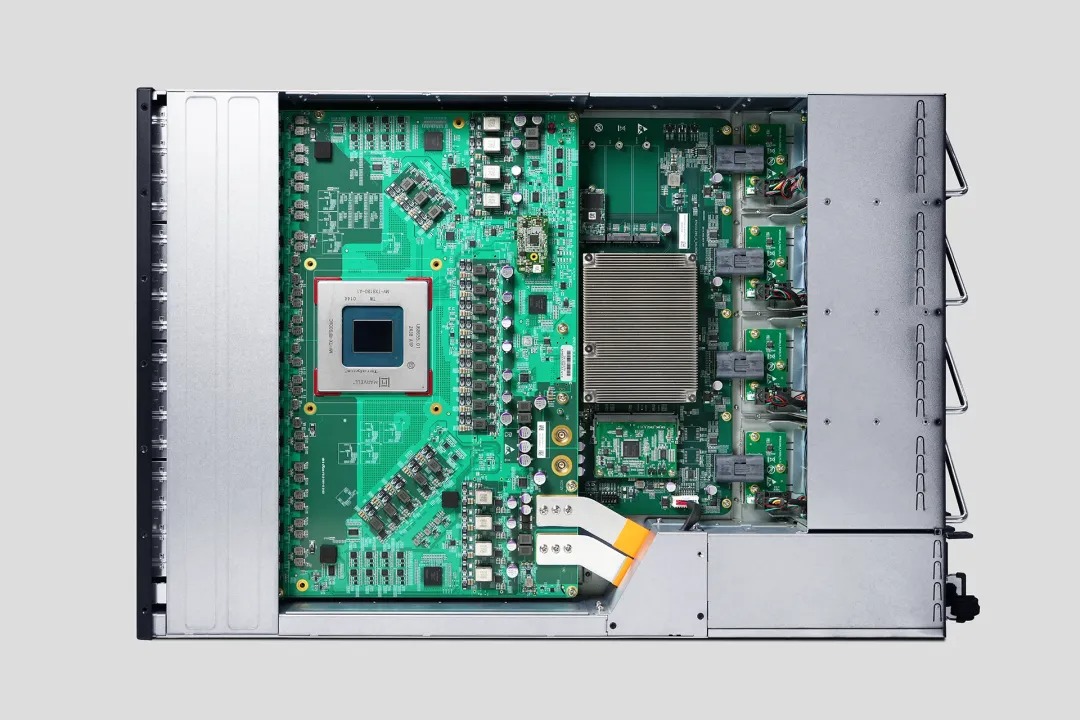
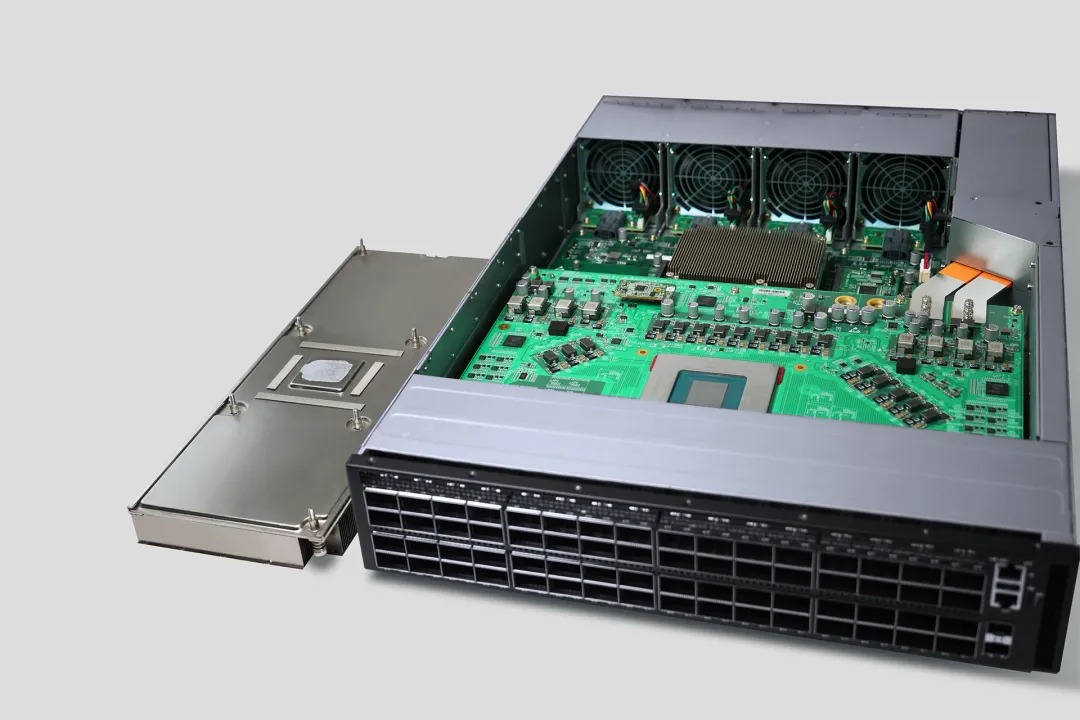
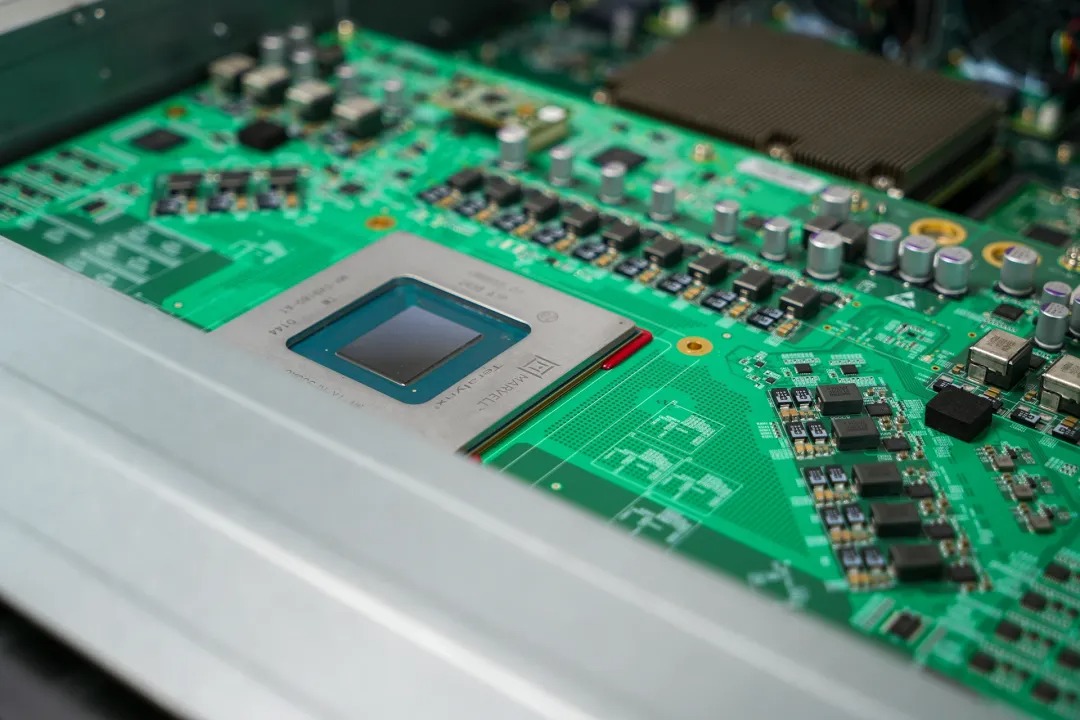
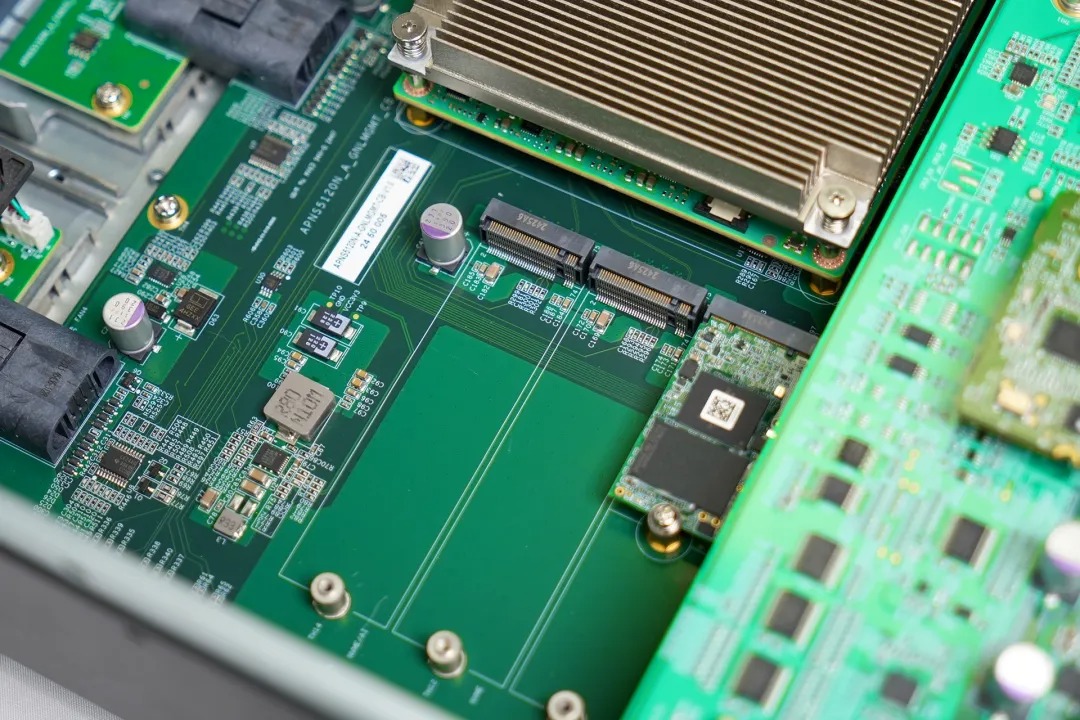
开放网络的先行者与推动者—星融元
加入我们技术支持(Support)  TEL:(+86)4000989811

部署手册:开源AAA解决方案 —FreeRADIUS

1 软件介绍

2 基础环

2.1 部署环

2.2 操作系统基础设

3 安装配置数据

4 安装配置Web和PHP

5 安装配置FreeRADIUS

6 安装配置DaloRaDIUS

7 部署结果

1 软件介绍

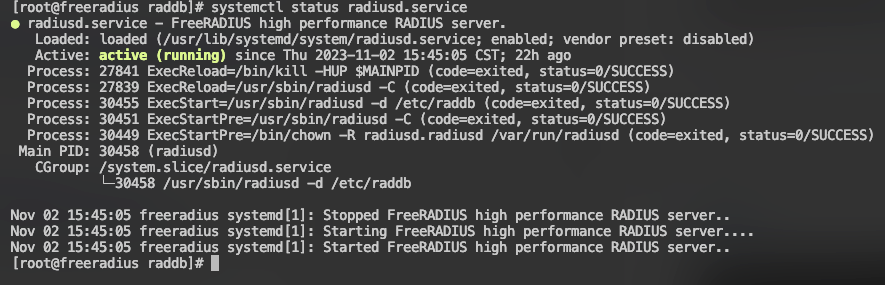
RADIUS(Remote Authentication and Dial-In User Service)是做拨号用户接入认证和服务请求认证的网络协议。RADIUS提供中心式认证、鉴权和计费(AAA)能力,用于管理接入用户使用网络资源。RADIUS允许使用集中式的数据库来保存所有用户的配置信息,以供所有用户共享使用。

FreeRADIUS是一个开源的、模块化、高性能并且功能丰富的一套RADIUS程序,包含服务器、客户端、开发库和一些额外的相关RADIUS工具。作为第一款开源发布的RADIUS程序,源码几乎可以被任何系统编译安装。并且,产品为大规模的AAA认证服务器(1000万用户和每天百万级的请求)部署设计。FreeRADIUS没有Web界面,因此我们使用第三方Web界面DaloRADIUS作为管理界面。

2 基础环境

2.1 部署环境

  • 服务器硬件:KVM虚拟机,2 vCPU + 2GB vMem + 8GB Disk
  • 操作系统:CentOS Linux release 7.8.2003
  • 数据库:PostgreSQL 15.4
  • Web:v2.4.6
  • PHP:v5.4.16
  • FreeRADIUS:v3.0.13
  • DaloRADIUS:v1.3

2.2 操作系统基础设置

关闭SELinux

SELinux不关闭会导致Web访问异常。

# setenforce 0
# sed -i 's/SELINUX=enforcing/SELINUX=disabled/g' /etc/sysconfig/selinux

关闭防火墙

防止安装完成后无法从外部访问的情况。

# systemctl stop firewalld && systemctl disable firewalld                          

配置YUM源

配置系统的基础YUM源、EPEL源以及PostgreSQL数据库的源。

# mv /etc/yum.repos.d/CentOS-Base.repo /etc/yum.repos.d/CentOS-Base.repo.backup
# wget -P /etc/yum.repos.d/ https://mirrors.163.com/.help/CentOS7-Base-163.repo
# yum clean all
# yum makecache
# yum install epel-release -y
# yum install -y https://download.postgresql.org/pub/repos/yum/reporpms/EL-7-x86_64/pgdg-redhat-repo-latest.noarch.rpm

下载安装包

提前准备好DaloRADIUS的安装包。

# wget https://codeload.github.com/lirantal/daloradius/tar.gz/refs/tags/1.3 -O /tmp/freeradius

3 安装配置数据库

# yum install -y mariadb-server mariadb
# systemctl start mariadb
# systemctl enable mariadb
# mysql_secure_installation

# mysql -u root -p
MariaDB [(none)]> create database radius;
MariaDB [(none)]> grant all on radius.* to radius@localhost identified by 'radius';
MariaDB [(none)]> flush privileges;
MariaDB [(none)]> exit

4 安装配置Web和PHP

# yum install -y httpd
# systemctl enable httpd
# systemctl start httpd

# yum install -y php php-mysql php-pear php-devel php-common php-gd php-mbstring php-mcrypt php-xml php-pear-DB
# systemctl restart httpd

5 安装配置FreeRADIUS

# yum install -y freeradius freeradius-utils freeradius-mysql
# systemctl start radiusd.service
# systemctl enable radiusd.service

# mysql -u root -p radius < /etc/raddb/mods-config/sql/main/mysql/schema.sql
# vim /etc/raddb/mods-available/sql
#  cat  /etc/raddb/mods-available/sql | grep -v ^#
sql {
        # The sub-module to use to execute queries. This should match
        # the database you're attempting to connect to.
        #
        #    * rlm_sql_mysql
        #    * rlm_sql_mssql
        #    * rlm_sql_oracle
        #    * rlm_sql_postgresql
        #    * rlm_sql_sqlite
        #    * rlm_sql_null (log queries to disk)
        #
        driver = "rlm_sql_mysql"


        # The dialect of SQL you want to use, this should usually match
        # the driver you selected above.
        #
        # If you're using rlm_sql_null, then it should be the type of
        # database the logged queries are going to be executed against.
        dialect = "mysql"

        # Connection info:
        #
        server = "localhost"
        port = 3306
        login = "radius"
        password = "radius"

        # Database table configuration for everything except Oracle
        radius_db = "radius"
# chgrp -h radiusd /etc/raddb/mods-available/sql
# systemctl restart radiusd.service
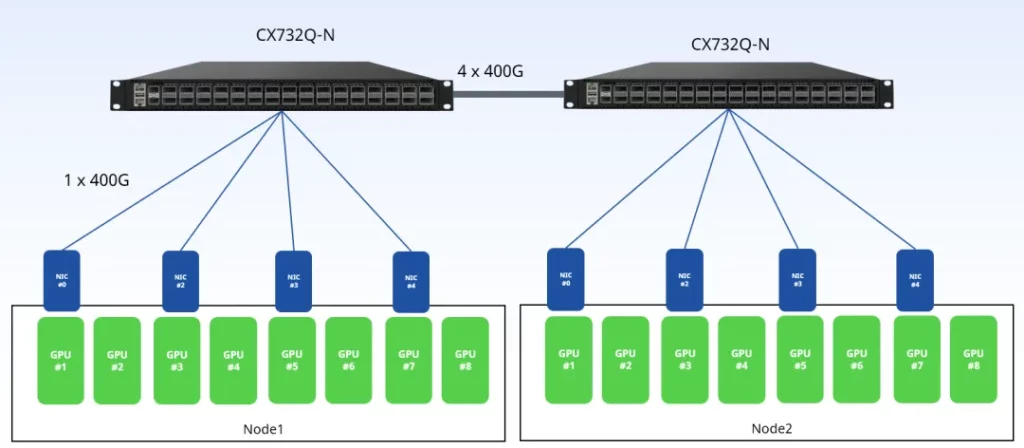
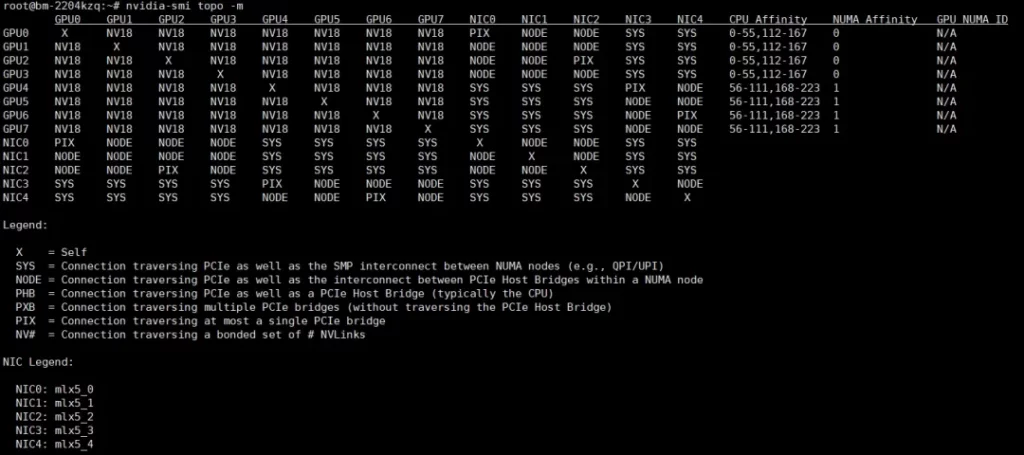
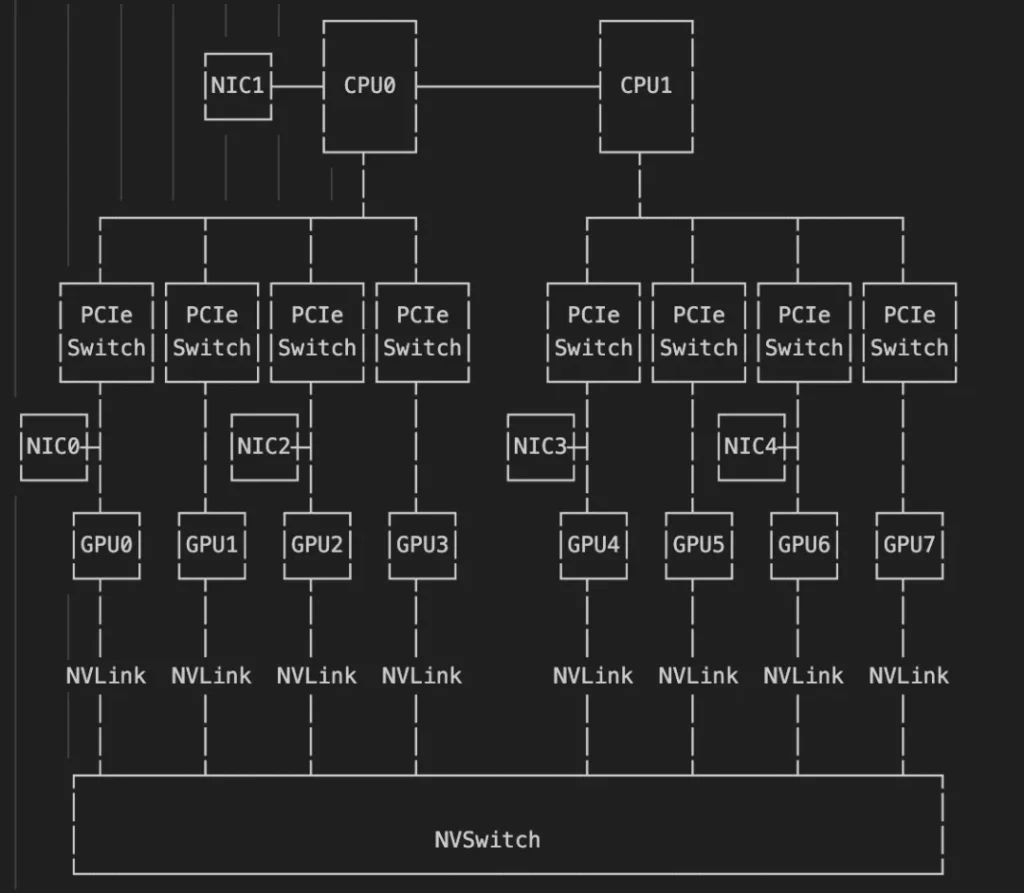
6 安装配置DaloRaDIUS

# cd /tmp/freeradius
# tar xvf daloradius-1.3.tar.gz
# mv daloradius-1.3/ /var/www/html/daloradius
# chown -R apache:apache /var/www/html/daloradius
# cd /var/www/html/daloradius/
# mv library/daloradius.conf.php.sample library/daloradius.conf.php
# chmod -R 644 library/daloradius.conf.php
# mysql -u root -p radius < /var/www/html/daloradius/contrib/db/fr2-mysql-daloradius-and-freeradius.sql
# mysql -u root -p radius < /var/www/html/daloradius/contrib/db/mysql-daloradius.sql
# vim library/daloradius.conf.php
# cat library/daloradius.conf.php
……
$configValues['FREERADIUS_VERSION'] = '2';
$configValues['CONFIG_DB_ENGINE'] = 'mysqli';
$configValues['CONFIG_DB_HOST'] = 'localhost';
$configValues['CONFIG_DB_PORT'] = '3306';
$configValues['CONFIG_DB_USER'] = 'radius';
$configValues['CONFIG_DB_PASS'] = 'radius';
$configValues['CONFIG_DB_NAME'] = 'radius';

# systemctl restart httpd

7 部署结果

完成FreeRADIUS的安装部署后,可通过浏览器访问网址:http://freeradius-ip/daloradius/验证部署结果,默认的用户名和密码为administrator/radius。

图1:FreeRADIUS的Web界面
图1:FreeRADIUS的Web界面

案例验证:分析NCCL-Tests运行日志优化Scale-Out网络拓扑

1、背景:All-reduce 和 Ring 算法

2、工具说明:NCCL-Tests

2.1NCCL-Tests常用参数及解释

3、案例验证:优化GPU互连拓扑

3.1NCCL-Test 性能测试结果

4、机内拓扑分析

5、NCCL通信路径分析

6、附录

背景:All-reduce 和 Ring 算法

GPU并行计算中需要大规模地在计算节点之间同步参数梯度,产生了大量的集合通信流量。为了优化集合通信性能,业界开发了不同的集合通信库(xCCL),其核心都是实现 All-Reduce,这也是分布式训练最主要的通信方式。

图1

LLM训练中的 All Reduce 操作一般分为三个步骤:

  • 把每个节点的数据切分成N份;
  • 通过reduce-scatter,让每个节点都得到1/N的完整数据块;
  • 通过all-gather,让所有节点的每个1/N数据块都变得完整

基于这种流量模式,Ring算法是目前实现该操作最常见的基础算法之一。

图2

顾名思义,Ring算法构建了一个环形网络——每个节点的数据会被切分成N份数据在所有GPU之间移动,且每个GPU只和相邻的GPU通信。这种流水线模式能充分利用所有节点的发送和接收带宽,减少 GPU 等待数据的空闲时间,同时也改善了传输大数据块时的性能和时延抖动问题。(但对于小规模数据传输,Ring算法可能会表现出较高的延迟和低效。)

工具说明:NCCL-Tests

NVIDIA提供的NCCL是当前面向AI的集合通信事实标准,NCCL-Test 是 NVIDIA 开源的工具,我们可以在官方Github下载来进行不同算法的性能测试(例如:ring,trees…)。本次测试使用All reduce的ring算法来进行性能评估。

root@bm-2204kzq:~# /usr/local/openmpi/bin/mpirun  #多机集群测试需要使用MPI方式执行
--allow-run-as-root
-bind-to none #不将进程绑定到特定的CPU核心
-H 172.17.0.215:8,172.17.0.81:8 # host列表,:后指定每台机器要用的GPU数量
-np 16 #指定要运行的进程数,等于总GPU数量
-x NCCL_SOCKET_NTHREADS=16
-mca btl_tcp_if_include bond0
-mca pml ^ucx -mca btl ^openib #指定BTL的value为'^openib'
-x NCCL_DEBUG=INFO #NCCL的调试级别为info
-x NCCL_IB_GID_INDEX=3
-x NCCL_IB_HCA=mlx5_0:1,mlx5_2:1,mlx5_3:1,mlx5_4:1
-x NCCL_SOCKET_IFNAME=bond0 #指定了 NCCL 使用的网络接口
-x UCX_TLS=sm,ud #调整MPI使用的传输模式
-x LD_LIBRARY_PATH -x PATH
-x NCCL_IBEXT_DISABLE=1 #如使用RoCE网络,此处应禁用
-x NCCL_ALGO=ring
/root/nccl-tests/build/all_reduce_perf -b 512 -e 18G -f 2 -g 1 #执行all reduce操作

NCCL-Tests常用参数及解释

  • GPU 数量
    • -t,--nthreads <num threads> 每个进程的线程数量配置, 默认 1;
    • -g,--ngpus <GPUs per thread> 每个线程的 GPU 数量,默认 1;
  • 数据大小配置
    • -b,--minbytes <min size in bytes> 开始的最小数据量,默认 32M;
    • -e,--maxbytes <max size in bytes> 结束的最大数据量,默认 32M;
  • 数据步长设置
    • -i,--stepbytes <increment size> 每次增加的数据量,默认: 1M;
    • -f,--stepfactor <increment factor> 每次增加的倍数,默认禁用;
  • NCCL 操作相关配置
    • -o,--op <sum/prod/min/max/avg/all>指定哪种操作为reduce,仅适用于Allreduce、Reduce或ReduceScatter等操作。默认值为:求和(Sum);
    • -d,--datatype <nccltype/all>指定使用哪种数据类型,默认 : Float;
  • 性能相关配置
    • -n,--iters <iteration count> 每次操作(一次发送)循环多少次,默认 : 20;
    • -w,--warmup_iters <warmup iteration count> 预热迭代次数(不计时),默认:5;
    • -m,--agg_iters <aggregation count> 每次迭代中要聚合在一起的操作数,默认:1;
    • -a,--average <0/1/2/3> 在所有 ranks 计算均值作为最终结果 (MPI=1 only). <0=Rank0,1=Avg,2=Min,3=Max>,默认:1;
  • 测试相关配置
    • -p,--parallel_init <0/1> 使用线程并行初始化 NCCL,默认: 0;
    • -c,--check <0/1> 检查结果的正确性。在大量GPU上可能会非常慢,默认:1;
    • -z,--blocking <0/1> 使NCCL集合阻塞,即在每个集合之后让CPU等待和同步,默认:0;
    • -G,--cudagraph <num graph launches>  将迭代作为CUDA图形捕获,然后重复指定的次数,默认:0;

案例验证:优化GPU互连拓扑

下图是一个未优化的双机8卡(H20)组网测试拓扑:

按照一般CPU云数据中心的连接方式,将同服务器的网卡连接到一台交换机上,两台交换机之间有4条400G链路相连。参与测试的为星融元(Asterfusion)交换机(CX732Q-N,32 x 400GE QSFP-DD, 2 x 10GE SFP+)。

图3

NCCL-Test 性能测试结果

                                        out-of-place                       in-place          
#       size         count      type   redop    root     time   algbw   busbw #wrong     time   algbw   busbw #wrong
#        (B)    (elements)                               (us)  (GB/s)  (GB/s)            (us)  (GB/s)  (GB/s)       
         512           128     float     sum      -1    56.12    0.01    0.02      0    54.54    0.01    0.02      0
        1024           256     float     sum      -1    55.09    0.02    0.03      0    53.85    0.02    0.04      0
        2048           512     float     sum      -1    55.67    0.04    0.07      0    54.84    0.04    0.07      0
        4096          1024     float     sum      -1    55.70    0.07    0.14      0    55.05    0.07    0.14      0
        8192          2048     float     sum      -1    56.36    0.15    0.27      0    56.53    0.14    0.27      0
       16384          4096     float     sum      -1    57.21    0.29    0.54      0    57.02    0.29    0.54      0
       32768          8192     float     sum      -1    60.74    0.54    1.01      0    59.87    0.55    1.03      0
       65536         16384     float     sum      -1    67.42    0.97    1.82      0    68.41    0.96    1.80      0
      131072         32768     float     sum      -1    109.6    1.20    2.24      0    108.8    1.20    2.26      0
      262144         65536     float     sum      -1    108.3    2.42    4.54      0    108.3    2.42    4.54      0
      524288        131072     float     sum      -1    115.0    4.56    8.55      0    112.8    4.65    8.72      0
     1048576        262144     float     sum      -1    135.0    7.77   14.57      0    129.4    8.10   15.19      0
     2097152        524288     float     sum      -1    144.6   14.51   27.20      0    142.9   14.67   27.51      0
     4194304       1048576     float     sum      -1    222.0   18.89   35.43      0    220.0   19.07   35.75      0
     8388608       2097152     float     sum      -1    396.5   21.15   39.66      0    392.1   21.40   40.12      0
    16777216       4194304     float     sum      -1    736.3   22.78   42.72      0    904.7   18.55   34.77      0
    33554432       8388608     float     sum      -1   1405.5   23.87   44.76      0   1542.0   21.76   40.80      0
    67108864      16777216     float     sum      -1   2679.0   25.05   46.97      0   2721.0   24.66   46.24      0
   134217728      33554432     float     sum      -1   5490.1   24.45   45.84      0   5291.6   25.36   47.56      0
   268435456      67108864     float     sum      -1    10436   25.72   48.23      0    11788   22.77   42.70      0
   536870912     134217728     float     sum      -1    25853   20.77   38.94      0    23436   22.91   42.95      0
  1073741824     268435456     float     sum      -1    47974   22.38   41.97      0    54979   19.53   36.62      0
  2147483648     536870912     float     sum      -1   117645   18.25   34.23      0   117423   18.29   34.29      0
  4294967296    1073741824     float     sum      -1   248208   17.30   32.44      0   229171   18.74   35.14      0
  8589934592    2147483648     float     sum      -1   474132   18.12   33.97      0   476988   18.01   33.77      0
 17179869184    4294967296     float     sum      -1   949191   18.10   33.94      0   965703   17.79   33.36      0
# Out of bounds values : 0 OK
  • size (B):操作处理的数据的大小,以字节为单位;
  • count (elements):操作处理的元素的数量;
  • type:元素的数据类型;
  • redo p:使用的归约操作;
  • root:-1 表示这个操作没有根节点(all-reduce 操作涉及到所有的节点);
  • time (us):操作的执行时间,以微秒为单位;
  • algbw (GB/s):算法带宽,以 GB/s 为单位;
  • busbw (GB/s):总线带宽,以 GB/s 为单位;
  • wrong:错误的数量,如果这个值不是 0,那可能表示有一些错误发生。

查看结果时需要关注如下几点:

  • 数据量增加时,带宽是否会下降(下降明显不符合预期);
  • 带宽的峰值,每次算到的带宽峰值,可以只关注 in 或者 out;
  • 平均值,在数据量递增的情况下,可能无法体现最终的结果;
  • 请确保数据量足够大,可以压到带宽上限(通过调整 b、e 或者 n 选项)。

分析以上信息可以发现:平均总线带宽仅22GB/s,在达到47GB/s左右的峰值流量后,随着数据量越大带宽性能却在下降,与正常值相差甚远。

机内拓扑分析

通过 nvidia-smi topo -m 可以得知机内设备拓扑

图4

将上表转化为如下示意图:

图5

NCCL通信路径分析

NCCL中用Channel的概念表示一个通信路径,在初始化的过程会自动感知拓扑并计算最佳的通信路径。为了更好的利用带宽和网卡实现并发通信,NCCL会使用多channel。NCCL-test运行日志里列出了16组channel如下:

### ChannelNum:16
    bm-2204kzq:252978:253054 [0] NCCL INFO Channel 00/16 :    0   7   5   6   4   3   1   2   8  15  13  14  12  11   9  10
    bm-2204kzq:252978:253054 [0] NCCL INFO Channel 01/16 :    0   7   5   6   4   3   1  10   8  15  13  14  12  11   9   2
    bm-2204kzq:252978:253054 [0] NCCL INFO Channel 02/16 :    0   7   5   6  12  11   9  10   8  15  13  14   4   3   1   2
    bm-2204kzq:252978:253054 [0] NCCL INFO Channel 03/16 :    0   7   5  14  12  11   9  10   8  15  13   6   4   3   1   2
    bm-2204kzq:252978:253054 [0] NCCL INFO Channel 04/16 :    0   7   5   6   4   3   1   2   8  15  13  14  12  11   9  10
    bm-2204kzq:252978:253054 [0] NCCL INFO Channel 05/16 :    0   7   5   6   4   3   1  10   8  15  13  14  12  11   9   2
    bm-2204kzq:252978:253054 [0] NCCL INFO Channel 06/16 :    0   7   5   6  12  11   9  10   8  15  13  14   4   3   1   2
    bm-2204kzq:252978:253054 [0] NCCL INFO Channel 07/16 :    0   7   5  14  12  11   9  10   8  15  13   6   4   3   1   2
    bm-2204kzq:252978:253054 [0] NCCL INFO Channel 08/16 :    0   7   5   6   4   3   1   2   8  15  13  14  12  11   9  10
    bm-2204kzq:252978:253054 [0] NCCL INFO Channel 09/16 :    0   7   5   6   4   3   1  10   8  15  13  14  12  11   9   2
    bm-2204kzq:252978:253054 [0] NCCL INFO Channel 10/16 :    0   7   5   6  12  11   9  10   8  15  13  14   4   3   1   2
    bm-2204kzq:252978:253054 [0] NCCL INFO Channel 11/16 :    0   7   5  14  12  11   9  10   8  15  13   6   4   3   1   2
    bm-2204kzq:252978:253054 [0] NCCL INFO Channel 12/16 :    0   7   5   6   4   3   1   2   8  15  13  14  12  11   9  10
    bm-2204kzq:252978:253054 [0] NCCL INFO Channel 13/16 :    0   7   5   6   4   3   1  10   8  15  13  14  12  11   9   2
    bm-2204kzq:252978:253054 [0] NCCL INFO Channel 14/16 :    0   7   5   6  12  11   9  10   8  15  13  14   4   3   1   2
    bm-2204kzq:252978:253054 [0] NCCL INFO Channel 15/16 :    0   7   5  14  12  11   9  10   8  15  13   6   4   3   1   2

Device map 显示 Rank #0-7、#8-15在同一服务器

### Device maps
    ## GPU map
        #  Rank  0 Group  0 Pid 252978 on bm-2204kzq device  0 [0x0f] NVIDIA H20
        #  Rank  1 Group  0 Pid 252979 on bm-2204kzq device  1 [0x34] NVIDIA H20
        #  Rank  2 Group  0 Pid 252980 on bm-2204kzq device  2 [0x48] NVIDIA H20
        #  Rank  3 Group  0 Pid 252981 on bm-2204kzq device  3 [0x5a] NVIDIA H20
        #  Rank  4 Group  0 Pid 252982 on bm-2204kzq device  4 [0x87] NVIDIA H20
        #  Rank  5 Group  0 Pid 252983 on bm-2204kzq device  5 [0xae] NVIDIA H20
        #  Rank  6 Group  0 Pid 252984 on bm-2204kzq device  6 [0xc2] NVIDIA H20
        #  Rank  7 Group  0 Pid 252985 on bm-2204kzq device  7 [0xd7] NVIDIA H20
        #  Rank  8 Group  0 Pid 253834 on bm-2204qhn device  0 [0x0f] NVIDIA H20 
        #  Rank  9 Group  0 Pid 253835 on bm-2204qhn device  1 [0x34] NVIDIA H20 
        #  Rank 10 Group  0 Pid 253836 on bm-2204qhn device  2 [0x48] NVIDIA H20 
        #  Rank 11 Group  0 Pid 253837 on bm-2204qhn device  3 [0x5a] NVIDIA H20 
        #  Rank 12 Group  0 Pid 253838 on bm-2204qhn device  4 [0x87] NVIDIA H20 
        #  Rank 13 Group  0 Pid 253839 on bm-2204qhn device  5 [0xae] NVIDIA H20
        #  Rank 14 Group  0 Pid 253840 on bm-2204qhn device  6 [0xc2] NVIDIA H20
        #  Rank 15 Group  0 Pid 253841 on bm-2204qhn device  7 [0xd7] NVIDIA H20 

结合每个channel的具体路径信息(详见文末),在所有16条channel下的机间流量仅有以下8种固定的rank组合:10-0、2-8、1-10、9-2、6-12、14-4、5-14、13-6,对应的,产生通信的网卡有且仅有:

<bm-2204kzq>       <bm-2204qhn>
NIC0: mlx5_0 <---> NIC2: mlx5_2
NIC2: mlx5_2 
NIC3: mlx5_3 <---> NIC4: mlx5_4
NIC4: mlx5_4 

优化前性能不佳的原因是: 所有跨节点的并行流量都需跨交换机在四条互联链路上负载均衡,而现有的ECMP负载均衡对大流不够友好,形成了性能瓶颈。

所以在设计Scale-out网络拓扑的时候,我们应让集群内所有同轨道的网卡连接在一台交换机上,使集群性能达到最优。

图6

按此方式调整后,测得单机四卡模式跨RoCE交换机(CX732Q-N)的总线带宽与网卡直连数值相近,约195GB/s


附录

## NIC map
        bm-2204kzq:252982:252982 [*] NCCL INFO NCCL_SOCKET_IFNAME set by environment to bond0
        bm-2204kzq:252982:252982 [*] NCCL INFO Bootstrap : Using bond0:172.17.0.215<0>
        bm-2204kzq:252982:252982 [*] NCCL INFO NCCL version 2.22.3+cuda12.6
        bm-2204kzq:252985:253055 [*] NCCL INFO NET/IB : Using [0]mlx5_2:1/RoCE [1]mlx5_3:1/RoCE [2]mlx5_4:1/RoCE [3]mlx5_0:1/RoCE [RO]; OOB bond0:172.17.0.215<0>
        
        bm-2204qhn:253837:253837 [*] NCCL INFO NCCL_SOCKET_IFNAME set by environment to bond0
        bm-2204qhn:253837:253837 [*] NCCL INFO Bootstrap : Using bond0:172.17.0.81<0>
        bm-2204qhn:253837:253837 [*] NCCL INFO NCCL version 2.22.3+cuda12.6
        bm-2204qhn:253840:253908 [*] NCCL INFO NET/IB : Using [0]mlx5_0:1/RoCE [1]mlx5_2:1/RoCE [2]mlx5_3:1/RoCE [3]mlx5_4:1/RoCE [RO]; OOB bond0:172.17.0.81<0>
### ChannelNum:16
    bm-2204kzq:252978:253054 [0] NCCL INFO Channel 00/16 :    0   7   5   6   4   3   1   2   8  15  13  14  12  11   9  10
    bm-2204kzq:252978:253054 [0] NCCL INFO Channel 01/16 :    0   7   5   6   4   3   1  10   8  15  13  14  12  11   9   2
    bm-2204kzq:252978:253054 [0] NCCL INFO Channel 02/16 :    0   7   5   6  12  11   9  10   8  15  13  14   4   3   1   2
    bm-2204kzq:252978:253054 [0] NCCL INFO Channel 03/16 :    0   7   5  14  12  11   9  10   8  15  13   6   4   3   1   2
    bm-2204kzq:252978:253054 [0] NCCL INFO Channel 04/16 :    0   7   5   6   4   3   1   2   8  15  13  14  12  11   9  10
    bm-2204kzq:252978:253054 [0] NCCL INFO Channel 05/16 :    0   7   5   6   4   3   1  10   8  15  13  14  12  11   9   2
    bm-2204kzq:252978:253054 [0] NCCL INFO Channel 06/16 :    0   7   5   6  12  11   9  10   8  15  13  14   4   3   1   2
    bm-2204kzq:252978:253054 [0] NCCL INFO Channel 07/16 :    0   7   5  14  12  11   9  10   8  15  13   6   4   3   1   2
    bm-2204kzq:252978:253054 [0] NCCL INFO Channel 08/16 :    0   7   5   6   4   3   1   2   8  15  13  14  12  11   9  10
    bm-2204kzq:252978:253054 [0] NCCL INFO Channel 09/16 :    0   7   5   6   4   3   1  10   8  15  13  14  12  11   9   2
    bm-2204kzq:252978:253054 [0] NCCL INFO Channel 10/16 :    0   7   5   6  12  11   9  10   8  15  13  14   4   3   1   2
    bm-2204kzq:252978:253054 [0] NCCL INFO Channel 11/16 :    0   7   5  14  12  11   9  10   8  15  13   6   4   3   1   2
    bm-2204kzq:252978:253054 [0] NCCL INFO Channel 12/16 :    0   7   5   6   4   3   1   2   8  15  13  14  12  11   9  10
    bm-2204kzq:252978:253054 [0] NCCL INFO Channel 13/16 :    0   7   5   6   4   3   1  10   8  15  13  14  12  11   9   2
    bm-2204kzq:252978:253054 [0] NCCL INFO Channel 14/16 :    0   7   5   6  12  11   9  10   8  15  13  14   4   3   1   2
    bm-2204kzq:252978:253054 [0] NCCL INFO Channel 15/16 :    0   7   5  14  12  11   9  10   8  15  13   6   4   3   1   2

    ## Channel C0
        bm-2204kzq:252978:253054 [0] NCCL INFO Channel 00/16 :    0   7   5   6   4   3   1   2   8  15  13  14  12  11   9  10

        bm-2204kzq:
            [0]mlx5_2:1/RoCE 
            [1]mlx5_3:1/RoCE 
            [2]mlx5_4:1/RoCE 
            [3]mlx5_0:1/RoCE
        
        bm-2204qhn:
            [0]mlx5_0:1/RoCE 
            [1]mlx5_2:1/RoCE 
            [2]mlx5_3:1/RoCE 
            [3]mlx5_4:1/RoCE

        bm-2204kzq:252978:253115 [0] NCCL INFO Channel 00/0 : 0[0] -> 7[7] via P2P/CUMEM
        bm-2204kzq:252985:253113 [7] NCCL INFO Channel 00/0 : 7[7] -> 5[5] via P2P/CUMEM
        bm-2204kzq:252983:253114 [5] NCCL INFO Channel 00/0 : 5[5] -> 6[6] via P2P/CUMEM
        bm-2204kzq:252984:253117 [6] NCCL INFO Channel 00/0 : 6[6] -> 4[4] via P2P/CUMEM
        bm-2204kzq:252982:253118 [4] NCCL INFO Channel 00/0 : 4[4] -> 3[3] via P2P/CUMEM
        bm-2204kzq:252981:253116 [3] NCCL INFO Channel 00/0 : 3[3] -> 1[1] via P2P/CUMEM
        bm-2204kzq:252979:253119 [1] NCCL INFO Channel 00/0 : 1[1] -> 2[2] via P2P/CUMEM
        bm-2204kzq:252980:253120 [2] NCCL INFO Channel 00/0 : 2[2] -> 8[0] [send] via NET/IB/3(0)/GDRDMA mlx5_0:1/RoCE
        bm-2204qhn:253834:253970 [0] NCCL INFO Channel 00/0 : 2[2] -> 8[0] [receive] via NET/IB/0/GDRDMA mlx5_0:1/RoCE
        bm-2204qhn:253834:253970 [0] NCCL INFO Channel 00/0 : 8[0] -> 15[7] via P2P/CUMEM
        bm-2204qhn:253841:253968 [7] NCCL INFO Channel 00/0 : 15[7] -> 13[5] via P2P/CUMEM
        bm-2204qhn:253839:253969 [5] NCCL INFO Channel 00/0 : 13[5] -> 14[6] via P2P/CUMEM
        bm-2204qhn:253840:253973 [6] NCCL INFO Channel 00/0 : 14[6] -> 12[4] via P2P/CUMEM
        bm-2204qhn:253838:253972 [4] NCCL INFO Channel 00/0 : 12[4] -> 11[3] via P2P/CUMEM
        bm-2204qhn:253837:253967 [3] NCCL INFO Channel 00/0 : 11[3] -> 9[1] via P2P/CUMEM
        bm-2204qhn:253835:253971 [1] NCCL INFO Channel 00/0 : 9[1] -> 10[2] via P2P/CUMEM
        bm-2204qhn:253836:253974 [2] NCCL INFO Channel 00/0 : 10[2] -> 0[0] [send] via NET/IB/0(8)/GDRDMA mlx5_0:1/RoCE
        bm-2204kzq:252978:253115 [0] NCCL INFO Channel 00/0 : 10[2] -> 0[0] [receive] via NET/IB/3/GDRDMA mlx5_0:1/RoCE

    ## Channel C1
        bm-2204kzq:252978:253054 [0] NCCL INFO Channel 01/16 :    0   7   5   6   4   3   1  10   8  15  13  14  12  11   9   2
        
        bm-2204kzq:
            [0]mlx5_2:1/RoCE 
            [1]mlx5_3:1/RoCE 
            [2]mlx5_4:1/RoCE 
            [3]mlx5_0:1/RoCE
        
        bm-2204qhn:
            [0]mlx5_0:1/RoCE 
            [1]mlx5_2:1/RoCE 
            [2]mlx5_3:1/RoCE 
            [3]mlx5_4:1/RoCE
            
        bm-2204kzq:252978:253115 [0] NCCL INFO Channel 01/0 : 0[0] -> 7[7] via P2P/CUMEM
        bm-2204kzq:252985:253113 [7] NCCL INFO Channel 01/0 : 7[7] -> 5[5] via P2P/CUMEM
        bm-2204kzq:252983:253114 [5] NCCL INFO Channel 01/0 : 5[5] -> 6[6] via P2P/CUMEM
        bm-2204kzq:252984:253117 [6] NCCL INFO Channel 01/0 : 6[6] -> 4[4] via P2P/CUMEM
        bm-2204kzq:252982:253118 [4] NCCL INFO Channel 01/0 : 4[4] -> 3[3] via P2P/CUMEM
        bm-2204kzq:252981:253116 [3] NCCL INFO Channel 01/0 : 3[3] -> 1[1] via P2P/CUMEM
        bm-2204kzq:252979:253119 [1] NCCL INFO Channel 01/0 : 1[1] -> 10[2] [send] via NET/IB/0(2)/GDRDMA mlx5_2:1/RoCE 
        bm-2204qhn:253836:253974 [2] NCCL INFO Channel 01/0 : 1[1] -> 10[2] [receive] via NET/IB/1/GDRDMA mlx5_2:1/RoCE 
        bm-2204qhn:253836:253974 [2] NCCL INFO Channel 01/0 : 10[2] -> 8[0] via P2P/CUMEM
        bm-2204qhn:253834:253970 [0] NCCL INFO Channel 01/0 : 8[0] -> 15[7] via P2P/CUMEM
        bm-2204qhn:253841:253968 [7] NCCL INFO Channel 01/0 : 15[7] -> 13[5] via P2P/CUMEM
        bm-2204qhn:253839:253969 [5] NCCL INFO Channel 01/0 : 13[5] -> 14[6] via P2P/CUMEM
        bm-2204qhn:253840:253973 [6] NCCL INFO Channel 01/0 : 14[6] -> 12[4] via P2P/CUMEM
        bm-2204qhn:253838:253972 [4] NCCL INFO Channel 01/0 : 12[4] -> 11[3] via P2P/CUMEM
        bm-2204qhn:253837:253967 [3] NCCL INFO Channel 01/0 : 11[3] -> 9[1] via P2P/CUMEM
        bm-2204qhn:253835:253971 [1] NCCL INFO Channel 01/0 : 9[1] -> 2[2] [send] via NET/IB/1(10)/GDRDMA mlx5_2:1/RoCE 
        bm-2204kzq:252980:253120 [2] NCCL INFO Channel 01/0 : 9[1] -> 2[2] [receive] via NET/IB/0/GDRDMA mlx5_2:1/RoCE 
        bm-2204kzq:252980:253120 [2] NCCL INFO Channel 01/0 : 2[2] -> 0[0] via P2P/CUMEM
        
    ## Channel C2
        bm-2204kzq:252978:253054 [0] NCCL INFO Channel 02/16 :    0   7   5   6  12  11   9  10   8  15  13  14   4   3   1   2

        bm-2204kzq:
            [0]mlx5_2:1/RoCE 
            [1]mlx5_3:1/RoCE 
            [2]mlx5_4:1/RoCE 
            [3]mlx5_0:1/RoCE
        
        bm-2204qhn:
            [0]mlx5_0:1/RoCE 
            [1]mlx5_2:1/RoCE 
            [2]mlx5_3:1/RoCE 
            [3]mlx5_4:1/RoCE
            
        bm-2204kzq:252978:253115 [0] NCCL INFO Channel 02/0 : 0[0] -> 7[7] via P2P/CUMEM
        bm-2204kzq:252985:253113 [7] NCCL INFO Channel 02/0 : 7[7] -> 5[5] via P2P/CUMEM
        bm-2204kzq:252983:253114 [5] NCCL INFO Channel 02/0 : 5[5] -> 6[6] via P2P/CUMEM
        bm-2204kzq:252984:253117 [6] NCCL INFO Channel 02/0 : 6[6] -> 12[4] [send] via NET/IB/1(4)/GDRDMA mlx5_3:1/RoCE
        bm-2204qhn:253838:253972 [4] NCCL INFO Channel 02/0 : 6[6] -> 12[4] [receive] via NET/IB/2/GDRDMA mlx5_3:1/RoCE
        bm-2204qhn:253838:253972 [4] NCCL INFO Channel 02/0 : 12[4] -> 11[3] via P2P/CUMEM
        bm-2204qhn:253837:253967 [3] NCCL INFO Channel 02/0 : 11[3] -> 9[1] via P2P/CUMEM
        bm-2204qhn:253835:253971 [1] NCCL INFO Channel 02/0 : 9[1] -> 10[2] via P2P/CUMEM
        bm-2204qhn:253836:253974 [2] NCCL INFO Channel 02/0 : 10[2] -> 8[0] via P2P/CUMEM
        bm-2204qhn:253834:253970 [0] NCCL INFO Channel 02/0 : 8[0] -> 15[7] via P2P/CUMEM
        bm-2204qhn:253841:253968 [7] NCCL INFO Channel 02/0 : 15[7] -> 13[5] via P2P/CUMEM
        bm-2204qhn:253839:253969 [5] NCCL INFO Channel 02/0 : 13[5] -> 14[6] via P2P/CUMEM
        bm-2204qhn:253840:253973 [6] NCCL INFO Channel 02/0 : 14[6] -> 4[4] [send] via NET/IB/2(12)/GDRDMA mlx5_3:1/RoCE
        bm-2204kzq:252982:253118 [4] NCCL INFO Channel 02/0 : 14[6] -> 4[4] [receive] via NET/IB/1/GDRDMA mlx5_3:1/RoCE
        bm-2204kzq:252982:253118 [4] NCCL INFO Channel 02/0 : 4[4] -> 3[3] via P2P/CUMEM
        bm-2204kzq:252981:253116 [3] NCCL INFO Channel 02/0 : 3[3] -> 1[1] via P2P/CUMEM
        bm-2204kzq:252979:253119 [1] NCCL INFO Channel 02/0 : 1[1] -> 2[2] via P2P/CUMEM
        bm-2204kzq:252980:253120 [2] NCCL INFO Channel 02/0 : 2[2] -> 0[0] via P2P/CUMEM

    ## Channel C3
        bm-2204kzq:252978:253054 [0] NCCL INFO Channel 03/16 :    0   7   5  14  12  11   9  10   8  15  13   6   4   3   1   2

        bm-2204kzq:
            [0]mlx5_2:1/RoCE 
            [1]mlx5_3:1/RoCE 
            [2]mlx5_4:1/RoCE 
            [3]mlx5_0:1/RoCE
        
        bm-2204qhn:
            [0]mlx5_0:1/RoCE 
            [1]mlx5_2:1/RoCE 
            [2]mlx5_3:1/RoCE 
            [3]mlx5_4:1/RoCE
            
        bm-2204kzq:252978:253115 [0] NCCL INFO Channel 03/0 : 0[0] -> 7[7] via P2P/CUMEM
        bm-2204kzq:252985:253113 [7] NCCL INFO Channel 03/0 : 7[7] -> 5[5] via P2P/CUMEM
        bm-2204kzq:252983:253114 [5] NCCL INFO Channel 03/0 : 5[5] -> 14[6] [send] via NET/IB/2(6)/GDRDMA mlx5_4:1/RoCE
        bm-2204qhn:253840:253973 [6] NCCL INFO Channel 03/0 : 5[5] -> 14[6] [receive] via NET/IB/3/GDRDMA mlx5_4:1/RoCE
        bm-2204qhn:253840:253973 [6] NCCL INFO Channel 03/0 : 14[6] -> 12[4] via P2P/CUMEM
        bm-2204qhn:253838:253972 [4] NCCL INFO Channel 03/0 : 12[4] -> 11[3] via P2P/CUMEM
        bm-2204qhn:253837:253967 [3] NCCL INFO Channel 03/0 : 11[3] -> 9[1] via P2P/CUMEM
        bm-2204qhn:253835:253971 [1] NCCL INFO Channel 03/0 : 9[1] -> 10[2] via P2P/CUMEM
        bm-2204qhn:253836:253974 [2] NCCL INFO Channel 03/0 : 10[2] -> 8[0] via P2P/CUMEM
        bm-2204qhn:253834:253970 [0] NCCL INFO Channel 03/0 : 8[0] -> 15[7] via P2P/CUMEM
        bm-2204qhn:253841:253968 [7] NCCL INFO Channel 03/0 : 15[7] -> 13[5] via P2P/CUMEM
        bm-2204qhn:253839:253969 [5] NCCL INFO Channel 03/0 : 13[5] -> 6[6] [send] via NET/IB/3(14)/GDRDMA mlx5_4:1/RoCE
        bm-2204kzq:252984:253117 [6] NCCL INFO Channel 03/0 : 13[5] -> 6[6] [receive] via NET/IB/2/GDRDMA mlx5_4:1/RoCE
        bm-2204kzq:252984:253117 [6] NCCL INFO Channel 03/0 : 6[6] -> 4[4] via P2P/CUMEM
        bm-2204kzq:252982:253118 [4] NCCL INFO Channel 03/0 : 4[4] -> 3[3] via P2P/CUMEM
        bm-2204kzq:252981:253116 [3] NCCL INFO Channel 03/0 : 3[3] -> 1[1] via P2P/CUMEM
        bm-2204kzq:252979:253119 [1] NCCL INFO Channel 03/0 : 1[1] -> 2[2] via P2P/CUMEM
        bm-2204kzq:252980:253120 [2] NCCL INFO Channel 03/0 : 2[2] -> 0[0] via P2P/CUMEM

    ## Channel C4
        bm-2204kzq:252978:253054 [0] NCCL INFO Channel 04/16 :    0   7   5   6   4   3   1   2   8  15  13  14  12  11   9  10

        bm-2204kzq:
            [0]mlx5_2:1/RoCE 
            [1]mlx5_3:1/RoCE 
            [2]mlx5_4:1/RoCE 
            [3]mlx5_0:1/RoCE
        
        bm-2204qhn:
            [0]mlx5_0:1/RoCE 
            [1]mlx5_2:1/RoCE 
            [2]mlx5_3:1/RoCE 
            [3]mlx5_4:1/RoCE
            
        bm-2204kzq:252978:253115 [0] NCCL INFO Channel 04/0 : 0[0] -> 7[7] via P2P/CUMEM
        bm-2204kzq:252985:253113 [7] NCCL INFO Channel 04/0 : 7[7] -> 5[5] via P2P/CUMEM
        bm-2204kzq:252983:253114 [5] NCCL INFO Channel 04/0 : 5[5] -> 6[6] via P2P/CUMEM
        bm-2204kzq:252984:253117 [6] NCCL INFO Channel 04/0 : 6[6] -> 4[4] via P2P/CUMEM
        bm-2204kzq:252982:253118 [4] NCCL INFO Channel 04/0 : 4[4] -> 3[3] via P2P/CUMEM
        bm-2204kzq:252981:253116 [3] NCCL INFO Channel 04/0 : 3[3] -> 1[1] via P2P/CUMEM
        bm-2204kzq:252979:253119 [1] NCCL INFO Channel 04/0 : 1[1] -> 2[2] via P2P/CUMEM
        bm-2204kzq:252980:253120 [2] NCCL INFO Channel 04/0 : 2[2] -> 8[0] [send] via NET/IB/3(0)/GDRDMA mlx5_0:1/RoCE
        bm-2204qhn:253834:253970 [0] NCCL INFO Channel 04/0 : 2[2] -> 8[0] [receive] via NET/IB/0/GDRDMA mlx5_0:1/RoCE
        bm-2204qhn:253834:253970 [0] NCCL INFO Channel 04/0 : 8[0] -> 15[7] via P2P/CUMEM
        bm-2204qhn:253841:253968 [7] NCCL INFO Channel 04/0 : 15[7] -> 13[5] via P2P/CUMEM
        bm-2204qhn:253839:253969 [5] NCCL INFO Channel 04/0 : 13[5] -> 14[6] via P2P/CUMEM
        bm-2204qhn:253840:253973 [6] NCCL INFO Channel 04/0 : 14[6] -> 12[4] via P2P/CUMEM
        bm-2204qhn:253838:253972 [4] NCCL INFO Channel 04/0 : 12[4] -> 11[3] via P2P/CUMEM
        bm-2204qhn:253837:253967 [3] NCCL INFO Channel 04/0 : 11[3] -> 9[1] via P2P/CUMEM
        bm-2204qhn:253835:253971 [1] NCCL INFO Channel 04/0 : 9[1] -> 10[2] via P2P/CUMEM
        bm-2204qhn:253836:253974 [2] NCCL INFO Channel 04/0 : 10[2] -> 0[0] [send] via NET/IB/0(8)/GDRDMA mlx5_0:1/RoCE
        bm-2204kzq:252978:253115 [0] NCCL INFO Channel 04/0 : 10[2] -> 0[0] [receive] via NET/IB/3/GDRDMA mlx5_0:1/RoCE

    ## Channel C5
        bm-2204kzq:252978:253054 [0] NCCL INFO Channel 05/16 :    0   7   5   6   4   3   1  10   8  15  13  14  12  11   9   2

        bm-2204kzq:
            [0]mlx5_2:1/RoCE 
            [1]mlx5_3:1/RoCE 
            [2]mlx5_4:1/RoCE 
            [3]mlx5_0:1/RoCE
        
        bm-2204qhn:
            [0]mlx5_0:1/RoCE 
            [1]mlx5_2:1/RoCE 
            [2]mlx5_3:1/RoCE 
            [3]mlx5_4:1/RoCE
            
        bm-2204kzq:252978:253115 [0] NCCL INFO Channel 05/0 : 0[0] -> 7[7] via P2P/CUMEM
        bm-2204kzq:252985:253113 [7] NCCL INFO Channel 05/0 : 7[7] -> 5[5] via P2P/CUMEM
        bm-2204kzq:252983:253114 [5] NCCL INFO Channel 05/0 : 5[5] -> 6[6] via P2P/CUMEM
        bm-2204kzq:252984:253117 [6] NCCL INFO Channel 05/0 : 6[6] -> 4[4] via P2P/CUMEM
        bm-2204kzq:252982:253118 [4] NCCL INFO Channel 05/0 : 4[4] -> 3[3] via P2P/CUMEM
        bm-2204kzq:252981:253116 [3] NCCL INFO Channel 05/0 : 3[3] -> 1[1] via P2P/CUMEM
        bm-2204kzq:252979:253119 [1] NCCL INFO Channel 05/0 : 1[1] -> 10[2] [send] via NET/IB/0(2)/GDRDMA mlx5_2:1/RoCE
        bm-2204qhn:253836:253974 [2] NCCL INFO Channel 05/0 : 1[1] -> 10[2] [receive] via NET/IB/1/GDRDMA mlx5_2:1/RoCE
        bm-2204qhn:253836:253974 [2] NCCL INFO Channel 05/0 : 10[2] -> 8[0] via P2P/CUMEM
        bm-2204qhn:253834:253970 [0] NCCL INFO Channel 05/0 : 8[0] -> 15[7] via P2P/CUMEM
        bm-2204qhn:253841:253968 [7] NCCL INFO Channel 05/0 : 15[7] -> 13[5] via P2P/CUMEM
        bm-2204qhn:253839:253969 [5] NCCL INFO Channel 05/0 : 13[5] -> 14[6] via P2P/CUMEM
        bm-2204qhn:253840:253973 [6] NCCL INFO Channel 05/0 : 14[6] -> 12[4] via P2P/CUMEM
        bm-2204qhn:253838:253972 [4] NCCL INFO Channel 05/0 : 12[4] -> 11[3] via P2P/CUMEM
        bm-2204qhn:253837:253967 [3] NCCL INFO Channel 05/0 : 11[3] -> 9[1] via P2P/CUMEM
        bm-2204qhn:253835:253971 [1] NCCL INFO Channel 05/0 : 9[1] -> 2[2] [send] via NET/IB/1(10)/GDRDMA mlx5_2:1/RoCE
        bm-2204kzq:252980:253120 [2] NCCL INFO Channel 05/0 : 9[1] -> 2[2] [receive] via NET/IB/0/GDRDMA mlx5_2:1/RoCE
        bm-2204kzq:252980:253120 [2] NCCL INFO Channel 05/0 : 2[2] -> 0[0] via P2P/CUMEM

    ## Channel C6
        bm-2204kzq:252978:253054 [0] NCCL INFO Channel 06/16 :    0   7   5   6  12  11   9  10   8  15  13  14   4   3   1   2

        bm-2204kzq:
            [0]mlx5_2:1/RoCE 
            [1]mlx5_3:1/RoCE 
            [2]mlx5_4:1/RoCE 
            [3]mlx5_0:1/RoCE
        
        bm-2204qhn:
            [0]mlx5_0:1/RoCE 
            [1]mlx5_2:1/RoCE 
            [2]mlx5_3:1/RoCE 
            [3]mlx5_4:1/RoCE
            
        bm-2204kzq:252978:253115 [0] NCCL INFO Channel 06/0 : 0[0] -> 7[7] via P2P/CUMEM
        bm-2204kzq:252985:253113 [7] NCCL INFO Channel 06/0 : 7[7] -> 5[5] via P2P/CUMEM
        bm-2204kzq:252983:253114 [5] NCCL INFO Channel 06/0 : 5[5] -> 6[6] via P2P/CUMEM
        bm-2204kzq:252984:253117 [6] NCCL INFO Channel 06/0 : 6[6] -> 12[4] [send] via NET/IB/1(4)/GDRDMA mlx5_3:1/RoCE
        bm-2204qhn:253838:253972 [4] NCCL INFO Channel 06/0 : 6[6] -> 12[4] [receive] via NET/IB/2/GDRDMA mlx5_3:1/RoCE
        bm-2204qhn:253838:253972 [4] NCCL INFO Channel 06/0 : 12[4] -> 11[3] via P2P/CUMEM
        bm-2204qhn:253837:253967 [3] NCCL INFO Channel 06/0 : 11[3] -> 9[1] via P2P/CUMEM
        bm-2204qhn:253835:253971 [1] NCCL INFO Channel 06/0 : 9[1] -> 10[2] via P2P/CUMEM
        bm-2204qhn:253836:253974 [2] NCCL INFO Channel 06/0 : 10[2] -> 8[0] via P2P/CUMEM
        bm-2204qhn:253834:253970 [0] NCCL INFO Channel 06/0 : 8[0] -> 15[7] via P2P/CUMEM
        bm-2204qhn:253841:253968 [7] NCCL INFO Channel 06/0 : 15[7] -> 13[5] via P2P/CUMEM
        bm-2204qhn:253839:253969 [5] NCCL INFO Channel 06/0 : 13[5] -> 14[6] via P2P/CUMEM
        bm-2204qhn:253840:253973 [6] NCCL INFO Channel 06/0 : 14[6] -> 4[4] [send] via NET/IB/2(12)/GDRDMA mlx5_3:1/RoCE
        bm-2204kzq:252982:253118 [4] NCCL INFO Channel 06/0 : 14[6] -> 4[4] [receive] via NET/IB/1/GDRDMA mlx5_3:1/RoCE
        bm-2204kzq:252982:253118 [4] NCCL INFO Channel 06/0 : 4[4] -> 3[3] via P2P/CUMEM
        bm-2204kzq:252981:253116 [3] NCCL INFO Channel 06/0 : 3[3] -> 1[1] via P2P/CUMEM
        bm-2204kzq:252979:253119 [1] NCCL INFO Channel 06/0 : 1[1] -> 2[2] via P2P/CUMEM
        bm-2204kzq:252980:253120 [2] NCCL INFO Channel 06/0 : 2[2] -> 0[0] via P2P/CUMEM

    ## Channel C7
        bm-2204kzq:252978:253054 [0] NCCL INFO Channel 07/16 :    0   7   5  14  12  11   9  10   8  15  13   6   4   3   1   2

        bm-2204kzq:
            [0]mlx5_2:1/RoCE 
            [1]mlx5_3:1/RoCE 
            [2]mlx5_4:1/RoCE 
            [3]mlx5_0:1/RoCE
        
        bm-2204qhn:
            [0]mlx5_0:1/RoCE 
            [1]mlx5_2:1/RoCE 
            [2]mlx5_3:1/RoCE 
            [3]mlx5_4:1/RoCE
            
        bm-2204kzq:252978:253115 [0] NCCL INFO Channel 07/0 : 0[0] -> 7[7] via P2P/CUMEM
        bm-2204kzq:252985:253113 [7] NCCL INFO Channel 07/0 : 7[7] -> 5[5] via P2P/CUMEM
        bm-2204kzq:252983:253114 [5] NCCL INFO Channel 07/0 : 5[5] -> 14[6] [send] via NET/IB/2(6)/GDRDMA mlx5_4:1/RoCE
        bm-2204qhn:253840:253973 [6] NCCL INFO Channel 07/0 : 5[5] -> 14[6] [receive] via NET/IB/3/GDRDMA mlx5_4:1/RoCE
        bm-2204qhn:253840:253973 [6] NCCL INFO Channel 07/0 : 14[6] -> 12[4] via P2P/CUMEM
        bm-2204qhn:253838:253972 [4] NCCL INFO Channel 07/0 : 12[4] -> 11[3] via P2P/CUMEM
        bm-2204qhn:253837:253967 [3] NCCL INFO Channel 07/0 : 11[3] -> 9[1] via P2P/CUMEM
        bm-2204qhn:253835:253971 [1] NCCL INFO Channel 07/0 : 9[1] -> 10[2] via P2P/CUMEM
        bm-2204qhn:253836:253974 [2] NCCL INFO Channel 07/0 : 10[2] -> 8[0] via P2P/CUMEM
        bm-2204qhn:253834:253970 [0] NCCL INFO Channel 07/0 : 8[0] -> 15[7] via P2P/CUMEM
        bm-2204qhn:253841:253968 [7] NCCL INFO Channel 07/0 : 15[7] -> 13[5] via P2P/CUMEM
        bm-2204qhn:253839:253969 [5] NCCL INFO Channel 07/0 : 13[5] -> 6[6] [send] via NET/IB/3(14)/GDRDMA mlx5_4:1/RoCE
        bm-2204kzq:252984:253117 [6] NCCL INFO Channel 07/0 : 13[5] -> 6[6] [receive] via NET/IB/2/GDRDMA mlx5_4:1/RoCE
        bm-2204kzq:252984:253117 [6] NCCL INFO Channel 07/0 : 6[6] -> 4[4] via P2P/CUMEM
        bm-2204kzq:252982:253118 [4] NCCL INFO Channel 07/0 : 4[4] -> 3[3] via P2P/CUMEM
        bm-2204kzq:252981:253116 [3] NCCL INFO Channel 07/0 : 3[3] -> 1[1] via P2P/CUMEM
        bm-2204kzq:252979:253119 [1] NCCL INFO Channel 07/0 : 1[1] -> 2[2] via P2P/CUMEM
        bm-2204kzq:252980:253120 [2] NCCL INFO Channel 07/0 : 2[2] -> 0[0] via P2P/CUMEM

    ## Channel C8
        bm-2204kzq:252978:253054 [0] NCCL INFO Channel 08/16 :    0   7   5   6   4   3   1   2   8  15  13  14  12  11   9  10

        bm-2204kzq:
            [0]mlx5_2:1/RoCE 
            [1]mlx5_3:1/RoCE 
            [2]mlx5_4:1/RoCE 
            [3]mlx5_0:1/RoCE
        
        bm-2204qhn:
            [0]mlx5_0:1/RoCE 
            [1]mlx5_2:1/RoCE 
            [2]mlx5_3:1/RoCE 
            [3]mlx5_4:1/RoCE
            
        bm-2204kzq:252978:253115 [0] NCCL INFO Channel 08/0 : 0[0] -> 7[7] via P2P/CUMEM
        bm-2204kzq:252985:253113 [7] NCCL INFO Channel 08/0 : 7[7] -> 5[5] via P2P/CUMEM
        bm-2204kzq:252983:253114 [5] NCCL INFO Channel 08/0 : 5[5] -> 6[6] via P2P/CUMEM
        bm-2204kzq:252984:253117 [6] NCCL INFO Channel 08/0 : 6[6] -> 4[4] via P2P/CUMEM
        bm-2204kzq:252982:253118 [4] NCCL INFO Channel 08/0 : 4[4] -> 3[3] via P2P/CUMEM
        bm-2204kzq:252981:253116 [3] NCCL INFO Channel 08/0 : 3[3] -> 1[1] via P2P/CUMEM
        bm-2204kzq:252979:253119 [1] NCCL INFO Channel 08/0 : 1[1] -> 2[2] via P2P/CUMEM
        bm-2204kzq:252980:253120 [2] NCCL INFO Channel 08/0 : 2[2] -> 8[0] [send] via NET/IB/3(0)/GDRDMA mlx5_0:1/RoCE
        bm-2204qhn:253834:253970 [0] NCCL INFO Channel 08/0 : 2[2] -> 8[0] [receive] via NET/IB/0/GDRDMA mlx5_0:1/RoCE
        bm-2204qhn:253834:253970 [0] NCCL INFO Channel 08/0 : 8[0] -> 15[7] via P2P/CUMEM
        bm-2204qhn:253841:253968 [7] NCCL INFO Channel 08/0 : 15[7] -> 13[5] via P2P/CUMEM
        bm-2204qhn:253839:253969 [5] NCCL INFO Channel 08/0 : 13[5] -> 14[6] via P2P/CUMEM
        bm-2204qhn:253840:253973 [6] NCCL INFO Channel 08/0 : 14[6] -> 12[4] via P2P/CUMEM
        bm-2204qhn:253838:253972 [4] NCCL INFO Channel 08/0 : 12[4] -> 11[3] via P2P/CUMEM
        bm-2204qhn:253837:253967 [3] NCCL INFO Channel 08/0 : 11[3] -> 9[1] via P2P/CUMEM
        bm-2204qhn:253835:253971 [1] NCCL INFO Channel 08/0 : 9[1] -> 10[2] via P2P/CUMEM
        bm-2204qhn:253836:253974 [2] NCCL INFO Channel 08/0 : 10[2] -> 0[0] [send] via NET/IB/0(8)/GDRDMA mlx5_0:1/RoCE
        bm-2204kzq:252978:253115 [0] NCCL INFO Channel 08/0 : 10[2] -> 0[0] [receive] via NET/IB/3/GDRDMA mlx5_0:1/RoCE

    ## Channel C9
        bm-2204kzq:252978:253054 [0] NCCL INFO Channel 09/16 :    0   7   5   6   4   3   1  10   8  15  13  14  12  11   9   2

        bm-2204kzq:
            [0]mlx5_2:1/RoCE 
            [1]mlx5_3:1/RoCE 
            [2]mlx5_4:1/RoCE 
            [3]mlx5_0:1/RoCE
        
        bm-2204qhn:
            [0]mlx5_0:1/RoCE 
            [1]mlx5_2:1/RoCE 
            [2]mlx5_3:1/RoCE 
            [3]mlx5_4:1/RoCE
            
        bm-2204kzq:252978:253115 [0] NCCL INFO Channel 09/0 : 0[0] -> 7[7] via P2P/CUMEM
        bm-2204kzq:252985:253113 [7] NCCL INFO Channel 09/0 : 7[7] -> 5[5] via P2P/CUMEM
        bm-2204kzq:252983:253114 [5] NCCL INFO Channel 09/0 : 5[5] -> 6[6] via P2P/CUMEM
        bm-2204kzq:252984:253117 [6] NCCL INFO Channel 09/0 : 6[6] -> 4[4] via P2P/CUMEM
        bm-2204kzq:252982:253118 [4] NCCL INFO Channel 09/0 : 4[4] -> 3[3] via P2P/CUMEM
        bm-2204kzq:252981:253116 [3] NCCL INFO Channel 09/0 : 3[3] -> 1[1] via P2P/CUMEM
        bm-2204kzq:252979:253119 [1] NCCL INFO Channel 09/0 : 1[1] -> 10[2] [send] via NET/IB/0(2)/GDRDMA mlx5_2:1/RoCE
        bm-2204qhn:253836:253974 [2] NCCL INFO Channel 09/0 : 1[1] -> 10[2] [receive] via NET/IB/1/GDRDMA mlx5_2:1/RoCE
        bm-2204qhn:253836:253974 [2] NCCL INFO Channel 09/0 : 10[2] -> 8[0] via P2P/CUMEM
        bm-2204qhn:253834:253970 [0] NCCL INFO Channel 09/0 : 8[0] -> 15[7] via P2P/CUMEM
        bm-2204qhn:253841:253968 [7] NCCL INFO Channel 09/0 : 15[7] -> 13[5] via P2P/CUMEM
        bm-2204qhn:253839:253969 [5] NCCL INFO Channel 09/0 : 13[5] -> 14[6] via P2P/CUMEM
        bm-2204qhn:253840:253973 [6] NCCL INFO Channel 09/0 : 14[6] -> 12[4] via P2P/CUMEM
        bm-2204qhn:253838:253972 [4] NCCL INFO Channel 09/0 : 12[4] -> 11[3] via P2P/CUMEM
        bm-2204qhn:253837:253967 [3] NCCL INFO Channel 09/0 : 11[3] -> 9[1] via P2P/CUMEM
        bm-2204qhn:253835:253971 [1] NCCL INFO Channel 09/0 : 9[1] -> 2[2] [send] via NET/IB/1(10)/GDRDMA mlx5_2:1/RoCE
        bm-2204kzq:252980:253120 [2] NCCL INFO Channel 09/0 : 9[1] -> 2[2] [receive] via NET/IB/0/GDRDMA mlx5_2:1/RoCE
        bm-2204kzq:252980:253120 [2] NCCL INFO Channel 09/0 : 2[2] -> 0[0] via P2P/CUMEM

    ## Channel C10
        bm-2204kzq:252978:253054 [0] NCCL INFO Channel 10/16 :    0   7   5   6  12  11   9  10   8  15  13  14   4   3   1   2

        bm-2204kzq:
            [0]mlx5_2:1/RoCE 
            [1]mlx5_3:1/RoCE 
            [2]mlx5_4:1/RoCE 
            [3]mlx5_0:1/RoCE
        
        bm-2204qhn:
            [0]mlx5_0:1/RoCE 
            [1]mlx5_2:1/RoCE 
            [2]mlx5_3:1/RoCE 
            [3]mlx5_4:1/RoCE
            
        bm-2204kzq:252978:253115 [0] NCCL INFO Channel 10/0 : 0[0] -> 7[7] via P2P/CUMEM
        bm-2204kzq:252985:253113 [7] NCCL INFO Channel 10/0 : 7[7] -> 5[5] via P2P/CUMEM
        bm-2204kzq:252983:253114 [5] NCCL INFO Channel 10/0 : 5[5] -> 6[6] via P2P/CUMEM
        bm-2204kzq:252984:253117 [6] NCCL INFO Channel 10/0 : 6[6] -> 12[4] [send] via NET/IB/1(4)/GDRDMA mlx5_3:1/RoCE
        bm-2204qhn:253838:253972 [4] NCCL INFO Channel 10/0 : 6[6] -> 12[4] [receive] via NET/IB/2/GDRDMA mlx5_3:1/RoCE
        bm-2204qhn:253838:253972 [4] NCCL INFO Channel 10/0 : 12[4] -> 11[3] via P2P/CUMEM
        bm-2204qhn:253837:253967 [3] NCCL INFO Channel 10/0 : 11[3] -> 9[1] via P2P/CUMEM
        bm-2204qhn:253835:253971 [1] NCCL INFO Channel 10/0 : 9[1] -> 10[2] via P2P/CUMEM
        bm-2204qhn:253836:253974 [2] NCCL INFO Channel 10/0 : 10[2] -> 8[0] via P2P/CUMEM
        bm-2204qhn:253834:253970 [0] NCCL INFO Channel 10/0 : 8[0] -> 15[7] via P2P/CUMEM
        bm-2204qhn:253841:253968 [7] NCCL INFO Channel 10/0 : 15[7] -> 13[5] via P2P/CUMEM
        bm-2204qhn:253839:253969 [5] NCCL INFO Channel 10/0 : 13[5] -> 14[6] via P2P/CUMEM
        bm-2204qhn:253840:253973 [6] NCCL INFO Channel 10/0 : 14[6] -> 4[4] [send] via NET/IB/2(12)/GDRDMA mlx5_3:1/RoCE
        bm-2204kzq:252982:253118 [4] NCCL INFO Channel 10/0 : 14[6] -> 4[4] [receive] via NET/IB/1/GDRDMA mlx5_3:1/RoCE
        bm-2204kzq:252982:253118 [4] NCCL INFO Channel 10/0 : 4[4] -> 3[3] via P2P/CUMEM
        bm-2204kzq:252981:253116 [3] NCCL INFO Channel 10/0 : 3[3] -> 1[1] via P2P/CUMEM
        bm-2204kzq:252979:253119 [1] NCCL INFO Channel 10/0 : 1[1] -> 2[2] via P2P/CUMEM
        bm-2204kzq:252980:253120 [2] NCCL INFO Channel 10/0 : 2[2] -> 0[0] via P2P/CUMEM

    ## Channel C11
        bm-2204kzq:252978:253054 [0] NCCL INFO Channel 11/16 :    0   7   5  14  12  11   9  10   8  15  13   6   4   3   1   2

        bm-2204kzq:
            [0]mlx5_2:1/RoCE 
            [1]mlx5_3:1/RoCE 
            [2]mlx5_4:1/RoCE 
            [3]mlx5_0:1/RoCE
        
        bm-2204qhn:
            [0]mlx5_0:1/RoCE 
            [1]mlx5_2:1/RoCE 
            [2]mlx5_3:1/RoCE 
            [3]mlx5_4:1/RoCE
            
        bm-2204kzq:252978:253115 [0] NCCL INFO Channel 11/0 : 0[0] -> 7[7] via P2P/CUMEM
        bm-2204kzq:252985:253113 [7] NCCL INFO Channel 11/0 : 7[7] -> 5[5] via P2P/CUMEM
        bm-2204kzq:252983:253114 [5] NCCL INFO Channel 11/0 : 5[5] -> 14[6] [send] via NET/IB/2(6)/GDRDMA mlx5_4:1/RoCE
        bm-2204qhn:253840:253973 [6] NCCL INFO Channel 11/0 : 5[5] -> 14[6] [receive] via NET/IB/3/GDRDMA mlx5_4:1/RoCE
        bm-2204qhn:253840:253973 [6] NCCL INFO Channel 11/0 : 14[6] -> 12[4] via P2P/CUMEM
        bm-2204qhn:253838:253972 [4] NCCL INFO Channel 11/0 : 12[4] -> 11[3] via P2P/CUMEM
        bm-2204qhn:253837:253967 [3] NCCL INFO Channel 11/0 : 11[3] -> 9[1] via P2P/CUMEM
        bm-2204qhn:253835:253971 [1] NCCL INFO Channel 11/0 : 9[1] -> 10[2] via P2P/CUMEM
        bm-2204qhn:253836:253974 [2] NCCL INFO Channel 11/0 : 10[2] -> 8[0] via P2P/CUMEM
        bm-2204qhn:253834:253970 [0] NCCL INFO Channel 11/0 : 8[0] -> 15[7] via P2P/CUMEM
        bm-2204qhn:253841:253968 [7] NCCL INFO Channel 11/0 : 15[7] -> 13[5] via P2P/CUMEM
        bm-2204qhn:253839:253969 [5] NCCL INFO Channel 11/0 : 13[5] -> 6[6] [send] via NET/IB/3(14)/GDRDMA mlx5_4:1/RoCE
        bm-2204kzq:252984:253117 [6] NCCL INFO Channel 11/0 : 13[5] -> 6[6] [receive] via NET/IB/2/GDRDMA mlx5_4:1/RoCE
        bm-2204kzq:252984:253117 [6] NCCL INFO Channel 11/0 : 6[6] -> 4[4] via P2P/CUMEM
        bm-2204kzq:252982:253118 [4] NCCL INFO Channel 11/0 : 4[4] -> 3[3] via P2P/CUMEM
        bm-2204kzq:252981:253116 [3] NCCL INFO Channel 11/0 : 3[3] -> 1[1] via P2P/CUMEM
        bm-2204kzq:252979:253119 [1] NCCL INFO Channel 11/0 : 1[1] -> 2[2] via P2P/CUMEM
        bm-2204kzq:252980:253120 [2] NCCL INFO Channel 11/0 : 2[2] -> 0[0] via P2P/CUMEM

    ## Channel C12
        bm-2204kzq:252978:253054 [0] NCCL INFO Channel 12/16 :    0   7   5   6   4   3   1   2   8  15  13  14  12  11   9  10

        bm-2204kzq:
            [0]mlx5_2:1/RoCE 
            [1]mlx5_3:1/RoCE 
            [2]mlx5_4:1/RoCE 
            [3]mlx5_0:1/RoCE
        
        bm-2204qhn:
            [0]mlx5_0:1/RoCE 
            [1]mlx5_2:1/RoCE 
            [2]mlx5_3:1/RoCE 
            [3]mlx5_4:1/RoCE
            
        bm-2204kzq:252978:253115 [0] NCCL INFO Channel 12/0 : 0[0] -> 7[7] via P2P/CUMEM
        bm-2204kzq:252985:253113 [7] NCCL INFO Channel 12/0 : 7[7] -> 5[5] via P2P/CUMEM
        bm-2204kzq:252983:253114 [5] NCCL INFO Channel 12/0 : 5[5] -> 6[6] via P2P/CUMEM
        bm-2204kzq:252984:253117 [6] NCCL INFO Channel 12/0 : 6[6] -> 4[4] via P2P/CUMEM
        bm-2204kzq:252982:253118 [4] NCCL INFO Channel 12/0 : 4[4] -> 3[3] via P2P/CUMEM
        bm-2204kzq:252981:253116 [3] NCCL INFO Channel 12/0 : 3[3] -> 1[1] via P2P/CUMEM
        bm-2204kzq:252979:253119 [1] NCCL INFO Channel 12/0 : 1[1] -> 2[2] via P2P/CUMEM
        bm-2204kzq:252980:253120 [2] NCCL INFO Channel 12/0 : 2[2] -> 8[0] [send] via NET/IB/3(0)/GDRDMA mlx5_0:1/RoCE
        bm-2204qhn:253834:253970 [0] NCCL INFO Channel 12/0 : 2[2] -> 8[0] [receive] via NET/IB/0/GDRDMA mlx5_0:1/RoCE
        bm-2204qhn:253834:253970 [0] NCCL INFO Channel 12/0 : 8[0] -> 15[7] via P2P/CUMEM
        bm-2204qhn:253841:253968 [7] NCCL INFO Channel 12/0 : 15[7] -> 13[5] via P2P/CUMEM
        bm-2204qhn:253839:253969 [5] NCCL INFO Channel 12/0 : 13[5] -> 14[6] via P2P/CUMEM
        bm-2204qhn:253840:253973 [6] NCCL INFO Channel 12/0 : 14[6] -> 12[4] via P2P/CUMEM
        bm-2204qhn:253838:253972 [4] NCCL INFO Channel 12/0 : 12[4] -> 11[3] via P2P/CUMEM
        bm-2204qhn:253837:253967 [3] NCCL INFO Channel 12/0 : 11[3] -> 9[1] via P2P/CUMEM
        bm-2204qhn:253835:253971 [1] NCCL INFO Channel 12/0 : 9[1] -> 10[2] via P2P/CUMEM
        bm-2204qhn:253836:253974 [2] NCCL INFO Channel 12/0 : 10[2] -> 0[0] [send] via NET/IB/0(8)/GDRDMA mlx5_0:1/RoCE
        bm-2204kzq:252978:253115 [0] NCCL INFO Channel 12/0 : 10[2] -> 0[0] [receive] via NET/IB/3/GDRDMA mlx5_0:1/RoCE

    ## Channel C13
        bm-2204kzq:252978:253054 [0] NCCL INFO Channel 13/16 :    0   7   5   6   4   3   1  10   8  15  13  14  12  11   9   2

        bm-2204kzq:
            [0]mlx5_2:1/RoCE 
            [1]mlx5_3:1/RoCE 
            [2]mlx5_4:1/RoCE 
            [3]mlx5_0:1/RoCE
        
        bm-2204qhn:
            [0]mlx5_0:1/RoCE 
            [1]mlx5_2:1/RoCE 
            [2]mlx5_3:1/RoCE 
            [3]mlx5_4:1/RoCE
            
        bm-2204kzq:252980:253120 [2] NCCL INFO Channel 13/0 : 2[2] -> 0[0] via P2P/CUMEM
        bm-2204kzq:252978:253115 [0] NCCL INFO Channel 13/0 : 0[0] -> 7[7] via P2P/CUMEM
        bm-2204kzq:252985:253113 [7] NCCL INFO Channel 13/0 : 7[7] -> 5[5] via P2P/CUMEM
        bm-2204kzq:252983:253114 [5] NCCL INFO Channel 13/0 : 5[5] -> 6[6] via P2P/CUMEM
        bm-2204kzq:252984:253117 [6] NCCL INFO Channel 13/0 : 6[6] -> 4[4] via P2P/CUMEM
        bm-2204kzq:252982:253118 [4] NCCL INFO Channel 13/0 : 4[4] -> 3[3] via P2P/CUMEM
        bm-2204kzq:252981:253116 [3] NCCL INFO Channel 13/0 : 3[3] -> 1[1] via P2P/CUMEM
        bm-2204kzq:252979:253119 [1] NCCL INFO Channel 13/0 : 1[1] -> 10[2] [send] via NET/IB/0(2)/GDRDMA mlx5_2:1/RoCE
        bm-2204qhn:253836:253974 [2] NCCL INFO Channel 13/0 : 1[1] -> 10[2] [receive] via NET/IB/1/GDRDMA mlx5_2:1/RoCE
        bm-2204qhn:253836:253974 [2] NCCL INFO Channel 13/0 : 10[2] -> 8[0] via P2P/CUMEM
        bm-2204qhn:253834:253970 [0] NCCL INFO Channel 13/0 : 8[0] -> 15[7] via P2P/CUMEM
        bm-2204qhn:253841:253968 [7] NCCL INFO Channel 13/0 : 15[7] -> 13[5] via P2P/CUMEM
        bm-2204qhn:253839:253969 [5] NCCL INFO Channel 13/0 : 13[5] -> 14[6] via P2P/CUMEM
        bm-2204qhn:253840:253973 [6] NCCL INFO Channel 13/0 : 14[6] -> 12[4] via P2P/CUMEM
        bm-2204qhn:253838:253972 [4] NCCL INFO Channel 13/0 : 12[4] -> 11[3] via P2P/CUMEM
        bm-2204qhn:253837:253967 [3] NCCL INFO Channel 13/0 : 11[3] -> 9[1] via P2P/CUMEM
        bm-2204qhn:253835:253971 [1] NCCL INFO Channel 13/0 : 9[1] -> 2[2] [send] via NET/IB/1(10)/GDRDMA mlx5_2:1/RoCE
        bm-2204kzq:252980:253120 [2] NCCL INFO Channel 13/0 : 9[1] -> 2[2] [receive] via NET/IB/0/GDRDMA mlx5_2:1/RoCE

    ## Channel C14
        bm-2204kzq:252978:253054 [0] NCCL INFO Channel 14/16 :    0   7   5   6  12  11   9  10   8  15  13  14   4   3   1   2

        bm-2204kzq:
            [0]mlx5_2:1/RoCE 
            [1]mlx5_3:1/RoCE 
            [2]mlx5_4:1/RoCE 
            [3]mlx5_0:1/RoCE
        
        bm-2204qhn:
            [0]mlx5_0:1/RoCE 
            [1]mlx5_2:1/RoCE 
            [2]mlx5_3:1/RoCE 
            [3]mlx5_4:1/RoCE
            
        bm-2204kzq:252978:253115 [0] NCCL INFO Channel 14/0 : 0[0] -> 7[7] via P2P/CUMEM
        bm-2204kzq:252985:253113 [7] NCCL INFO Channel 14/0 : 7[7] -> 5[5] via P2P/CUMEM
        bm-2204kzq:252983:253114 [5] NCCL INFO Channel 14/0 : 5[5] -> 6[6] via P2P/CUMEM
        bm-2204kzq:252984:253117 [6] NCCL INFO Channel 14/0 : 6[6] -> 12[4] [send] via NET/IB/1(4)/GDRDMA mlx5_3:1/RoCE
        bm-2204qhn:253838:253972 [4] NCCL INFO Channel 14/0 : 6[6] -> 12[4] [receive] via NET/IB/2/GDRDMA mlx5_3:1/RoCE
        bm-2204qhn:253838:253972 [4] NCCL INFO Channel 14/0 : 12[4] -> 11[3] via P2P/CUMEM
        bm-2204qhn:253837:253967 [3] NCCL INFO Channel 14/0 : 11[3] -> 9[1] via P2P/CUMEM
        bm-2204qhn:253835:253971 [1] NCCL INFO Channel 14/0 : 9[1] -> 10[2] via P2P/CUMEM
        bm-2204qhn:253836:253974 [2] NCCL INFO Channel 14/0 : 10[2] -> 8[0] via P2P/CUMEM
        bm-2204qhn:253834:253970 [0] NCCL INFO Channel 14/0 : 8[0] -> 15[7] via P2P/CUMEM
        bm-2204qhn:253841:253968 [7] NCCL INFO Channel 14/0 : 15[7] -> 13[5] via P2P/CUMEM
        bm-2204qhn:253839:253969 [5] NCCL INFO Channel 14/0 : 13[5] -> 14[6] via P2P/CUMEM
        bm-2204qhn:253840:253973 [6] NCCL INFO Channel 14/0 : 14[6] -> 4[4] [send] via NET/IB/2(12)/GDRDMA mlx5_3:1/RoCE
        bm-2204kzq:252982:253118 [4] NCCL INFO Channel 14/0 : 14[6] -> 4[4] [receive] via NET/IB/1/GDRDMA mlx5_3:1/RoCE
        bm-2204kzq:252982:253118 [4] NCCL INFO Channel 14/0 : 4[4] -> 3[3] via P2P/CUMEM
        bm-2204kzq:252981:253116 [3] NCCL INFO Channel 14/0 : 3[3] -> 1[1] via P2P/CUMEM
        bm-2204kzq:252979:253119 [1] NCCL INFO Channel 14/0 : 1[1] -> 2[2] via P2P/CUMEM
        bm-2204kzq:252980:253120 [2] NCCL INFO Channel 14/0 : 2[2] -> 0[0] via P2P/CUMEM

    ## Channel C15
        bm-2204kzq:252978:253054 [0] NCCL INFO Channel 15/16 :    0   7   5  14  12  11   9  10   8  15  13   6   4   3   1   2
        
        bm-2204kzq:
            [0]mlx5_2:1/RoCE 
            [1]mlx5_3:1/RoCE 
            [2]mlx5_4:1/RoCE 
            [3]mlx5_0:1/RoCE
        
        bm-2204qhn:
            [0]mlx5_0:1/RoCE 
            [1]mlx5_2:1/RoCE 
            [2]mlx5_3:1/RoCE 
            [3]mlx5_4:1/RoCE
            
        bm-2204kzq:252978:253115 [0] NCCL INFO Channel 15/0 : 0[0] -> 7[7] via P2P/CUMEM
        bm-2204kzq:252985:253113 [7] NCCL INFO Channel 15/0 : 7[7] -> 5[5] via P2P/CUMEM
        bm-2204kzq:252983:253114 [5] NCCL INFO Channel 15/0 : 5[5] -> 14[6] [send] via NET/IB/2(6)/GDRDMA mlx5_4:1/RoCE
        bm-2204qhn:253840:253973 [6] NCCL INFO Channel 15/0 : 5[5] -> 14[6] [receive] via NET/IB/3/GDRDMA mlx5_4:1/RoCE
        bm-2204qhn:253840:253973 [6] NCCL INFO Channel 15/0 : 14[6] -> 12[4] via P2P/CUMEM
        bm-2204qhn:253838:253972 [4] NCCL INFO Channel 15/0 : 12[4] -> 11[3] via P2P/CUMEM
        bm-2204qhn:253837:253967 [3] NCCL INFO Channel 15/0 : 11[3] -> 9[1] via P2P/CUMEM
        bm-2204qhn:253835:253971 [1] NCCL INFO Channel 15/0 : 9[1] -> 10[2] via P2P/CUMEM
        bm-2204qhn:253836:253974 [2] NCCL INFO Channel 15/0 : 10[2] -> 8[0] via P2P/CUMEM
        bm-2204qhn:253834:253970 [0] NCCL INFO Channel 15/0 : 8[0] -> 15[7] via P2P/CUMEM
        bm-2204qhn:253841:253968 [7] NCCL INFO Channel 15/0 : 15[7] -> 13[5] via P2P/CUMEM
        bm-2204qhn:253839:253969 [5] NCCL INFO Channel 15/0 : 13[5] -> 6[6] [send] via NET/IB/3(14)/GDRDMA mlx5_4:1/RoCE
        bm-2204kzq:252984:253117 [6] NCCL INFO Channel 15/0 : 13[5] -> 6[6] [receive] via NET/IB/2/GDRDMA mlx5_4:1/RoCE
        bm-2204kzq:252984:253117 [6] NCCL INFO Channel 15/0 : 6[6] -> 4[4] via P2P/CUMEM
        bm-2204kzq:252982:253118 [4] NCCL INFO Channel 15/0 : 4[4] -> 3[3] via P2P/CUMEM
        bm-2204kzq:252981:253116 [3] NCCL INFO Channel 15/0 : 3[3] -> 1[1] via P2P/CUMEM
        bm-2204kzq:252979:253119 [1] NCCL INFO Channel 15/0 : 1[1] -> 2[2] via P2P/CUMEM
        bm-2204kzq:252980:253120 [2] NCCL INFO Channel 15/0 : 2[2] -> 0[0] via P2P/CUMEM

配置指导:CX-N的ZTP功能验证-以MC-LAG场景为例

1 介绍

2 工作原理

3 具体配置

3.1 MC-LAG场景准备

3.1.1 物理拓扑

3.1.2 设备接口信息

3.1.3 文件导出

3.1.4 恢复设备出场设置

3.1.5 启动ZTP服务

3.2 DHCP配置

3.3 配置文件上传FTP

4 验证

4.1 配置验证

4.1.1 Spine1

4.1.2 Leaf1

4.1.3 Leaf2

4.1.4 Leaf3

4.1.5 Leaf4

4.2 服务器连通性验证

4.2.1 服务器配置

4.2.2 服务器互相访问

4.3 交换机功能验证

4.3.1 BGP

4.3.2 MC-LAG

4.3.3 VXLAN EVPN

4.3.4 路由

1 介绍

零配置部署ZTP(Zero Touch Provisioning)是指新出厂或者空配置设备(要求设备的/host/ztp/ztp_data.json不存在以及/etc/sonic/config_db.json没有被改动还是默认配置状态)上电时自动加载开局文件(配置文件、升级文件)的功能,实现设备的免现场配置和部署,从而降低人力成本,提升部署效率(需要提前编辑好设备配置文件)。本文旨在指导使用ZTP方式自动化完成CX-N设备的MC-LAG场景的配置工作。

工作原理

设备使用基于DHCP协议实现的ZTP功能,通过DHCP协议Option字段附带配置文件、升级文件的地址和路径信息,实现相关开局文件的自动化获取和加载任务。本质上就是从FTP获取config_db.json文件替换交换机中的/etc/sonic/config_db.json文件,从而实现配置的自动下发。

ZTP功能工作原理

以设备出厂状态为例:

  1. 首先ZTP服务会检查自身设备的/etc/sonic/config_db.json文件相对于默认配置有无改动以及检查/host/ztp/ztp_data.json存在——当ztp成功执行的时候会以此文件来记录操作过程。
  2. 检测到设备没有进行配置后,通过DHCP服务来获取存放ZTP配置的FTP服务器信息,正常DHCP服务器应当配置option bootfile-name ftp://ftpserver:test@10.230.1.11/ztp.json 字段。
  3. 通过获取FTP服务器的ztp.json中的配置信息,到FTP对应路径下获得与设备序列号相同文件名的配置文件。
  4. 将FTP中获取的config_db.json文件覆盖本身的config_db.json文件,重启服务器信息。

至此,整个ZTP零配置部署流程完成。

具体配置

3.1 MC-LAG场景准备

3.1.1 物理拓扑

拓扑图

3.1.2设备接口信息

设备接口信息

3.1.3文件导出

完成MC-LAG场景配置后需要导出所有交换机的/etc/sonic/config_db.json文件,并将config_db.json文件改名为设备序列号。以Spine1为例,其序列号如图所示,因此需要将config_db.json改名F018716A006.json。

获取序列号

五台交换机的配置文件如下所示:

五台交换机的配置文件

3.1.4恢复设备出场设置

各交换机以此执行如下命令:

admin@Spine1:~$ sudo sonic-cli
Spine1# delete startup-config

3.1.5启动ZTP服务

以Spine1为例,所有交换机按如下方式开启ZTP服务:

admin@Spine1:~$ sudo config ztp enable
admin@Spine1:~$ sudo config ztp run

3.2 DHCP配置

首先准备好FTP服务器(验证使用10.230.1.11,FTP账号密码为ftpuser/ftpuser),修改DHCP服务器的配置文件/etc/dhcp/dhcpd.conf,再对应网段添加option bootfile-nameftp://ftpuser:ftpuser@10.230.1.11/ztp.json。配置完成后重启dhcp服务。

root@adminserver:/etc/dhcp# vi dhcpd.conf
subnet 10.230.1.0  netmask 255.255.255.0 {
range 10.230.1.100  10.230.1.240;
option routers 10.230.1.1;
option broadcast-address 10.230.1.255;
default-lease-time 21600;
max-lease-time 43200;
allow leasequery;
option domain-name-servers  223.5.5.5,114.114.114.114;
option bootfile-name "ftp://ftpuser:ftpuser@10.230.1.11/ztp.json";
}

3.3 配置文件上传FTP

在ftp的根目录下上传ztp.json文件,文件中要配置好ZTP的操作内容。config_db.json指定配置文件所在目录,identifier字段为使用序列号serial-number作为配置识别参数。

{
  "ztp": {
    "configdb-json": {
      "dynamic-url": {
        "source": {
          "prefix": "ftp://ftpuser:ftpuser@10.230.1.11/ZTP_CFG/",
          "identifier": "serial-number",
          "suffix": ".json"
        },
        "destination": "/etc/sonic/config_db.json"
      }
    },
     "reboot-on-success": true
  }
}

上传config_db.json配置文件到FTP的ZTP_CFG目录下。

config_db.json文件

重启设备,启动后设备将打印ZTP输出结果。打印成功后,可以开始进行配置验证工作。

输出打印

验证

4.1 配置验证

4.1.1 Spine1

Spine1# show running-config
!
interface ethernet 0/0
 fec rs
 ip address 10.0.10.2/30
 mtu 9216
 speed 100000
exit
!
interface ethernet 0/4
 fec rs
 ip address 10.0.20.2/30
 mtu 9216
 speed 100000
exit
!
interface ethernet 0/8
 fec rs
 ip address 10.0.30.2/30
 mtu 9216
 speed 100000
exit
!
interface ethernet 0/12
 fec rs
 ip address 10.0.40.2/30
 mtu 9216
 speed 100000
exit
!
interface loopback 0
 ip address 10.10.25.1/32
exit
!
hostname Spine1
!
interface mgmt 0
 ip address 10.230.1.7/24 gw 10.230.1.1
exit
!
router bgp 65201
 bgp router-id 10.10.25.1
 no bgp ebgp-requires-policy
 neighbor PEER_V4_EBGP peer-group
 neighbor PEER_V4_EBGP bfd
 neighbor 10.0.10.1 remote-as 65101
 neighbor 10.0.10.1 peer-group PEER_V4_EBGP
 neighbor 10.0.20.1 remote-as 65101
 neighbor 10.0.20.1 peer-group PEER_V4_EBGP
 neighbor 10.0.30.1 remote-as 65102
 neighbor 10.0.30.1 peer-group PEER_V4_EBGP
 neighbor 10.0.40.1 remote-as 65102
 neighbor 10.0.40.1 peer-group PEER_V4_EBGP
 !
 address-family ipv4 unicast
  network 10.10.25.1/32
 exit-address-family
 !
 address-family l2vpn evpn
  neighbor PEER_V4_EBGP activate
  advertise-all-vni
 exit-address-family
exit
!
end

4.1.2 Leaf1

Leaf1# show running-config
!
interface vxlan 0
 source 10.10.25.3
exit
!
vrf 100
 mac 60:eb:5a:00:86:20
 vni 1000 vxlan 0
exit-vrf
!
vlan 100
 vni 10
!
vlan 300
!
interface link-aggregation 1
 description server1
 switchport access vlan 100
exit
!
interface link-aggregation 2
 switchport trunk vlan 100
 switchport trunk vlan 300
exit
!
interface ethernet 0/0
 mtu 9216
 no fec
 speed 10000
 link-aggregation-group 1
exit
!
interface ethernet 0/48
 fec rs
 ip address 10.0.10.1/30
 mtu 9216
 speed 100000
exit
!
interface ethernet 0/52
 fec rs
 mtu 9216
 speed 100000
exit
!
interface ethernet 0/56
 fec rs
 mtu 9216
 speed 100000
 link-aggregation-group 2
exit
!
interface ethernet 0/60
 fec rs
 mtu 9216
 speed 100000
 link-aggregation-group 2
exit
!
interface ethernet 0/64
 fec rs
 mtu 9216
 speed 100000
exit
!
interface ethernet 0/68
 fec rs
 mtu 9216
 speed 100000
exit
!
interface ethernet 0/72
 fec rs
 mtu 9216
 speed 100000
exit
!
interface ethernet 0/76
 fec rs
 mtu 9216
 speed 100000
exit
!
interface loopback 0
 ip address 10.10.25.3/32
exit
!
interface vlan 100
 ip address 100.0.10.1/24
 mac-address 18:17:25:37:64:40
 vrf 100
exit
!
interface vlan 300
 ip address 10.0.0.3/24
exit
!
hostname Leaf1
!
interface mgmt 0
 ip address 10.230.1.18/24 gw 10.230.1.1
exit
!
mclag domain 1
 local-address 10.0.0.3
 peer-address 10.0.0.4
 peer-link link-aggregation 2
 commit
 member lag 1
!
router bgp 65101
 bgp router-id 10.10.25.3
 no bgp ebgp-requires-policy
 neighbor 10.0.10.2 remote-as 65201
 neighbor 10.0.10.2 bfd
 !
 address-family ipv4 unicast
  network 10.10.25.3/32
network 10.0.10.1/30
 exit-address-family
 !
 address-family l2vpn evpn
  neighbor 10.0.10.2 activate
  advertise-all-vni
 exit-address-family
exit
!
end

4.1.3 Leaf2

Leaf2# show running-config
!
interface vxlan 0
 source 10.10.25.3
exit
!
vrf 100
 mac 60:eb:5a:00:86:20
 vni 1000 vxlan 0
exit-vrf
!
vlan 100
 vni 10
!
vlan 300
!
interface link-aggregation 1
 switchport access vlan 100
exit
!
interface link-aggregation 2
 switchport trunk vlan 100
 switchport trunk vlan 300
exit
!
interface ethernet 0/0
 mtu 9216
 no fec
 speed 10000
 link-aggregation-group 1
exit
!
interface ethernet 0/48
 fec rs
 ip address 10.0.20.1/30
 mtu 9216
 speed 100000
exit
!
interface ethernet 0/56
 fec rs
 mtu 9216
 speed 100000
 link-aggregation-group 2
exit
!
interface ethernet 0/60
 fec rs
 mtu 9216
 speed 100000
 link-aggregation-group 2
exit
!
interface loopback 0
 ip address 10.10.25.3/32
exit
!
interface vlan 100
 ip address 100.0.10.1/24
 mac-address 18:17:25:37:64:40
 vrf 100
exit
!
interface vlan 300
 ip address 10.0.0.4/24
exit
!
hostname Leaf2
!
interface mgmt 0
 ip address 10.230.1.19/24 gw 10.230.1.1
exit
!
mclag domain 1
 local-address 10.0.0.4
 peer-address 10.0.0.3
 peer-link link-aggregation 2
 commit
 member lag 1
!
router bgp 65101
 bgp router-id 10.10.25.3
 no bgp ebgp-requires-policy
 neighbor 10.0.20.2 remote-as 65201
 neighbor 10.0.20.2 bfd
 !
 address-family ipv4 unicast
  network 10.10.25.3/32
network 10.0.20.1/30
 exit-address-family
 !
 address-family l2vpn evpn
  neighbor 10.0.20.2 activate
  advertise-all-vni
 exit-address-family
exit
!
end

4.1.4 Leaf3

Leaf3# show running-config
!
interface vxlan 0
 source 10.10.25.4
exit
!
vrf 200
 mac 60:eb:5a:00:86:22
 vni 1000 vxlan 0
exit-vrf
!
vlan 200
 vni 20
!
vlan 300
!
interface link-aggregation 1
 switchport access vlan 200
exit
!
interface link-aggregation 2
 switchport trunk vlan 200
 switchport trunk vlan 300
exit
!
interface ethernet 0/0
 mtu 9216
 no fec
 speed 10000
 link-aggregation-group 1
exit
!
interface ethernet 0/48
 fec rs
 ip address 10.0.30.1/30
 mtu 9216
 speed 100000
exit
!
interface ethernet 0/56
 fec rs
 mtu 9216
 speed 100000
 link-aggregation-group 2
exit
!
interface ethernet 0/60
 fec rs
 mtu 9216
 speed 100000
 link-aggregation-group 2
exit
!
interface loopback 0
 ip address 10.10.25.4/32
exit
!
interface vlan 200
 ip address 100.0.20.1/24
 mac-address 18:17:25:37:64:32
 vrf 200
exit
!
interface vlan 300
 ip address 10.0.0.5/24
exit
!
hostname Leaf3
!
interface mgmt 0
 ip address 10.230.1.20/24 gw 10.230.1.1
exit
!
mclag domain 1
 local-address 10.0.0.5
 peer-address 10.0.0.6
 peer-link link-aggregation 2
 commit
 member lag 1
!
router bgp 65102
 bgp router-id 10.10.25.4
 no bgp ebgp-requires-policy
 neighbor 10.0.30.2 remote-as 65201
 neighbor 10.0.30.2 bfd
 !
 address-family ipv4 unicast
  network 10.10.25.4/32
network 10.0.30.1/30
 exit-address-family
 !
 address-family l2vpn evpn
  neighbor 10.0.30.2 activate
  advertise-all-vni
 exit-address-family
exit
!
end

4.1.5 Leaf4

Leaf4# show running-config
!
interface vxlan 0
 source 10.10.25.4
exit
!
vrf 200
 mac 60:eb:5a:00:86:22
 vni 1000 vxlan 0
exit-vrf
!
vlan 200
 vni 20
!
vlan 300
!
interface link-aggregation 1
 switchport access vlan 200
exit
!
interface link-aggregation 2
 switchport trunk vlan 200
 switchport trunk vlan 300
exit
!
interface ethernet 0/0
 mtu 9216
 no fec
 speed 10000
 link-aggregation-group 1
exit
!
interface ethernet 0/48
 fec rs
 ip address 10.0.40.1/30
 mtu 9216
 speed 100000
exit
!
interface ethernet 0/56
 fec rs
 mtu 9216
 speed 100000
 link-aggregation-group 2
exit
!
interface ethernet 0/60
 fec rs
 mtu 9216
 speed 100000
 link-aggregation-group 2
exit
!
interface loopback 0
 ip address 10.10.25.4/32
exit
!
interface vlan 200
 ip address 100.0.20.1/24
 mac-address 18:17:25:37:64:32
 vrf 200
exit
!
interface vlan 300
 ip address 10.0.0.6/24
exit
!
hostname Leaf4
!
interface mgmt 0
 ip address 10.230.1.21/24 gw 10.230.1.1
exit
!
mclag domain 1
 local-address 10.0.0.6
 peer-address 10.0.0.5
 peer-link link-aggregation 2
 commit
 member lag 1
!
router bgp 65102
 bgp router-id 10.10.25.4
 no bgp ebgp-requires-policy
 neighbor 10.0.40.2 remote-as 65201
 neighbor 10.0.40.2 bfd
 !
 address-family ipv4 unicast
  network 10.10.25.4/32
network 10.0.40.1/30
 exit-address-family
 !
 address-family l2vpn evpn
  neighbor 10.0.40.2 activate
  advertise-all-vni
 exit-address-family
exit
!
end

4.2 服务器连通性验证

4.2.1 服务器配置

Server1:
网卡配置
4.2.1-1
路由添加
[root@server1 ~]# route add -net 100.0.20.0 netmask 255.255.255.0  gw 100.0.10.1 dev bond0
Server2:
网卡配置
4.2.1-2

路由添加
[root@server2 ~]# route add -net 100.0.10.0 netmask 255.255.255.0 gw 100.0.20.1 dev bond0

4.2.2 服务器互相访问

Server1:

4.2.2-1

Server2:

4.2.2-2

4.3 交换机功能验证

4.3.1 BGP

Spine1:

4.3.1-1

Leaf1:

4.3.1-2

Leaf2:

4.3.1-3

Leaf3:

4.3.1-4

Leaf4:

4.3.1-5

4.3.2 MC-LAG

Leaf1:

4.3.2-1

Leaf2:

4.3.2-2

Leaf3:

4.3.2-3

Leaf4:

4.3.2-4

4.3.3 VXLAN EVPN

Leaf1:

4.3.3-1

Leaf2:

4.3.3-2

Leaf3:

4.3.3-3

Leaf4:

4.3.3-4

4.3.4 路由

Leaf1:

4.3.4-1

Leaf2:

4.3.4-2

Leaf3:

4.3.4-3

Leaf4:

4.3.4-4

部署指南:基于Asterfusion CX312-T和CX532-T部署 EVPN-VXLAN

1 目标与物理网络拓扑

2 硬件与软件环境

3 解决方案:BGP EVPN和VXLAN

3.1 逻辑组网与配置思路

3.2 配置步骤

4 测试结果

1 目标与物理网络拓扑

本文主要描述如何在Asterfusion CX312P-T和CX532P-T(以下简称CX312和CX532)搭建的网络上部署如下解决方案:

  • BGP EVPNVXLAN

在网络上承载VXLAN网络,将原本在服务器上进行的封装、去封装全部从Server端卸载到CX312内的VTEP上,并且在网络上启动BGP EVPN,自动化地创建VXLAN隧道、传递虚拟网络路由。

如上解决方案共用一个物理拓扑,如图1所示:

物理网络拓扑
图1:物理网络拓扑

部署过程中所涉及到的设备、接口及管理网口的IP地址如下表1所示:

设备名称设备型号IP地址备注
Spine1CX532-T10.230.1.7
Spine2CX532-T10.230.1.8
Leaf1CX312-T10.230.1.18
Leaf2CX312-T10.230.1.19
Servrr1X8610.230.1.11互联网口ens1f2
Servrr2X8610.230.1.12互联网口ens1f3

表1:设备管理口列表

2 硬件与软件环境

部署环境中涉及到的硬件和软件如表2和表3所示:

名称型号硬件指标数量备注
交换机CX532-T【参见产品彩页】2
交换机CX312-T【参见产品彩页】2
服务器X862本方案采用10G网卡
光模块10GSFP+4
光模块100GQSFP2812
光纤多模100G适用6
光纤多模10G/25G适用2

表2:硬件环境

名称版本
AFCV5.0.0
服务器系统CentOS Linux 7.9.2009
服务器内核3.10.0-1127.18.2.el7

表3:软件环境

3 解决方案:BGP EVPN和VXLAN

3.1 逻辑组网与配置思路

BGP EVPN和VXLAN方案网络拓扑与接口配置

图3:BGP EVPN和VXLAN方案网络拓扑与接口配置

配置思路:

  1. 配置各交换机的端口IP信息
  2. 配置Leaf1和Leaf2的VLAN信息
  3. 配置各交换机的BGP
  4. 配置Leaf1和Leaf2使能EVPN
  5. Leaf1和Leaf2创建Vnet,绑定VLAN
  6. Leaf1和Leaf2配置二层和三层VXLAN映射
  7. 配置Server1和Server2的IP和路由信息
  8. 测试Server1和Server2的连通性
  9. 查看Leaf1的路由信息
  10. 查看Leaf2的路由信息

3.2 配置步骤

  • 配置各交换机的端口IP信息
Spine1:
sudo config interface ip add Ethernet4 10.0.10.2/24
sudo config interface ip add Ethernet8 10.0.11.2/24

Spine2:
sudo config interface ip add Ethernet4 10.1.10.2/24
sudo config interface ip add Ethernet8 10.1.11.2/24

Leaf1:
sudo config interface ip add Ethernet48 10.0.10.1/24
sudo config interface ip add Ethernet52 10.1.10.1/24

Leaf2:
sudo config interface ip add Ethernet48 10.0.11.1/24
sudo config interface ip add Ethernet52 10.1.11.1/24
  • 配置Leaf1和Leaf2的VLAN信息并配置好网口速率
Leaf1:
sudo config vlan add 10
sudo config interface ip add Vlan10 100.0.10.1/24
sudo config interface mac_address set Vlan10 18:17:25:55:17:69
sudo config vlan member add 10 Ethernet2 -u
sudo config interface speed Ethernet2 10000

Leaf2:
sudo config vlan add 20
sudo config interface ip add Vlan20 100.0.20.1/24
sudo config interface mac_address set Vlan20 18:17:25:55:17:71
sudo config vlan member add 20 Ethernet3 -u
sudo config interface speed Ethernet3 10000
  • 配置各交换机的BGP
Spine1:
sudo config bgp asn 65228
sudo config interface ip add Loopback0 10.10.0.100/32
sudo config bgp add neighbor 10.0.10.1 -a 65230 -l 10.0.10.2 -n Leaf1
sudo config bgp add neighbor 10.0.11.1 -a 65231 -l 10.0.11.2 -n Leaf2

Spine2:
sudo config bgp asn 65229
sudo config interface ip add Loopback0 10.10.0.110/32
sudo config bgp add neighbor 10.1.10.1 -a 65230 -l 10.1.10.2 -n Leaf1
sudo config bgp add neighbor 10.1.11.1 -a 65231 -l 10.1.11.2 -n Leaf2

Leaf1:
sudo config bgp asn 65230
sudo config interface ip add Loopback0 10.10.0.120/32
sudo config bgp add neighbor 10.0.10.2 -a 65228 -l 10.0.10.1 -n Spine1
sudo config bgp add neighbor 10.1.10.2 -a 65229 -l 10.1.10.1 -n Spine2

Leaf2:
sudo config bgp asn 65231
sudo config interface ip add Loopback0 10.10.0.130/32
sudo config bgp add neighbor 10.0.11.2 -a 65228 -l 10.0.11.1 -n Spine1
sudo config bgp add neighbor 10.1.11.2 -a 65229 -l 10.1.11.1 -n Spine2
  • 配置Leaf1和Leaf2使能EPVN
Leaf1:
sudo config evpn enable 10.10.0.120

Leaf2:
sudo config evpn enable 10.10.0.130
  • Leaf1和Leaf2创建Vnet,绑定VLAN
Leaf1:
sudo config vnet add Vnet123 -mac 18:17:25:55:17:69
sudo config interface vnet bind Vlan10 Vnet123 

Leaf2:
sudo config vnet add Vnet456 -mac 18:17:25:55:17:71
sudo config interface vnet bind Vlan20 Vnet456
  • Leaf1和Leaf2配置二层和三层VXLAN映射
Leaf1:
sudo config evpn map add 10 Vlan10
sudo config evpn map add 1000 Vnet123

Leaf2:
sudo config evpn map add 20 Vlan20
sudo config evpn map add 1000 Vnet456
sudo config evpn enable 10.10.0.130
  • 保存配置并重新加载
sudo config save -y
sudo config reload -y
  • 配置Server1和Server2的IP和路由信息
Server1:
[root@server1 ~]# ifconfig ens1f2

 
[root@server1 ~]# route add -net 100.0.20.0 netmask 255.255.255.0 gw 100.0.10.1 dev ens1f2

Server:2

 
[root@server1 ~]# route add -net 100.0.10.0 netmask 255.255.255.0 gw 100.0.20.1 dev ens1f3
  • 测试Server1和Server2的连通性
[root@server1 ~]# ping 100.0.20.3

 
[root@server1 ~]# ping 100.0.10.2

 
  • 查看Leaf1的路由信息
查看VTEP信息
admin@Leaf1:~$ show evpn status

交换机路由信息
admin@Leaf1:~$ ip route show


下面信息显示Server2的路由转发到了Leaf1

admin@Leaf1:~$ ip neigh show nud all | grep Vlan

admin@Leaf1:~$ sudo bridge fdb|grep vxlan

admin@Leaf1:~$ show ip route vrf Vnet123
  • 查看Leaf2的路由信息
查看VTEP信息
admin@Leaf2:~$ show evpn status

交换机路由信息
admin@Leaf2:~$ ip route show

下面信息显示Server2的路由转发到了Leaf1
admin@Leaf2:~$ ip neigh show nud all | grep Vlan

admin@Leaf2:~$ sudo bridge fdb |grep vxlan

admin@Leaf2:~$ show ip route vrf Vnet123

4 测试结果

  • Server1Server2之间使用交换机建立的VXLAN通道完成了通信;
  • Leaf1Leaf2对服务器之间的通信进行了VXLAN封装/去封装和L2/L3路由转发。

结论: VXLAN网络的封装、去封装可以从Server端卸载到CX312内的VTEP上,并且在网络上启动BGP EVPN,自动化地创建VXLAN隧道、传递虚拟网络路由。

部署教程:在VM上进行Soft-RoCE的功能验证与性能测试

1 概述

2 硬件与软件环境

3 验证思路及过程

3.1 验证思路

3.2 验证过程

3.2.1 配置部署Soft-RoCE

3.2.2 配置部署MPI环境

3.2.3 安装性能测试工具

3.2.4 进行性能对比测试

3.2.5 进行可用性测试

4 总结

1概述

RDMA(Remote Direct Memory Access)技术是一种基于网络的内存访问技术,它允许内存数据在计算机之间直接传输,无需CPU或操作系统的参与。目前,RDMA技术被广泛应用于超算、AI训练、存储等网络密集型场景。虽然RDMA技术的性能十分可观,但是需要专用的RDMA网卡,为了兼容普通网卡,IBTA提出了一种RDMA的软件实现方式——SoftRoCE。SoftRoCE整体由软件实现,底层使用普通的以太网卡,和硬件方案相比性能较差,但优势在于能用普通以太网卡与RDMA网卡通信。

本文档主要讲解如何在RHEL的社区发行版Rocky 8.5系统上配置部署SoftRoCE,进行TCP/IP模式和SoftRoCE模式的性能对比测试,以及是否可以正常运行MPI应用。

2硬件与软件环境

验证过程中涉及到的硬件和软件环境如表2-1和表2-2所示。

配置信息备注
CPU8 vCPUs
内存8 GB
硬盘100GB
网卡10GE
表2-1:虚拟机配置
软件版本备注
系统Rocky Linux 8.5
iperf33.5
perftest23.04.0.0.23
OpenMPI4.1.1
OSU Micro-Benchmarks5.6.3
表2-2:软件环境

3验证思路及过程

3.1验证思路

为了验证Soft-RoCE当前版本的可用性和性能,本次验证使用了2台Linux虚拟机配置部署Soft-RoCE,并进行RDMA网卡参数配置、MPI运行环境和应用的安装配置,最后再进行性能测试。

3.2验证过程

两台Server上需要进行同样的操作,此处只展示Server1上的操作步骤。

3.2.1配置部署Soft-RoCE

# 安装Soft-RoCE
[root@server1 ~]# dnf install rdma-core iproute libibverbs libibverbs-utils infiniband-diags
[root@server1 ~]# modprobe rdma_rxe
[root@server1 ~]# lsmod | grep rxe
rdma_rxe             131072  0
ib_uverbs            159744  2 rdma_rxe,rdma_ucm
ip6_udp_tunnel      16384   1 rdma_rxe
udp_tunnel           20480   1 rdma_rxe
ib_core               393216  11 rdma_cm,rdma_rxe,rpcrdma,ib_srpt,iw_cm,ib_iser, ib_umad,ib_isert,rdma_ucm,ib_uverbs,ib_cm
# 创建Soft-RoCE接口
[root@server1 ~]# rdma link add rxe_eth0 type rxe netdev ens192
[root@server1 ~]# ibv_devices 
    device                 node GUID
    ------              ----------------
rxe_eth0            020c29fffee73e3f
# 尝试配置无损相关参数,发现不可配置
[root@server1 ~]# ls /sys/class/net/
ens192  lo  virbr0  virbr0-nic
[root@server1 ~]# ls /sys/class/net/ens192/ -lh
total 0
-r--r--r--.  1 root root 4.0K Feb 21 16:41 addr_assign_type
-r--r--r--.  1 root root 4.0K Feb 21 16:41 address
-r--r--r--.  1 root root 4.0K Feb 21 16:41 addr_len
-r--r--r--.  1 root root 4.0K Feb 21 16:41 broadcast
-rw-r--r--.  1 root root 4.0K Feb 21 16:41 carrier
-r--r--r--.  1 root root 4.0K Feb 21 16:41 carrier_changes
-r--r--r--.  1 root root 4.0K Feb 21 16:41 carrier_down_count
-r--r--r--.  1 root root 4.0K Feb 21 16:41 carrier_up_count
lrwxrwxrwx.  1 root root    0 Feb 21 16:41 device -> ../../../0000:0b:00.0
-r--r--r--.  1 root root 4.0K Feb 21 16:41 dev_id
-r--r--r--.  1 root root 4.0K Feb 21 16:41 dev_port
-r--r--r--.  1 root root 4.0K Feb 21 16:41 dormant
-r--r--r--.  1 root root 4.0K Feb 21 16:41 duplex
-rw-r--r--.  1 root root 4.0K Feb 21 16:41 flags
-rw-r--r--.  1 root root 4.0K Feb 21 16:41 gro_flush_timeout
-rw-r--r--.  1 root root 4.0K Feb 21 16:41 ifalias
-r--r--r--.  1 root root 4.0K Feb 21 16:41 ifindex
-r--r--r--.  1 root root 4.0K Feb 21 16:41 iflink
-r--r--r--.  1 root root 4.0K Feb 21 16:41 link_mode
-rw-r--r--.  1 root root 4.0K Feb 21 16:41 mtu
-r--r--r--.  1 root root 4.0K Feb 21 16:41 name_assign_type
-rw-r--r--.  1 root root 4.0K Feb 21 16:41 napi_defer_hard_irqs
-rw-r--r--.  1 root root 4.0K Feb 21 16:41 netdev_group
-r--r--r--.  1 root root 4.0K Feb 21 16:41 operstate
-r--r--r--.  1 root root 4.0K Feb 21 16:41 phys_port_id
-r--r--r--.  1 root root 4.0K Feb 21 16:41 phys_port_name
-r--r--r--.  1 root root 4.0K Feb 21 16:41 phys_switch_id
drwxr-xr-x.  2 root root    0 Feb 21 16:41 power
-rw-r--r--.  1 root root 4.0K Feb 21 16:41 proto_down
drwxr-xr-x. 18 root root    0 Feb 21 16:41 queues
-r--r--r--.  1 root root 4.0K Feb 21 16:41 speed
drwxr-xr-x.  2 root root    0 Feb 21 16:41 statistics
lrwxrwxrwx.  1 root root    0 Feb 21 16:41 subsystem -> ../../../../../../class/net
-r--r--r--.  1 root root 4.0K Feb 21 16:41 testing
-rw-r--r--.  1 root root 4.0K Feb 21 16:41 threaded
-rw-r--r--.  1 root root 4.0K Feb 21 16:41 tx_queue_len
-r--r--r--.  1 root root 4.0K Feb 21 16:41 type
-rw-r--r--.  1 root root 4.0K Feb 21 16:41 uevent

3.2.2配置部署MPI环境

# 安装OpenMPI
[root@server1 ~]# dnf install openmpi openmpi-devel
[root@server1 ~]# vim .bashrc
# 配置OpenMPI的环境变量
[root@server1 ~]# export PATH=$PATH:/usr/lib64/openmpi/bin
[root@server1 ~]# export LD_LIBRARY_PATH=$LD_LIBRARY_PATH:/usr/lib64/openmpi/lib
[root@server1 ~]# source .bashr
[root@server1 ~]# mpirun --version
mpirun (Open MPI) 4.1.1

Report bugs to http://www.open-mpi.org/community/help/
# 修改主机名,配置免密登陆和Hosts
[root@server1 ~]# hostname server1
[root@server1 ~]# ssh-keygen
[root@server1 ~]# ssh-copy-id root@10.240.3.52
[root@server1 ~]# cat /etc/hosts 
127.0.0.1   localhost localhost.localdomain localhost4 localhost4.localdomain4
::1         localhost localhost.localdomain localhost6 localhost6.localdomain6

10.240.3.51 server1
10.240.3.52 server2
# 测试MPI运行环境
[root@server1 ~]# mpirun --allow-run-as-root -np 2 -host server1,server2 /usr/bin/hostname
server1
server2

3.2.3安装性能测试工具

# 安装iperf3
[root@server1 ~]# dnf install iperf3
# 安装perftest
[root@server1 ~]# dnf install perftest
# 安装OSU Micro-Benchmarks
[root@server1 ~]# dnf group install "Development Tools"
[root@server1 ~]# mkdir mpi
[root@server1 ~]# cd mpi/
[root@server1 mpi]# wget http://mvapich.cse.ohio-state.edu/download/mvapich/osu-micro-benchmarks-5.6.3.tar.gz
[root@server1 mpi]# tar xvf osu-micro-benchmarks-5.6.3.tar.gz
[root@server1 mpi]# cd osu-micro-benchmarks-5.6.3/
[root@server1 osu-micro-benchmarks-5.6.3]# ./configure CC=mpicc CXX=mpicc
[root@server1 osu-micro-benchmarks-5.6.3]# make -j
[root@server1 osu-micro-benchmarks-5.6.3]# ls -lt mpi/pt2pt/
total 1556
-rwxr-xr-x. 1 root root 153800 Feb 27 10:41 osu_latency_mp
-rwxr-xr-x. 1 root root 162600 Feb 27 10:41 osu_latency_mt
-rwxr-xr-x. 1 root root 153744 Feb 27 10:41 osu_bibw
-rwxr-xr-x. 1 root root 153672 Feb 27 10:41 osu_multi_lat
-rwxr-xr-x. 1 root root 152408 Feb 27 10:41 osu_latency
-rwxr-xr-x. 1 root root 153472 Feb 27 10:41 osu_bw
-rwxr-xr-x. 1 root root 159712 Feb 27 10:41 osu_mbw_mr
-rw-r--r--. 1 root root  43720 Feb 27 10:41 osu_latency_mp.o
-rw-r--r--. 1 root root  73792 Feb 27 10:41 osu_latency_mt.o
-rw-r--r--. 1 root root  62176 Feb 27 10:41 osu_mbw_mr.o
-rw-r--r--. 1 root root  43128 Feb 27 10:41 osu_bibw.o
-rw-r--r--. 1 root root  42336 Feb 27 10:41 osu_bw.o
-rw-r--r--. 1 root root  42776 Feb 27 10:41 osu_multi_lat.o
-rw-r--r--. 1 root root  39320 Feb 27 10:41 osu_latency.o
-rw-r--r--. 1 root root  27797 Feb 27 10:40 Makefile
-rw-rw-r--. 1 1006 1006  28560 Jun  1  2020 Makefile.in
-rw-rw-r--. 1 1006 1006   1446 Jun  1  2020 Makefile.am
-rw-rw-r--. 1 1006 1006   5283 Jun  1  2020 osu_bibw.c
-rw-rw-r--. 1 1006 1006   4836 Jun  1  2020 osu_bw.c
-rw-rw-r--. 1 1006 1006   4439 Jun  1  2020 osu_latency.c
-rw-rw-r--. 1 1006 1006   5892 Jun  1  2020 osu_latency_mp.c
-rw-rw-r--. 1 1006 1006   9971 Jun  1  2020 osu_latency_mt.c
-rw-rw-r--. 1 1006 1006   9775 Jun  1  2020 osu_mbw_mr.c
-rw-rw-r--. 1 1006 1006   5022 Jun  1  2020 osu_multi_lat.c

3.2.4进行性能对比测试

# 使用iperf3的测试结果作为参照(在server1上运行server端,在server2上运行client端)
[root@server2 ~]# iperf3 -c 10.240.3.51
Connecting to host 10.240.3.51, port 5201
[  5] local 10.240.3.52 port 58984 connected to 10.240.3.51 port 5201
[ ID] Interval           Transfer     Bitrate         Retr  Cwnd
[  5]   0.00-1.00   sec   894 MBytes  7.50 Gbits/sec    0    844 KBytes       
[  5]   1.00-2.00   sec   906 MBytes  7.60 Gbits/sec    0    887 KBytes       
[  5]   2.00-3.00   sec   900 MBytes  7.55 Gbits/sec    0   1.20 MBytes       
[  5]   3.00-4.00   sec   915 MBytes  7.68 Gbits/sec    0   1.37 MBytes       
[  5]   4.00-5.00   sec   904 MBytes  7.58 Gbits/sec    0   1.37 MBytes       
[  5]   5.00-6.00   sec   888 MBytes  7.45 Gbits/sec    0   1.37 MBytes       
[  5]   6.00-7.00   sec   998 MBytes  8.37 Gbits/sec    0   1.37 MBytes       
[  5]   7.00-8.00   sec   859 MBytes  7.21 Gbits/sec    0   1.37 MBytes       
[  5]   8.00-9.00   sec  1.01 GBytes  8.67 Gbits/sec    0   1.37 MBytes       
[  5]   9.00-10.00  sec   914 MBytes  7.67 Gbits/sec    0   1.37 MBytes       
- - - - - - - - - - - - - - - - - - - - - - - - -
[ ID] Interval           Transfer     Bitrate         Retr
[  5]   0.00-10.00  sec  8.99 GBytes  7.73 Gbits/sec    0             sender
[  5]   0.00-10.04  sec  8.99 GBytes  7.69 Gbits/sec                  receiver

iperf Done.
# 使用perftest进行Soft-RoCE性能测试

3.2.5进行可用性测试

# 使用iperf3的测试结果作为参照(在server1上运行server端,在server2上运行client端)
[root@server2 ~]# iperf3 -c 10.240.3.51
Connecting to host 10.240.3.51, port 5201
[  5] local 10.240.3.52 port 58984 connected to 10.240.3.51 port 5201
[ ID] Interval           Transfer     Bitrate         Retr  Cwnd
[  5]   0.00-1.00   sec   894 MBytes  7.50 Gbits/sec    0    844 KBytes       
[  5]   1.00-2.00   sec   906 MBytes  7.60 Gbits/sec    0    887 KBytes       
[  5]   2.00-3.00   sec   900 MBytes  7.55 Gbits/sec    0   1.20 MBytes       
[  5]   3.00-4.00   sec   915 MBytes  7.68 Gbits/sec    0   1.37 MBytes       
[  5]   4.00-5.00   sec   904 MBytes  7.58 Gbits/sec    0   1.37 MBytes       
[  5]   5.00-6.00   sec   888 MBytes  7.45 Gbits/sec    0   1.37 MBytes       
[  5]   6.00-7.00   sec   998 MBytes  8.37 Gbits/sec    0   1.37 MBytes       
[  5]   7.00-8.00   sec   859 MBytes  7.21 Gbits/sec    0   1.37 MBytes       
[  5]   8.00-9.00   sec  1.01 GBytes  8.67 Gbits/sec    0   1.37 MBytes       
[  5]   9.00-10.00  sec   914 MBytes  7.67 Gbits/sec    0   1.37 MBytes       
- - - - - - - - - - - - - - - - - - - - - - - - -
[ ID] Interval           Transfer     Bitrate         Retr
[  5]   0.00-10.00  sec  8.99 GBytes  7.73 Gbits/sec    0             sender
[  5]   0.00-10.04  sec  8.99 GBytes  7.69 Gbits/sec                  receiver

iperf Done.
# 使用perftest进行Soft-RoCE性能测试

4总结

功能/可用性方面:
Soft-RoCE可以正常使用IB的性能测试工具,通过配置MPI运行环境,进行简单测试,并运行OMB性能测试工具,也能证明Soft-RoCE可以正常配置承载MPI应用。
性能方面:
由于本次的测试是在虚拟化环境中完成,性能表现情况仅供参考,这次性能测试先使用iperf3进行常规的TCP/IP协议的带宽测试,10Gbps的虚拟网口实测可以跑到8Gbps左右,作为性能参考;再使用ib_send_bw进行RoCEv2的带宽测试,实测可以跑到2Gbps左右,性能不太理想,只能跑到网口实测带宽的1/4左右。

并行文件系统的安装部署与性能测试

1 目标

本文档将简要介绍并行文件系统及其开源方案BeeGFS的基本概念,并选用Asterfusion CX-N系列超低时延云交换机进行组网,完成3节点环境的部署配置和性能测试。

2 概要介绍

2.1 关于并行文件系统

高性能计算机系统(HPC)通过汇总多个计算资源来快速解决大型计算问题,为了让集群中的计算节点更好地配合,通常会为HPC搭建一个用于计算节点之间共享的并行文件系统。

并行文件系统(Parallel File System)是一种经过优化的高性能文件系统,提供毫秒级别访问时延,TB/s级别带宽和百万级别的IOPS,能够快速处理高性能计算(HPC)工作负载。

并行文件系统适用于需要处理大量数据和高度并行化计算的领域,例如:

  1. 科学计算:天气预测、气候模拟、地震模拟、流体力学、生物医学、物理学等需要处理大量实验数据和进行复杂计算的领域;
  2. 工业制造:汽车设计、航空航天、船舶设计、复杂机械制造等需要进行大规模计算和模拟的领域;
  3. 金融:证券交易、风险管理、金融建模等需要处理大量交易数据和进行复杂计算的领域;
  4. 动画制作:电影、电视、游戏等需要进行大规模渲染和图像处理的领域;
  5. 互联网应用:大规模数据挖掘、搜索引擎、社交网络、电子商务等需要处理大量数据和进行实时计算的领域。
    如今,HPC已经从传统的计算密集型(大规模的仿真应用等),转变为数据驱动的以数据为中心的计算(基于大规模数据的生产、处理和分析等),这种转变趋势驱使后端存储不断演进发展,满足高性能和高可扩展性的要求。
    并行文件系统中,文件/数据被切分并放置到多个存储设备中(各个被切分的数据如何放置,由并行文件系统通过算法来控制),系统使用全局名称空间来进行数据访问。并行文件系统的客户端可以同时使用多个 IO 路径将数据读/写到多个存储设备。
    目前,常用的并行文件系统有以下几种:
  6. Lustre:是一种开源的并行分布式文件系统,由Sun Microsystems和Cray公司开发,目前由OpenSFS和欧洲开源软件基金会(EOFS)维护。被广泛应用于高性能计算(HPC)和大规模数据存储领域,具有高性能、高可靠性和高可扩展性等特点;
  7. BeeGFS:是一种高性能、可扩展的并行文件系统,由Fraunhofer Institute for Industrial Mathematics and IT(ITWM)开发。它支持多种数据访问协议,包括POSIX、NFS和SMB等,被广泛应用于高性能计算和大规模数据存储领域;
  8. IBM Spectrum Scale(原名GPFS):是一种高性能、可扩展的并行文件系统,由IBM公司开发,可用于大规模数据存储和分析。它支持多种数据访问协议,包括POSIX、NFS、SMB和HDFS等;
  9. Ceph:是一种开源的分布式存储系统,可以提供块存储、对象存储和文件存储等多种接口,支持高可靠性和可扩展性的数据存储和访问;
  10. PVFS(Parallel Virtual File System):是一种开源的并行文件系统,由Clemson University和Oak Ridge National Laboratory共同开发。被广泛用于科学计算和高性能计算领域,具有高性能和高可扩展性等特点。

这些并行文件系统都具有高性能、高可靠性和高可扩展性等特点,被广泛应用于高性能计算、大规模数据存储和分析等领域。

2.2 关于BeeGFS

BeeGFS原名为FhGFS,是由Fraunhofer Institute为工业数学计算而设计开发,由于在欧洲和美国的中小型HPC系统性能表现良好,在2014年改名注册为BeeGFS并受到科研和商业的广泛应用。

BeeGFS既是一个网络文件系统也是一个并行文件系统。客户端通过网络与存储服务器进行通信(具有TCP/IP或任何具有RDMA功能的互连,如InfiniBand,RoCE或Omni-Path,支持native verbs 接口)。

BeeGFS实现了文件和MetaData的分离。文件是用户希望存储的数据,而MetaData是包括访问权限、文件大小和位置的“关于数据的数据”,MetaData中最重要的是如何从多个文件服务器中找到具体对应的文件,这样才能使客户端获取特定文件或目录的MetaData后,可以直接与存储文件的Stroage服务器对话以检索信息。

BeeGFS的Storage Servers和MetaData Servers的数量可以弹性伸缩。因此,可通过扩展到适当数量的服务器来满足不同性能要求,软件整体架构如下图所示:

BeeGFS整体架构图

图1:BeeGFS整体架构图

组件名称组件包名称说明
管理服务beegfs-mgmtd管理服务用于监控所有已注册服务的状态,不存储用户的任何数据。
注:在进行元数据服务、存储服务、客户端服务配置时,都需要指向管理服务节点IP地址,一般集群部署需要第一个部署的服务,有且只有一个。
元数据服务beegfs-meta元数据服务用于存储文件的元数据信息,如目录结构、权限信息、数据分片存放位置等,一个文件对应一个元数据文件,客户端打开文件时,由元数据服务向客户端提供数据具体存放节点位置,之后客户端直接与存储服务进行数据读写操作,可支持横向扩展,增加多个元数据服务用以提升文件系统性能。
存储服务beegfs-storage存储服务用于存储条带化后的数据块文件。
客户端服务beegfs-client
beegfs-helperd
客户端服务用于集群存储空间挂载,当服务开启时自动挂载到本地路径,之后可通过nfs/samba服务将本地挂载点导出,提供linux/windows客户端访问。
注:挂载路径通过/etc/beegfs/beegfs-mounts.conf 配置文件指定,beegfs-helperd主要用于日志写入,不需要额外的配置。
命令行组件beegfs-utils
beegfs-common
提供命令行工具,如beegfs-ctl、beegfs-df等。
表1:BeeGFS的系统组件

2.3 关于Asterfusion CX-N系列超低时延云交换机

星融元Asterfusion自主开发的面向数据中心网络的CX-N系列超低时延云交换机,为云数据中心的高性能计算集群、存储集群、大数据分析、高频交易、Cloud OS全面融合等多业务场景提供高性能的网络服务。

本次测试环境使用了一台CX532P-N进行组网,这款1U交换机拥有32x100GE QSFP28光口,和2 x 10GE SFP+光口,交换容量高达6.4Tbps。

3 测试环境声明与组网拓扑

3.1 硬件设备与物料

设备类型配置参数数量
交换机CX532P-N(1U, 32 x 100GE QSFP28, 2 x 10GE SFP+)1
模块、线缆100G breakout 4x25G[10G] 的模块、线缆1
服务器处理器:Intel(R) Core(TM) i7-7700
内存:8GB
硬盘:1TB HDD + 1TB SSD
1
服务器处理器:Intel(R) Core(TM) i7-8700
内存:8GB
硬盘:1TB HDD + 1TB SSD
1
服务器处理器:Intel(R) Core(TM) i7-9700
内存:8GB
硬盘:1TB HDD + 1TB SSD
1
表2:硬件设备与物料

3.2 系统和软件版本

设备类型主机名版本
交换机CX532P-NAsterNOS Software, Version 3.1, R0314P06
服务器server4操作系统:openEuler release 22.03 (LTS-SP1)
内核:5.10.0-136.35.0.111.oe2203sp1.x86_64
BeeGFS:7.3.3
OFED驱动:MLNX_OFED_LINUX-5.4-3.6.8.1-openeuler22.03-x86_64
服务器server5操作系统:openEuler release 22.03 (LTS-SP1)
内核:5.10.0-136.35.0.111.oe2203sp1.x86_64
BeeGFS:7.3.3
OFED驱动:MLNX_OFED_LINUX-5.4-3.6.8.1-openeuler22.03-x86_64
服务器server6操作系统:Rocky Linux release 8.8 (Green Obsidian)
内核:4.18.0-477.13.1.el8_8.x86_64
BeeGFS:7.3.3
OFED驱动:MLNX_OFED_LINUX-5.4-3.7.5.0-rhel8.8-x86_64
表3:系统和软件版本

3.3 存储系统规划

主机名节点IP节点角色硬盘划分
server4管理口 10.230.1.54
业务-1 172.16.8.54/24
mgmtd、meta、storagemgmtd:50G NVMe
meta:50G NVMe
storage:500G NVMe
server5管理口 10.230.1.55
业务-1 172.16.8.55/24
mgmtd、meta、storagemgmtd:50G NVMe
meta:50G NVMe
storage:500G NVMe
server6管理口 10.230.1.56
业务-1 172.16.8.56/24
client、helperd/
表4:存储规划

3.4 测试组网拓扑

测试组网拓扑

图2:测试组网拓扑

4 测试结果

4.1 Run BeeGFS Bench

命令行

4.2 Run IOR and mdtest

命令行
命令行
命令行

4.3 Run dbench

命令行

4.4 Run IO500

命令行

5 配置参考

5.1 服务器

5.1.1 安装Mellanox OFED驱动

Server4
# 下载当前系统发行版适用的驱动包
[root@server4 ~]# cat /etc/openEuler-release 
openEuler release 22.03 (LTS-SP1)
[root@server4 ~]# wget https://content.mellanox.com/ofed/MLNX_OFED-5.4-3.6.8.1/MLNX_OFED_LINUX-5.4-3.6.8.1-openeuler22.03-x86_64.tgz
# 编译当前系统内核适用的驱动包
[root@server4 ~]# tar xvf MLNX_OFED_LINUX-5.4-3.6.8.1-openeuler22.03-x86_64.tgz
[root@server4 MLNX_OFED_LINUX-5.4-3.6.8.1-openeuler22.03-x86_64]# cd MLNX_OFED_LINUX-5.4-3.6.8.1-openeuler22.03-x86_64
[root@server4 MLNX_OFED_LINUX-5.4-3.6.8.1-openeuler22.03-x86_64]# ./mlnx_add_kernel_support.sh -m /root/MLNX_OFED_LINUX-5.4-3.6.8.1-openeuler22.03-x86_64
[root@server4 MLNX_OFED_LINUX-5.4-3.6.8.1-openeuler22.03-x86_64]# cd ..
# 安装生成的驱动包
[root@server4 ~]# cp /tmp/MLNX_OFED_LINUX-5.4-3.6.8.1-openeuler22.03-x86_64-ext.tgz ./
[root@server4 ~]# tar xvf MLNX_OFED_LINUX-5.4-3.6.8.1-openeuler22.03-x86_64-ext.tgz
[root@server4 ~]# cd MLNX_OFED_LINUX-5.4-3.6.8.1-openeuler22.03-x86_64-ext
[root@server4 MLNX_OFED_LINUX-5.4-3.6.8.1-openeuler22.03-x86_64-ext]# ./mlnxofedinstall
# 生成initramfs,重启生效
[root@server4 MLNX_OFED_LINUX-5.4-3.6.8.1-openeuler22.03-x86_64-ext]# dracut -f
[root@server4 MLNX_OFED_LINUX-5.4-3.6.8.1-openeuler22.03-x86_64-ext]# reboot
# 启动openibd,检查驱动运行状态
[root@server4 ~]# /etc/init.d/openibd restart
[root@server4 ~]# /etc/init.d/openibd status

  HCA driver loaded

Configured Mellanox EN devices:
enp1s0f0
enp1s0f1

Currently active Mellanox devices:
enp1s0f0
enp1s0f1

The following OFED modules are loaded:

  rdma_ucm
  rdma_cm
  ib_ipoib
  mlx5_core
  mlx5_ib
  ib_uverbs
  ib_umad
  ib_cm
  ib_core
  mlxfw

[root@server4 ~]# 

Server5
# 下载当前系统发行版适用的驱动包
[root@server5 ~]# cat /etc/openEuler-release 
openEuler release 22.03 (LTS-SP1)
[root@server5 ~]# wget https://content.mellanox.com/ofed/MLNX_OFED-5.4-3.6.8.1/MLNX_OFED_LINUX-5.4-3.6.8.1-openeuler22.03-x86_64.tgz
# 编译当前系统内核适用的驱动包
[root@server5 ~]# tar xvf MLNX_OFED_LINUX-5.4-3.6.8.1-openeuler22.03-x86_64.tgz
[root@server5 MLNX_OFED_LINUX-5.4-3.6.8.1-openeuler22.03-x86_64]# cd MLNX_OFED_LINUX-5.4-3.6.8.1-openeuler22.03-x86_64
[root@server5 MLNX_OFED_LINUX-5.4-3.6.8.1-openeuler22.03-x86_64]# ./mlnx_add_kernel_support.sh -m /root/MLNX_OFED_LINUX-5.4-3.6.8.1-openeuler22.03-x86_64
[root@server5 MLNX_OFED_LINUX-5.4-3.6.8.1-openeuler22.03-x86_64]# cd ..
# 安装生成的驱动包
[root@server5 ~]# cp /tmp/MLNX_OFED_LINUX-5.4-3.6.8.1-openeuler22.03-x86_64-ext.tgz ./
[root@server5 ~]# tar xvf MLNX_OFED_LINUX-5.4-3.6.8.1-openeuler22.03-x86_64-ext.tgz
[root@server5 ~]# cd MLNX_OFED_LINUX-5.4-3.6.8.1-openeuler22.03-x86_64-ext
[root@server5 MLNX_OFED_LINUX-5.4-3.6.8.1-openeuler22.03-x86_64-ext]# ./mlnxofedinstall
# 生成initramfs,重启生效
[root@server5 MLNX_OFED_LINUX-5.4-3.6.8.1-openeuler22.03-x86_64-ext]# dracut -f
[root@server5 MLNX_OFED_LINUX-5.4-3.6.8.1-openeuler22.03-x86_64-ext]# reboot
# 启动openibd,检查驱动运行状态
[root@server5 ~]# /etc/init.d/openibd restart
[root@server5 ~]# /etc/init.d/openibd status

  HCA driver loaded

Configured Mellanox EN devices:
enp1s0f0
enp1s0f1

Currently active Mellanox devices:
enp1s0f0
enp1s0f1

The following OFED modules are loaded:

  rdma_ucm
  rdma_cm
  ib_ipoib
  mlx5_core
  mlx5_ib
  ib_uverbs
  ib_umad
  ib_cm
  ib_core
  mlxfw

[root@server5 ~]# 

Server6
# 下载当前系统发行版适用的驱动包
[root@server6 ~]# cat /etc/rocky-release
Rocky Linux release 8.8 (Green Obsidian)
[root@server6 ~]# wget https://content.mellanox.com/ofed/MLNX_OFED-5.4-3.7.5.0/MLNX_OFED_LINUX-5.4-3.7.5.0-rhel8.8-x86_64.tgz
# 编译当前系统内核适用的驱动包
[root@server6 ~]# tar xvf MLNX_OFED_LINUX-5.4-3.7.5.0-rhel8.8-x86_64.tgz
[root@server6 MLNX_OFED_LINUX-5.4-3.7.5.0-rhel8.8-x86_64]# cd MLNX_OFED_LINUX-5.4-3.7.5.0-rhel8.8-x86_64
[root@server6 MLNX_OFED_LINUX-5.4-3.7.5.0-rhel8.8-x86_64]# ./mlnx_add_kernel_support.sh -m /root/MLNX_OFED_LINUX-5.4-3.7.5.0-rhel8.8-x86_64
[root@server6 MLNX_OFED_LINUX-5.4-3.7.5.0-rhel8.8-x86_64]# cd ..
# 安装生成的驱动包
[root@server6 ~]# cp /tmp/MLNX_OFED_LINUX-5.4-3.7.5.0-rhel8.8-x86_64-ext.tgz ./
[root@server6 ~]# tar xvf MLNX_OFED_LINUX-5.4-3.7.5.0-rhel8.8-x86_64-ext.tgz
[root@server6 ~]# cd MLNX_OFED_LINUX-5.4-3.7.5.0-rhel8.8-x86_64-ext
[root@server6 MLNX_OFED_LINUX-5.4-3.7.5.0-rhel8.8-x86_64-ext]# ./mlnxofedinstall
# 生成initramfs,重启生效
[root@server6 MLNX_OFED_LINUX-5.4-3.7.5.0-rhel8.8-x86_64-ext]# dracut -f
[root@server6 MLNX_OFED_LINUX-5.4-3.7.5.0-rhel8.8-x86_64-ext]# reboot
# 启动openibd,检查驱动运行状态
[root@server6 ~]# /etc/init.d/openibd restart
[root@server6 ~]# /etc/init.d/openibd status

  HCA driver loaded

Configured Mellanox EN devices:
enp7s0
enp8s0

Currently active Mellanox devices:
enp7s0
enp8s0

The following OFED modules are loaded:

  rdma_ucm
  rdma_cm
  ib_ipoib
  mlx5_core
  mlx5_ib
  ib_uverbs
  ib_umad
  ib_cm
  ib_core
  mlxfw

[root@server6 ~]# 

5.1.2 配置RoCEv2

Server4
[root@server4 ~]# ibdev2netdev 
mlx5_0 port 1 ==> enp1s0f0 (Up)
mlx5_1 port 1 ==> enp1s0f1 (Up)
[root@server4 ~]# cat /etc/sysconfig/network-scripts/config-rocev2.sh
#enp1s0f0
mlnx_qos -i enp1s0f0 --trust dscp
mlnx_qos -i enp1s0f0 --pfc 0,0,0,0,1,0,0,0
cma_roce_mode -d mlx5_0 -p 1 -m 2
echo 128 > /sys/class/infiniband/mlx5_0/tc/1/traffic_class
cma_roce_tos -d mlx5_0 -t 128
echo 1 > /sys/class/net/enp1s0f0/ecn/roce_np/enable/1
echo 1 > /sys/class/net/enp1s0f0/ecn/roce_rp/enable/1
echo 40 > /sys/class/net/enp1s0f0/ecn/roce_np/cnp_dscp
sysctl -w net.ipv4.tcp_ecn=1
# enp1s0f1
mlnx_qos -i enp1s0f1 --trust dscp
mlnx_qos -i enp1s0f1 --pfc 0,0,0,0,1,0,0,0
cma_roce_mode -d mlx5_1 -p 1 -m 2
echo 128 > /sys/class/infiniband/mlx5_1/tc/1/traffic_class
cma_roce_tos -d mlx5_1 -t 128
echo 1 > /sys/class/net/enp1s0f1/ecn/roce_np/enable/1
echo 1 > /sys/class/net/enp1s0f1/ecn/roce_rp/enable/1
echo 40 > /sys/class/net/enp1s0f1/ecn/roce_np/cnp_dscp
[root@server4 ~]# mlnx_qos -i enp1s0f0
DCBX mode: OS controlled
Priority trust state: dscp
dscp2prio mapping:
        prio:0 dscp:07,06,05,04,03,02,01,00,
        prio:1 dscp:15,14,13,12,11,10,09,08,
        prio:2 dscp:23,22,21,20,19,18,17,16,
        prio:3 dscp:31,30,29,28,27,26,25,24,
        prio:4 dscp:39,38,37,36,35,34,33,32,
        prio:5 dscp:47,46,45,44,43,42,41,40,
        prio:6 dscp:55,54,53,52,51,50,49,48,
        prio:7 dscp:63,62,61,60,59,58,57,56,
default priority:
Receive buffer size (bytes): 130944,130944,0,0,0,0,0,0,
Cable len: 7
PFC configuration:
        priority    0   1   2   3   4   5   6   7
        enabled     0   0   0   0   1   0   0   0   
        buffer      0   0   0   0   1   0   0   0   
tc: 0 ratelimit: unlimited, tsa: strict
         priority:  0
         priority:  1
         priority:  2
         priority:  3
         priority:  4
         priority:  5
         priority:  6
         priority:  7
[root@server4 ~]# mlnx_qos -i enp1s0f1
DCBX mode: OS controlled
Priority trust state: dscp
dscp2prio mapping:
        prio:0 dscp:07,06,05,04,03,02,01,00,
        prio:1 dscp:15,14,13,12,11,10,09,08,
        prio:2 dscp:23,22,21,20,19,18,17,16,
        prio:3 dscp:31,30,29,28,27,26,25,24,
        prio:4 dscp:39,38,37,36,35,34,33,32,
        prio:5 dscp:47,46,45,44,43,42,41,40,
        prio:6 dscp:55,54,53,52,51,50,49,48,
        prio:7 dscp:63,62,61,60,59,58,57,56,
default priority:
Receive buffer size (bytes): 130944,130944,0,0,0,0,0,0,
Cable len: 7
PFC configuration:
        priority    0   1   2   3   4   5   6   7
        enabled     0   0   0   0   1   0   0   0   
        buffer      0   0   0   0   1   0   0   0   
tc: 0 ratelimit: unlimited, tsa: strict
         priority:  0
         priority:  1
         priority:  2
         priority:  3
         priority:  4
         priority:  5
         priority:  6
         priority:  7
[root@server4 ~]# cat /sys/class/net/*/ecn/roce_np/cnp_dscp
40
40
[root@server4 ~]# 

Server5
[root@server5 ~]# ibdev2netdev 
mlx5_0 port 1 ==> enp1s0f0 (Up)
mlx5_1 port 1 ==> enp1s0f1 (Up)
[root@server5 ~]# cat /etc/sysconfig/network-scripts/config-rocev2.sh
#enp1s0f0
mlnx_qos -i enp1s0f0 --trust dscp
mlnx_qos -i enp1s0f0 --pfc 0,0,0,0,1,0,0,0
cma_roce_mode -d mlx5_0 -p 1 -m 2
echo 128 > /sys/class/infiniband/mlx5_0/tc/1/traffic_class
cma_roce_tos -d mlx5_0 -t 128
echo 1 > /sys/class/net/enp1s0f0/ecn/roce_np/enable/1
echo 1 > /sys/class/net/enp1s0f0/ecn/roce_rp/enable/1
echo 40 > /sys/class/net/enp1s0f0/ecn/roce_np/cnp_dscp
sysctl -w net.ipv4.tcp_ecn=1
# enp1s0f1
mlnx_qos -i enp1s0f1 --trust dscp
mlnx_qos -i enp1s0f1 --pfc 0,0,0,0,1,0,0,0
cma_roce_mode -d mlx5_1 -p 1 -m 2
echo 128 > /sys/class/infiniband/mlx5_1/tc/1/traffic_class
cma_roce_tos -d mlx5_1 -t 128
echo 1 > /sys/class/net/enp1s0f1/ecn/roce_np/enable/1
echo 1 > /sys/class/net/enp1s0f1/ecn/roce_rp/enable/1
echo 40 > /sys/class/net/enp1s0f1/ecn/roce_np/cnp_dscp
[root@server5 ~]# mlnx_qos -i enp1s0f0
DCBX mode: OS controlled
Priority trust state: dscp
dscp2prio mapping:
        prio:0 dscp:07,06,05,04,03,02,01,00,
        prio:1 dscp:15,14,13,12,11,10,09,08,
        prio:2 dscp:23,22,21,20,19,18,17,16,
        prio:3 dscp:31,30,29,28,27,26,25,24,
        prio:4 dscp:39,38,37,36,35,34,33,32,
        prio:5 dscp:47,46,45,44,43,42,41,40,
        prio:6 dscp:55,54,53,52,51,50,49,48,
        prio:7 dscp:63,62,61,60,59,58,57,56,
default priority:
Receive buffer size (bytes): 130944,130944,0,0,0,0,0,0,
Cable len: 7
PFC configuration:
        priority    0   1   2   3   4   5   6   7
        enabled     0   0   0   0   1   0   0   0   
        buffer      0   0   0   0   1   0   0   0   
tc: 0 ratelimit: unlimited, tsa: strict
         priority:  0
         priority:  1
         priority:  2
         priority:  3
         priority:  4
         priority:  5
         priority:  6
         priority:  7
[root@server5 ~]# mlnx_qos -i enp1s0f1
DCBX mode: OS controlled
Priority trust state: dscp
dscp2prio mapping:
        prio:0 dscp:07,06,05,04,03,02,01,00,
        prio:1 dscp:15,14,13,12,11,10,09,08,
        prio:2 dscp:23,22,21,20,19,18,17,16,
        prio:3 dscp:31,30,29,28,27,26,25,24,
        prio:4 dscp:39,38,37,36,35,34,33,32,
        prio:5 dscp:47,46,45,44,43,42,41,40,
        prio:6 dscp:55,54,53,52,51,50,49,48,
        prio:7 dscp:63,62,61,60,59,58,57,56,
default priority:
Receive buffer size (bytes): 130944,130944,0,0,0,0,0,0,
Cable len: 7
PFC configuration:
        priority    0   1   2   3   4   5   6   7
        enabled     0   0   0   0   1   0   0   0   
        buffer      0   0   0   0   1   0   0   0   
tc: 0 ratelimit: unlimited, tsa: strict
         priority:  0
         priority:  1
         priority:  2
         priority:  3
         priority:  4
         priority:  5
         priority:  6
         priority:  7
[root@server5 ~]# cat /sys/class/net/*/ecn/roce_np/cnp_dscp
40
40
[root@server5 ~]# 

Server6
[root@server6 ~]# ibdev2netdev 
mlx5_0 port 1 ==> enp7s0 (Up)
mlx5_1 port 1 ==> enp8s0 (Up)
[root@server6 ~]# cat /etc/sysconfig/network-scripts/config-rocev2.sh
#enp7s0
mlnx_qos -i enp7s0 --trust dscp
mlnx_qos -i enp7s0 --pfc 0,0,0,0,1,0,0,0
cma_roce_mode -d mlx5_0 -p 1 -m 2
echo 128 > /sys/class/infiniband/mlx5_0/tc/1/traffic_class
cma_roce_tos -d mlx5_0 -t 128
echo 1 > /sys/class/net/enp7s0/ecn/roce_np/enable/1
echo 1 > /sys/class/net/enp7s0/ecn/roce_rp/enable/1
echo 40 > /sys/class/net/enp7s0/ecn/roce_np/cnp_dscp
sysctl -w net.ipv4.tcp_ecn=1
# enp8s0
mlnx_qos -i enp8s0 --trust dscp
mlnx_qos -i enp8s0 --pfc 0,0,0,0,1,0,0,0
cma_roce_mode -d mlx5_1 -p 1 -m 2
echo 128 > /sys/class/infiniband/mlx5_1/tc/1/traffic_class
cma_roce_tos -d mlx5_1 -t 128
echo 1 > /sys/class/net/enp8s0/ecn/roce_np/enable/1
echo 1 > /sys/class/net/enp8s0/ecn/roce_rp/enable/1
echo 40 > /sys/class/net/enp8s0/ecn/roce_np/cnp_dscp
[root@server6 ~]# mlnx_qos -i enp7s0
DCBX mode: OS controlled
Priority trust state: dscp
dscp2prio mapping:
        prio:0 dscp:07,06,05,04,03,02,01,00,
        prio:1 dscp:15,14,13,12,11,10,09,08,
        prio:2 dscp:23,22,21,20,19,18,17,16,
        prio:3 dscp:31,30,29,28,27,26,25,24,
        prio:4 dscp:39,38,37,36,35,34,33,32,
        prio:5 dscp:47,46,45,44,43,42,41,40,
        prio:6 dscp:55,54,53,52,51,50,49,48,
        prio:7 dscp:63,62,61,60,59,58,57,56,
default priority:
Receive buffer size (bytes): 130944,130944,0,0,0,0,0,0,max_buffer_size=262016
Cable len: 7
PFC configuration:
        priority    0   1   2   3   4   5   6   7
        enabled     0   0   0   0   1   0   0   0   
        buffer      0   0   0   0   1   0   0   0   
tc: 0 ratelimit: unlimited, tsa: strict
         priority:  0
         priority:  1
         priority:  2
         priority:  3
         priority:  4
         priority:  5
         priority:  6
         priority:  7
[root@server6 ~]# mlnx_qos -i enp8s0
DCBX mode: OS controlled
Priority trust state: dscp
dscp2prio mapping:
        prio:0 dscp:07,06,05,04,03,02,01,00,
        prio:1 dscp:15,14,13,12,11,10,09,08,
        prio:2 dscp:23,22,21,20,19,18,17,16,
        prio:3 dscp:31,30,29,28,27,26,25,24,
        prio:4 dscp:39,38,37,36,35,34,33,32,
        prio:5 dscp:47,46,45,44,43,42,41,40,
        prio:6 dscp:55,54,53,52,51,50,49,48,
        prio:7 dscp:63,62,61,60,59,58,57,56,
default priority:
Receive buffer size (bytes): 130944,130944,0,0,0,0,0,0,max_buffer_size=262016
Cable len: 7
PFC configuration:
        priority    0   1   2   3   4   5   6   7
        enabled     0   0   0   0   1   0   0   0   
        buffer      0   0   0   0   1   0   0   0   
tc: 0 ratelimit: unlimited, tsa: strict
         priority:  0
         priority:  1
         priority:  2
         priority:  3
         priority:  4
         priority:  5
         priority:  6
         priority:  7
[root@server6 ~]# cat /sys/class/net/*/ecn/roce_np/cnp_dscp
40
40
[root@server6 ~]# 

5.1.3 部署BeeGFS

5.1.3.1 安装各个服务的软件包

Server4:meta、storage、mgmt

[root@server4 ~]# cd /etc/yum.repos.d/
[root@server4 yum.repos.d]# wget https://www.beegfs.io/release/beegfs_7.3.3/dists/beegfs-rhel8.repo
[root@server4 yum.repos.d]# yum makecache
[root@server4 ~]# yum install beegfs-mgmtd
[root@server4 ~]# yum install beegfs-meta libbeegfs-ib
[root@server4 ~]# yum install beegfs-storage libbeegfs-ib

Server5:meta、storage、mgmt

[root@server5 ~]# cd /etc/yum.repos.d/
[root@server5 yum.repos.d]# wget https://www.beegfs.io/release/beegfs_7.3.3/dists/beegfs-rhel8.repo
[root@server5 yum.repos.d]# yum makecache
[root@server5 ~]# yum install beegfs-mgmtd
[root@server5 ~]# yum install beegfs-meta libbeegfs-ib
[root@server5 ~]# yum install beegfs-storage libbeegfs-ib

Server6:client

[root@server6 ~]# cd /etc/yum.repos.d/
[root@server6 yum.repos.d]# wget https://www.beegfs.io/release/beegfs_7.3.3/dists/beegfs-rhel8.repo
[root@server6 yum.repos.d]# yum makecache
[root@server6 ~]# yum install beegfs-client beegfs-helperd beegfs-utils

5.1.3.2 编译客户端内核模块
[root@server6 ~]# cat /etc/beegfs/beegfs-client-autobuild.conf
# This is a config file for the automatic build process of BeeGFS client kernel
# modules.
# http://www.beegfs.com

#
# --- Section: [Notes] ---
#

# General Notes
# =============
# To force a rebuild of the client modules:
#  $ /etc/init.d/beegfs-client rebuild
#
# To see a list of available build arguments:
#  $ make help -C /opt/beegfs/src/client/client_module_${BEEGFS_MAJOR_VERSION}/build
#
#  Help example for BeeGFS 2015.03 release:
#   $ make help -C /opt/beegfs/src/client/client_module_2015.03/build

# RDMA Support Notes
# ==================
# If you installed InfiniBand kernel modules from OpenFabrics OFED, then also
# define the correspsonding header include path by adding
# "OFED_INCLUDE_PATH=<path>" to the "buildArgs", where <path> usually is
# "/usr/src/openib/include" or "/usr/src/ofa_kernel/default/include" for
# Mellanox OFED.
#
# OFED headers are automatically detected even if OFED_INCLUDE_PATH is not
# defined. To build the client without RDMA support, define BEEGFS_NO_RDMA=1.
#

# NVIDIA GPUDirect Storage Support Notes
# ==================
# If you want to build BeeGFS with NVIDIA GPUDirect Storage support, add
# "NVFS_INCLUDE_PATH=<path>" to the "buildArgs" below, where path is the directory
# that contains nvfs-dma.h. This is usually the nvidia-fs source directory:
# /usr/src/nvidia-fs-VERSION.
#
# If config-host.h is not present in NVFS_INCLUDE_PATH, execute the configure
# script. Example:
# $ cd /usr/src/nvidia-fs-2.13.5
# $ ./configure
#
# NVIDIA_INCLUDE_PATH must be defined and point to the NVIDIA driver source:
# /usr/src/nvidia-VERSION/nvidia
#
# OFED_INCLUDE_PATH must be defined and point to Mellanox OFED.
#

#
# --- Section: [Build Settings] ---
#

# Build Settings
# ==============
# These are the arguments for the client module "make" command.
#
# Note: Quotation marks and equal signs can be used without escape characters
# here.
#
# Example1:
#  buildArgs=-j8
#
# Example2 (see "RDMA Support Notes" above):
#  buildArgs=-j8 OFED_INCLUDE_PATH=/usr/src/openib/include
#
# Example3 (see "NVIDIA GPUDirect Storage Support Notes" above):
#  buildArgs=-j8 OFED_INCLUDE_PATH=/usr/src/ofa_kernel/default/include \
#    NVFS_INCLUDE_PATH=/usr/src/nvidia-fs-2.13.5 \
#    NVIDIA_INCLUDE_PATH=/usr/src/nvidia-520.61.05/nvidia
#
# Default:
#  buildArgs=-j8

buildArgs=-j8 OFED_INCLUDE_PATH=/usr/src/ofa_kernel/default/include

# Turn Autobuild on/off
# =====================
# Controls whether modules will be built on "/etc/init.d/beegfs-client start".
#
# Note that even if autobuild is enabled here, the modules will only be built
# if no beegfs kernel module for the current kernel version exists in
# "/lib/modules/<kernel_version>/updates/".
#
# Default:
#  buildEnabled=true

buildEnabled=true
[root@server6 ~]# cat /etc/beegfs/beegfs-client.conf 
# This is a config file for BeeGFS clients.
# http://www.beegfs.com

# --- [Table of Contents] ---
#
# 1) Settings
# 2) Mount Options
# 3) Basic Settings Documentation
# 4) Advanced Settings Documentation

#
# --- Section 1.1: [Basic Settings] ---
#

sysMgmtdHost                  = server5

#
# --- Section 1.2: [Advanced Settings] ---
#

connAuthFile                  =
connDisableAuthentication     = true
connClientPortUDP             = 8004
connHelperdPortTCP            = 8006
connMgmtdPortTCP              = 8008
connMgmtdPortUDP              = 8008
connPortShift                 = 0

connCommRetrySecs             = 600
connFallbackExpirationSecs    = 900
connInterfacesFile            = /etc/beegfs/interface.conf
connRDMAInterfacesFile        = /etc/beegfs/interface.conf
connMaxInternodeNum           = 12
connMaxConcurrentAttempts     = 0
connNetFilterFile             = /etc/beegfs/network.conf

connUseRDMA                   = true
connTCPFallbackEnabled        = true
connTCPRcvBufSize             = 0
connUDPRcvBufSize             = 0
connRDMABufNum                = 70
connRDMABufSize               = 8192
connRDMATypeOfService         = 0
connTcpOnlyFilterFile         =

logClientID                   = false
logHelperdIP                  =
logLevel                      = 3
logType                       = helperd

quotaEnabled                  = false

sysCreateHardlinksAsSymlinks  = false
sysMountSanityCheckMS         = 11000
sysSessionCheckOnClose        = false
sysSyncOnClose                = false
sysTargetOfflineTimeoutSecs   = 900
sysUpdateTargetStatesSecs     = 30
sysXAttrsEnabled              = false

tuneFileCacheType             = buffered
tunePreferredMetaFile         =
tunePreferredStorageFile      =
tuneRemoteFSync               = true
tuneUseGlobalAppendLocks      = false
tuneUseGlobalFileLocks        = false

#
# --- Section 1.3: [Enterprise Features] ---
#
# See end-user license agreement for definition and usage limitations of
# enterprise features.
#

sysACLsEnabled                = false
[root@server6 ~]# mkdir /mnt/beegfs
[root@server6 ~]# cat /etc/beegfs/beegfs-mounts.conf 
/mnt/beegfs /etc/beegfs/beegfs-client.conf
[root@server6 ~]# cat /etc/beegfs/interface.conf 
enp7s0
[root@server6 ~]# cat /etc/beegfs/network.conf 
172.16.8.0/24
[root@server6 ~]# /etc/init.d/beegfs-client rebuild
[root@server6 ~]# systemctl restart beegfs-client
[root@server6 ~]# systemctl status beegfs-client
● beegfs-client.service - Start BeeGFS Client
   Loaded: loaded (/usr/lib/systemd/system/beegfs-client.service; enabled; vendor preset: disabled)
   Active: active (exited) since Tue 2023-06-27 19:25:17 CST; 18min ago
  Process: 22301 ExecStop=/etc/init.d/beegfs-client stop (code=exited, status=0/SUCCESS)
  Process: 22323 ExecStart=/etc/init.d/beegfs-client start (code=exited, status=0/SUCCESS)
 Main PID: 22323 (code=exited, status=0/SUCCESS)

6月 27 19:25:17 server6 systemd[1]: Starting Start BeeGFS Client...
6月 27 19:25:17 server6 beegfs-client[22323]: Starting BeeGFS Client:
6月 27 19:25:17 server6 beegfs-client[22323]: - Loading BeeGFS modules
6月 27 19:25:17 server6 beegfs-client[22323]: - Mounting directories from /etc/beegfs/beegfs-mounts.conf
6月 27 19:25:17 server6 systemd[1]: Started Start BeeGFS Client.
[root@server6 ~]# lsmod | grep beegfs
beegfs                540672  1
rdma_cm               118784  2 beegfs,rdma_ucm
ib_core               425984  9 beegfs,rdma_cm,ib_ipoib,iw_cm,ib_umad,rdma_ucm,ib_uverbs,mlx5_ib,ib_cm
mlx_compat             16384  12 beegfs,rdma_cm,ib_ipoib,mlxdevm,iw_cm,ib_umad,ib_core,rdma_ucm,ib_uverbs,mlx5_ib,ib_cm,mlx5_core
[root@server6 ~]# 
5.1.3.3 BeeGFS配置

Server5和Server6上的存储空间分配。

[root@server4 ~]# mkdir -p /mnt/beegfs/{mgmtd,meta,storage}
[root@server4 ~]# fdisk  -l /dev/nvme0n1
Disk /dev/nvme0n1:953.87 GiB,1024209543168 字节,2000409264 个扇区
磁盘型号:ZHITAI TiPlus5000 1TB                   
单元:扇区 / 1 * 512 = 512 字节
扇区大小(逻辑/物理):512 字节 / 512 字节
I/O 大小(最小/最佳):512 字节 / 512 字节
磁盘标签类型:gpt
磁盘标识符:090F6714-0F4E-E543-8293-10A0405490DE

设备                起点       末尾       扇区  大小 类型
/dev/nvme0n1p1      2048  104859647  104857600   50G Linux 文件系统
/dev/nvme0n1p2 104859648  209717247  104857600   50G Linux 文件系统
/dev/nvme0n1p3 209717248 1258293247 1048576000  500G Linux 文件系统
[root@server4 ~]# mkfs.ext4 /dev/nvme0n1p1
[root@server4 ~]# mkfs.ext4 /dev/nvme0n1p2
[root@server4 ~]# mkfs.xfs /dev/nvme0n1p3
[root@server4 ~]# mount /dev/nvme0n1p1 /mnt/beegfs/mgmtd/
[root@server4 ~]# mount /dev/nvme0n1p2 /mnt/beegfs/meta/
[root@server4 ~]# mount /dev/nvme0n1p3 /mnt/beegfs/storage/

[root@server5 ~]# mkdir -p /mnt/beegfs/{mgmtd,meta,storage}
[root@server5 ~]# fdisk -l /dev/nvme0n1
Disk /dev/nvme0n1:953.87 GiB,1024209543168 字节,2000409264 个扇区
磁盘型号:ZHITAI TiPlus5000 1TB                   
单元:扇区 / 1 * 512 = 512 字节
扇区大小(逻辑/物理):512 字节 / 512 字节
I/O 大小(最小/最佳):512 字节 / 512 字节
磁盘标签类型:gpt
磁盘标识符:A64F55F2-0650-8A40-BE56-BC451387B729

设备                起点       末尾       扇区  大小 类型
/dev/nvme0n1p1      2048  104859647  104857600   50G Linux 文件系统
/dev/nvme0n1p2 104859648  209717247  104857600   50G Linux 文件系统
/dev/nvme0n1p3 209717248 1258293247 1048576000  500G Linux 文件系统
[root@server5 ~]# mkfs.ext4 /dev/nvme0n1p1
[root@server5 ~]# mkfs.ext4 /dev/nvme0n1p2
[root@server5 ~]# mkfs.xfs /dev/nvme0n1p3
[root@server5 ~]# mount /dev/nvme0n1p1 /mnt/beegfs/mgmtd/
[root@server5 ~]# mount /dev/nvme0n1p2 /mnt/beegfs/meta/
[root@server5 ~]# mount /dev/nvme0n1p3 /mnt/beegfs/storage/ 

Mgmt服务配置。

[root@server5 ~]# /opt/beegfs/sbin/beegfs-setup-mgmtd -p /mnt/beegfs/mgmtd
[root@server5 ~]# systemctl restart beegfs-mgmtd
[root@server5 ~]# systemctl status beegfs-mgmtd
● beegfs-mgmtd.service - BeeGFS Management Server
     Loaded: loaded (/usr/lib/systemd/system/beegfs-mgmtd.service; enabled; vendor preset: disabled)
     Active: active (running) since Sun 2023-06-25 11:22:00 CST; 2 days ago
       Docs: http://www.beegfs.com/content/documentation/
   Main PID: 18739 (beegfs-mgmtd/Ma)
      Tasks: 11 (limit: 45464)
     Memory: 13.9M
     CGroup: /system.slice/beegfs-mgmtd.service
             └─ 18739 /opt/beegfs/sbin/beegfs-mgmtd cfgFile=/etc/beegfs/beegfs-mgmtd.conf runDaemonized=false

6月 25 11:22:00 server5 systemd[1]: Started BeeGFS Management Server.
[root@server5 ~]# 

Meta服务配置。

Server4
[root@server4 ~]# /opt/beegfs/sbin/beegfs-setup-meta -p /mnt/beegfs/meta -s 54 -m server5
[root@server4 ~]# systemctl restart beegfs-meta
[root@server4 ~]# systemctl status beegfs-meta
● beegfs-meta.service - BeeGFS Metadata Server
     Loaded: loaded (/usr/lib/systemd/system/beegfs-meta.service; enabled; vendor preset: disabled)
     Active: active (running) since Sun 2023-06-25 16:31:57 CST; 2 days ago
       Docs: http://www.beegfs.com/content/documentation/
   Main PID: 4444 (beegfs-meta/Mai)
      Tasks: 63 (limit: 45901)
     Memory: 2.2G
     CGroup: /system.slice/beegfs-meta.service
             └─ 4444 /opt/beegfs/sbin/beegfs-meta cfgFile=/etc/beegfs/beegfs-meta.conf runDaemonized=false

6月 25 16:31:57 server4 systemd[1]: Started BeeGFS Metadata Server.
[root@server4 ~]# 

Server5
[root@server5 ~]# /opt/beegfs/sbin/beegfs-setup-meta -p /mnt/beegfs/meta -s 55 -m server5
[root@server5 ~]# systemctl restart beegfs-meta
[root@server5 ~]# systemctl status beegfs-meta
● beegfs-meta.service - BeeGFS Metadata Server
     Loaded: loaded (/usr/lib/systemd/system/beegfs-meta.service; enabled; vendor preset: disabled)
     Active: active (running) since Sun 2023-06-25 11:22:16 CST; 2 days ago
       Docs: http://www.beegfs.com/content/documentation/
   Main PID: 18763 (beegfs-meta/Mai)
      Tasks: 87 (limit: 45464)
     Memory: 1.7G
     CGroup: /system.slice/beegfs-meta.service
             └─ 18763 /opt/beegfs/sbin/beegfs-meta cfgFile=/etc/beegfs/beegfs-meta.conf runDaemonized=false

6月 25 11:22:16 server5 systemd[1]: Started BeeGFS Metadata Server.
[root@server5 ~]# 

Storage服务配置。

Server4
[root@server4 ~]# /opt/beegfs/sbin/beegfs-setup-storage -p /mnt/beegfs/storage -s 540 -i 5401 -m server5 -f
[root@server4 ~]# systemctl restart beegfs-storage
[root@server4 ~]# systemctl status beegfs-storage
● beegfs-storage.service - BeeGFS Storage Server
     Loaded: loaded (/usr/lib/systemd/system/beegfs-storage.service; enabled; vendor preset: disabled)
     Active: active (running) since Sun 2023-06-25 15:46:33 CST; 2 days ago
       Docs: http://www.beegfs.com/content/documentation/
   Main PID: 4197 (beegfs-storage/)
      Tasks: 21 (limit: 45901)
     Memory: 118.4M
     CGroup: /system.slice/beegfs-storage.service
             └─ 4197 /opt/beegfs/sbin/beegfs-storage cfgFile=/etc/beegfs/beegfs-storage.conf runDaemonized=false

6月 25 15:46:33 server4 systemd[1]: Started BeeGFS Storage Server.
[root@server4 ~]# 

Server5
[root@server5 ~]# /opt/beegfs/sbin/beegfs-setup-storage -p /mnt/beegfs/storage -s 550 -i 5501 -m server5 -f
[root@server5 ~]# systemctl restart beegfs-storage.service 
[root@server5 ~]# systemctl status beegfs-storage.service 
● beegfs-storage.service - BeeGFS Storage Server
     Loaded: loaded (/usr/lib/systemd/system/beegfs-storage.service; enabled; vendor preset: disabled)
     Active: active (running) since Sun 2023-06-25 11:29:58 CST; 2 days ago
       Docs: http://www.beegfs.com/content/documentation/
   Main PID: 18901 (beegfs-storage/)
      Tasks: 21 (limit: 45464)
     Memory: 124.8M
     CGroup: /system.slice/beegfs-storage.service
             └─ 18901 /opt/beegfs/sbin/beegfs-storage cfgFile=/etc/beegfs/beegfs-storage.conf runDaemonized=false

6月 25 11:29:58 server5 systemd[1]: Started BeeGFS Storage Server.
[root@server5 ~]# 
5.1.3.4 状态检查
[root@server6 ~]# beegfs-check-servers 
Management
==========
server5 [ID: 1]: reachable at 172.16.8.55:8008 (protocol: TCP)

Metadata
==========
server4 [ID: 54]: reachable at 172.16.8.54:8005 (protocol: RDMA)
server5 [ID: 55]: reachable at 172.16.8.55:8005 (protocol: RDMA)

Storage
==========
server4 [ID: 540]: reachable at 172.16.8.54:8003 (protocol: RDMA)
server5 [ID: 550]: reachable at 172.16.8.55:8003 (protocol: RDMA)

[root@server6 ~]# beegfs-df
METADATA SERVERS:
TargetID   Cap. Pool        Total         Free    %      ITotal       IFree    %
========   =========        =====         ====    =      ======       =====    =
      54         low      48.9GiB      48.7GiB  99%        3.3M        3.2M  98%
      55         low      48.9GiB      48.7GiB  99%        3.3M        3.2M  98%

STORAGE TARGETS:
TargetID   Cap. Pool        Total         Free    %      ITotal       IFree    %
========   =========        =====         ====    =      ======       =====    =
    5401         low     499.8GiB     464.2GiB  93%      262.1M      262.1M 100%
    5501         low     499.8GiB     464.2GiB  93%      262.1M      262.1M 100%
[root@server6 ~]# beegfs-ctl --listnodes --nodetype=meta --nicdetails
server4 [ID: 54]
   Ports: UDP: 8005; TCP: 8005
   Interfaces: 
   + enp1s0f0[ip addr: 172.16.8.54; type: RDMA]
   + enp1s0f0[ip addr: 172.16.8.54; type: TCP]
server5 [ID: 55]
   Ports: UDP: 8005; TCP: 8005
   Interfaces: 
   + enp1s0f0[ip addr: 172.16.8.55; type: RDMA]
   + enp1s0f0[ip addr: 172.16.8.55; type: TCP]

Number of nodes: 2
Root: 55
[root@server6 ~]# beegfs-ctl --listnodes --nodetype=storage --nicdetails
server4 [ID: 540]
   Ports: UDP: 8003; TCP: 8003
   Interfaces: 
   + enp1s0f0[ip addr: 172.16.8.54; type: RDMA]
   + enp1s0f0[ip addr: 172.16.8.54; type: TCP]
server5 [ID: 550]
   Ports: UDP: 8003; TCP: 8003
   Interfaces: 
   + enp1s0f0[ip addr: 172.16.8.55; type: RDMA]
   + enp1s0f0[ip addr: 172.16.8.55; type: TCP]

Number of nodes: 2
[root@server6 ~]# beegfs-ctl --listnodes --nodetype=client --nicdetails
5751-649AC71D-server6 [ID: 8]
   Ports: UDP: 8004; TCP: 0
   Interfaces: 
   + enp7s0[ip addr: 172.16.8.56; type: TCP]
   + enp7s0[ip addr: 172.16.8.56; type: RDMA]

Number of nodes: 1
[root@server6 ~]# beegfs-net 

mgmt_nodes
=============
server5 [ID: 1]
   Connections: TCP: 1 (172.16.8.55:8008); 

meta_nodes
=============
server4 [ID: 54]
   Connections: RDMA: 4 (172.16.8.54:8005); 
server5 [ID: 55]
   Connections: RDMA: 4 (172.16.8.55:8005); 

storage_nodes
=============
server4 [ID: 540]
   Connections: RDMA: 4 (172.16.8.54:8003); 
server5 [ID: 550]
   Connections: RDMA: 4 (172.16.8.55:8003); 

[root@server6 ~]# 

5.1.4 挂载测试

[root@server6 ~]# df -h
文件系统                容量  已用  可用 已用% 挂载点
devtmpfs                1.8G     0  1.8G    0% /dev
tmpfs                   1.8G  4.0K  1.8G    1% /dev/shm
tmpfs                   1.8G  8.7M  1.8G    1% /run
tmpfs                   1.8G     0  1.8G    0% /sys/fs/cgroup
/dev/mapper/rocky-root  9.0G  6.8G  2.2G   76% /
/dev/vda2               994M  431M  564M   44% /boot
/dev/vda1                99M  5.8M   94M    6% /boot/efi
tmpfs                   367M     0  367M    0% /run/user/0
beegfs_nodev           1000G   72G  929G    8% /mnt/beegfs
[root@server6 ~]# 

5.1.5 安装IO500(IOR&mdtest)

安装OpenMPI。

[root@server6 ~]# mkdir iobench_tools
# 下载源码包
[root@server6 iobench_tools]# wget https://download.open-mpi.org/release/open-mpi/v4.1/openmpi-4.1.1.tar.gz
[root@server6 iobench_tools]# tar xvf openmpi-4.1.1.tar.gz
[root@server6 iobench_tools]# cd openmpi-4.1.1
# 编译安装
[root@server6 openmpi-4.1.1]# yum install automake gcc gcc-c++ gcc-gfortran
[root@server6 openmpi-4.1.1]# mkdir /usr/local/openmpi
[root@server6 openmpi-4.1.1]# ./configure --prefix=/usr/local/openmpi/
[root@server6 openmpi-4.1.1]# make
[root@server6 openmpi-4.1.1]# make install
# 配置环境变量
[root@server6 openmpi-4.1.1]# export PATH=$PATH:/usr/local/openmpi/bin
[root@server6 openmpi-4.1.1]# export LD_LIBRARY_PATH=$LD_LIBRARY_PATH:/usr/local/openmpi/lib
# 安装结果验证
[root@server6 openmpi-4.1.1]# mpirun --version
mpirun (Open MPI) 4.1.1

Report bugs to http://www.open-mpi.org/community/help/
# 运行测试
[root@server6 openmpi-4.1.1]# cd ..
[root@server6 iobench_tools]# echo '#include <mpi.h>
#include <stdio.h>

int main(int argc, char** argv) {
    MPI_Init(&argc, &argv);
    int world_rank;
    MPI_Comm_rank(MPI_COMM_WORLD, &world_rank);
    printf("Hello from process %d\n", world_rank);
    MPI_Finalize();
    return 0;
}' > mpi_hello.c
[root@server6 iobench_tools]# mpicc mpi_hello.c -o mpi_hello
[root@server6 iobench_tools]# mpirun --allow-run-as-root -mca btl ^openib -n 2 ./mpi_hello
Hello from process 0
Hello from process 1
[root@server6 iobench_tools]# 
# 添加环境变量到用户的bashrc文件
[root@server6 iobench_tools]# tail ~/.bashrc
if [ -f /etc/bashrc ]; then
        . /etc/bashrc
fi

export PATH=$PATH:/usr/local/openmpi/bin:/usr/local/ior/bin
export LD_LIBRARY_PATH=$LD_LIBRARY_PATH:/usr/local/openmpi/lib:/usr/local/ior/lib
export MPI_CC=mpicc

export OMPI_ALLOW_RUN_AS_ROOT=1
export OMPI_ALLOW_RUN_AS_ROOT_CONFIRM=1
[root@server6 iobench_tools]# source ~/.bashrc

安装IOR(mdtest)。

# 下载源代码
[root@server6 iobench_tools]# yum install git
[root@server6 iobench_tools]# git clone https://github.com/hpc/ior.git
[root@server6 iobench_tools]# cd ior/
# 编译安装
[root@server6 ior]# ./bootstrap 
[root@server6 ior]# mkdir /usr/local/ior
[root@server6 ior]# ./configure --prefix=/usr/local/ior/
[root@server6 ior]# make
[root@server6 ior]# make install
# 添加环境变量到用户的bashrc文件
[root@server6 ior]# tail ~/.bashrc
if [ -f /etc/bashrc ]; then
        . /etc/bashrc
fi

export PATH=$PATH:/usr/local/openmpi/bin:/usr/local/ior/bin
export LD_LIBRARY_PATH=$LD_LIBRARY_PATH:/usr/local/openmpi/lib:/usr/local/ior/lib
export MPI_CC=mpicc

export OMPI_ALLOW_RUN_AS_ROOT=1
export OMPI_ALLOW_RUN_AS_ROOT_CONFIRM=1
[root@server6 ior]# source ~/.bashrc 

安装IO500。

# 下载源码
[root@server6 iobench_tools]# git clone https://github.com/IO500/io500.git
[root@server6 iobench_tools]# cd io500
# 编译安装
[root@server6 io500]# ./prepare.sh
# 获取所有配置项
[root@server6 io500]# ./io500 --list > config-all.ini
# 自定义测试配置
[root@server6 io500]# cat config-beegfs.ini 
[global]
datadir = /mnt/beegfs/io500
timestamp-datadir = TRUE
resultdir = ./results
timestamp-resultdir = TRUE
api = POSIX
drop-caches = FALSE
drop-caches-cmd = sudo -n bash -c "echo 3 > /proc/sys/vm/drop_caches"
io-buffers-on-gpu = FALSE
verbosity = 1
scc = TRUE
dataPacketType = timestamp

[debug]
stonewall-time = 30

[ior-easy]
API = 
transferSize = 1m
blockSize = 204800m
filePerProc = TRUE
uniqueDir = FALSE
run = TRUE
verbosity = 

[ior-easy-write]
API = 
run = TRUE

[mdtest-easy]
API = 
n = 500000
run = TRUE

[mdtest-easy-write]
API = 
run = TRUE

[find-easy]
external-script = 
external-mpi-args = 
external-extra-args = 
nproc = 
run = TRUE
pfind-queue-length = 10000
pfind-steal-next = FALSE
pfind-parallelize-single-dir-access-using-hashing = FALSE

[ior-hard]
API = 
segmentCount = 500000
collective = 
run = TRUE
verbosity = 

[ior-hard-write]
API = 
collective = 
run = TRUE

[mdtest-hard]
API = 
n = 500000
files-per-dir = 
run = TRUE

[mdtest-hard-write]
API = 
run = TRUE

[find]
external-script = 
external-mpi-args = 
external-extra-args = 
nproc = 
run = TRUE
pfind-queue-length = 10000
pfind-steal-next = FALSE
pfind-parallelize-single-dir-access-using-hashing = FALSE

[find-hard]
external-script = 
external-mpi-args = 
external-extra-args = 
nproc = 
run = FALSE
pfind-queue-length = 10000
pfind-steal-next = FALSE
pfind-parallelize-single-dir-access-using-hashing = FALSE

[mdworkbench-bench]
run = FALSE

[ior-easy-read]
API = 
run = TRUE

[mdtest-easy-stat]
API = 
run = TRUE

[ior-hard-read]
API = 
collective = 
run = TRUE

[mdtest-hard-stat]
API = 
run = TRUE

[mdtest-easy-delete]
API = 
run = TRUE

[mdtest-hard-read]
API = 
run = TRUE

[mdtest-hard-delete]
API = 
run = TRUE

[root@server6 io500]# 

5.1.6 安装dbench

[root@server6 iobench_tools]# yum install dbench

5.2 交换机

5.2.1 CX532P-N的配置结果

532# show running-config 
!
class-map ecn_map
 match cos 3 4
!
vlan 456
!
policy-map ecn
 class ecn_map
  wred default_ecn
!
interface ethernet 0/16
 breakout 4x25G[10G]
 service-policy ecn
 switchport access vlan 456
exit
!
interface ethernet 0/17
 service-policy ecn
 switchport access vlan 456
exit
!
interface ethernet 0/18
 service-policy ecn
 switchport access vlan 456
exit
!
interface ethernet 0/19
 service-policy ecn
 switchport access vlan 456
exit
!
ip route 0.0.0.0/0 10.230.1.1 200
!
end

532# show interface priority-flow-control 
       Port    PFC0    PFC1    PFC2    PFC3    PFC4    PFC5    PFC6    PFC7
-----------  ------  ------  ------  ------  ------  ------  ------  ------
        0/0       -       -       -  enable  enable       -       -       -
        0/4       -       -       -  enable  enable       -       -       -
        0/8       -       -       -  enable  enable       -       -       -
       0/12       -       -       -  enable  enable       -       -       -
       0/16       -       -       -  enable  enable       -       -       -
       0/17       -       -       -  enable  enable       -       -       -
       0/18       -       -       -  enable  enable       -       -       -
       0/19       -       -       -  enable  enable       -       -       -
       0/20       -       -       -  enable  enable       -       -       -
       0/24       -       -       -  enable  enable       -       -       -
       0/28       -       -       -  enable  enable       -       -       -
       0/32       -       -       -  enable  enable       -       -       -
       0/36       -       -       -  enable  enable       -       -       -
       0/40       -       -       -  enable  enable       -       -       -
       0/44       -       -       -  enable  enable       -       -       -
       0/48       -       -       -  enable  enable       -       -       -
       0/52       -       -       -  enable  enable       -       -       -
       0/56       -       -       -  enable  enable       -       -       -
       0/60       -       -       -  enable  enable       -       -       -
       0/64       -       -       -  enable  enable       -       -       -
       0/68       -       -       -  enable  enable       -       -       -
       0/72       -       -       -  enable  enable       -       -       -
       0/76       -       -       -  enable  enable       -       -       -
       0/80       -       -       -  enable  enable       -       -       -
       0/84       -       -       -  enable  enable       -       -       -
       0/88       -       -       -  enable  enable       -       -       -
       0/92       -       -       -  enable  enable       -       -       -
       0/96       -       -       -  enable  enable       -       -       -
      0/100       -       -       -  enable  enable       -       -       -
      0/104       -       -       -  enable  enable       -       -       -
      0/108       -       -       -  enable  enable       -       -       -
      0/112       -       -       -  enable  enable       -       -       -
      0/116       -       -       -  enable  enable       -       -       -
      0/120       -       -       -  enable  enable       -       -       -
      0/124       -       -       -  enable  enable       -       -       -
 
532# show interface ecn
       Port    ECN0    ECN1    ECN2    ECN3    ECN4    ECN5    ECN6    ECN7
-----------  ------  ------  ------  ------  ------  ------  ------  ------
        0/0       -       -       -       -       -       -       -       -
        0/4       -       -       -       -       -       -       -       -
        0/8       -       -       -       -       -       -       -       -
       0/12       -       -       -       -       -       -       -       -
       0/16       -       -       -  enable  enable       -       -       -
       0/17       -       -       -  enable  enable       -       -       -
       0/18       -       -       -  enable  enable       -       -       -
       0/19       -       -       -  enable  enable       -       -       -
       0/20       -       -       -       -       -       -       -       -
       0/24       -       -       -       -       -       -       -       -
       0/28       -       -       -       -       -       -       -       -
       0/32       -       -       -       -       -       -       -       -
       0/36       -       -       -       -       -       -       -       -
       0/40       -       -       -       -       -       -       -       -
       0/44       -       -       -       -       -       -       -       -
       0/48       -       -       -       -       -       -       -       -
       0/52       -       -       -       -       -       -       -       -
       0/56       -       -       -       -       -       -       -       -
       0/60       -       -       -       -       -       -       -       -
       0/64       -       -       -       -       -       -       -       -
       0/68       -       -       -       -       -       -       -       -
       0/72       -       -       -       -       -       -       -       -
       0/76       -       -       -       -       -       -       -       -
       0/80       -       -       -       -       -       -       -       -
       0/84       -       -       -       -       -       -       -       -
       0/88       -       -       -       -       -       -       -       -
       0/92       -       -       -       -       -       -       -       -
       0/96       -       -       -       -       -       -       -       -
      0/100       -       -       -       -       -       -       -       -
      0/104       -       -       -       -       -       -       -       -
      0/108       -       -       -       -       -       -       -       -
      0/112       -       -       -       -       -       -       -       -
      0/116       -       -       -       -       -       -       -       -
      0/120       -       -       -       -       -       -       -       -
      0/124       -       -       -       -       -       -       -       -

532# 

6 参考资料

【1】BeeGFS Documentation 7.3.3 – Architecture、Quick Start Guide、RDMA Support
【2】高性能计算IO 500存储优化:实践与经验
【3】Github:open-mpi/ompi
【4】Github:IO500/io500
【5】AWS FSx Lustre 并行文件系统在 HPC 中的应用和性能评估

配置指导:使用OpenWrt制作出口设备

1 目标概述

本文主要描述如何使用OpenWrt镜像在X86服务器上制作出口设备。

2 适用场景

  • 需要搭建模拟测试环境对接防火墙或BGP设备。
  • 需要输出带防火墙等相关的验证解决方案的材料。

注意:OpenWrt不支持VRF。

3 获取软件

下载地址:openwrt-22.03.5-x86-64-generic-ext4-combined.img.gz
https://downloads.openwrt.org/releases/22.03.5/targets/x86/64/openwrt-22.03.5-x86-64-generic-ext4-combined.img.gz

4 硬件与软件环境

4.1 硬件环境

名称型号硬件指标备注
服务器或台式机X86CPU大于4核
内存大于4G
安装的centos7
表1:硬件环境

4.2 软件环境

软件版本备注
OpenWrtopenwrt-22.03.5-x86-64-generic-ext4-combined.img/
vncviewerVncviewer-4.2.9/
表2:软件环境

5 KVM安装OpenWrt

5.1 KVM安装

关闭selinux:

临时关闭:setenforce 0
永久关闭:
vim /etc/sysconfig/selinux 
打开文件设置 SELINUX=disabled

安装KVM相关软件包:

yum install qemu-kvm qemu-img virt-manager libvirt libvirt-python virt-manager libvirt-client virt-install virt-viewer -y

启动libvirt并设置开机自启动:

systemctl start libvirtd
systemctl enable libvirtd

5.2 安装OpenWrt

下载组件
OpenWrt官网地址: https://openwrt.org/zh/downloads
固件下载地址: https://downloads.openwrt.org/releases/
找到最新版的固件, 我这里选择的是:
https://downloads.openwrt.org/releases/22.03.5/targets/x86/64/openwrt-22.03.5-x86-64-generic-ext4-combined.img.gz

#下载后先解压缩:
#wget https://downloads.openwrt.org/releases/22.03.5/targets/x86/64/openwrt-22.03.5-x86-64-generic-ext4-combined.img.gz
#gzip -d openwrt-22.03.5-x86-64-generic-ext4-combined.img.gz

安装命令

#先创建服务器上的网桥br0,给网桥br0配置IP,挂载物理网口。
[root@computer1 opt]#brctl addbr br0
[root@computer1 opt]#brctl addif eno2
[root@computer1 opt]# ip address add 10.240.4.223 dev br0 
#如果要把配置固化下来,可以写到配置文件里面。
[root@computer1 opt]#vi /etc/sysconfig/network-scripts/ifcfg-bro
TYPE=bridge
BROWSER_ONLY=no
BOOTPROTO=static
DEFROUTE=no
NAME=br0
DEVICE=br0
ONBOOT=yes
IPADDR=10.240.4.223
PREFIX=24
GATEWAY=10.240.4.1
[root@computer1 opt]#vi /etc/sysconfig/network-scripts/ifcfg-eno2
TYPE=Ethernet
BOOTPROTO=none
NM_CONTROLLED=no
NAME=eno2
DEVICE=eno2
ONBOOT=yes
BRIDGE=br0

virt-install --name openwrt --ram 1024 --vcpus 2 --disk path=/opt/openwrt-22.03.5-x86-64-generic-ext4-combined.img --network bridge=br0,model=e1000  --force --import --autostart  --vnc --vncport=5911  --vnclisten=0.0.0.0
命令行

可以通过vncviewr访问

连接信息

也可以直接在服务器通过virsh console openwrt访问

命令行

如果想重新创建,先删除
[root@computer1 opt]# virsh undefine openwrt
Domain openwrt has been undefined
[root@computer1 opt]# virsh destroy openwrt
Domain openwrt destroyed

#给OpenWrt虚拟机配置业务IP

#OpenWrt默认会创建网桥br-lan,并且该网桥绑定eth0

命令行

6 高可用方案

创建另一台 OpenWrt虚机
复制镜像

cp  openwrt-22.03.5-x86-64-generic-ext4-combined.img  openwrt-22.03.5-x86-64-generic-ext4-combined-2.img

启动第二台OpenWrt(主要修改name、镜像名字、vncport)

virt-install --name openwrt2 --ram 1024 --vcpus 2 --disk path=/opt/openwrt-22.03.5-x86-64-generic-ext4-combined-2.img --network bridge=br0,model=e1000  --force --import --autostart  --vnc --vncport=5912  --vnclisten=0.0.0.0

登陆后修改第二台OpenWrt的IP为10.240.4.225

root@OpenWrt:~# vi /etc/config/network
config interface 'loopback'
        option device 'lo'
        option proto 'static'
        option ipaddr '127.0.0.1'
        option netmask '255.0.0.0'

config globals 'globals'
        option ula_prefix 'fd0a:d001:29bb::/48'

config device
        option name 'br-lan'
        option type 'bridge'
        list ports 'eth0'

config interface 'lan'
        option device 'br-lan'
        option proto 'static'
        option ipaddr '10.240.4.225'
        option netmask '255.255.255.0'
        option ip6assign '60'

给两台OpenWrt添加默认路由

修改DNS

两台OpenWrt,安装keepalived

配置keepalived
两台虚机修改/etc/config/keepalived

修改/etc/keepalived/keepalived.conf

重新启动服务:

在主路由上面 ip a 命令可以看到 vip 地址已经有了,电脑ping 这个地址可以通了
主机IP 10.240.4.224/24,备机IP 10.240.4.225/24
主机关闭该服务后IP只有10.240.4.224/24,虚拟IP丢失。

root@OpenWrt:/# /etc/init.d/keepalived stop

查看备机加载了虚拟IP:10.240.4.226/24

root@OpenWrt:/# ip a|grep br-lan
br-lan: <BROADCAST,MULTICAST,UP,LOWER_UP> mtu 1500 qdisc noqueue state UP group default
inet 10.240.4.225/24 brd 10.240.4.255 scope global br-lan
inet 10.240.4.226/24 scope global secondary br-lan

主机重启该服务后虚拟IP重新加载

root@OpenWrt:/# /etc/init.d/keepalived restart
备机同时则虚拟IP丢失
root@OpenWrt:/# ip a|grep br-lan
br-lan: mtu 1500 qdisc noqueue state UP group default
inet 10.240.4.225/24 brd 10.240.4.255 scope global br-lan

说明:
直接方法就是断开任意一个路由(10.240.4.224或者10.240.4.225),看虚拟路由VIP:10.240.4.226是否ping通。
有需要对wan口配置vrrp,可以参考官网配置:https://openwrt.org/docs/guide-user/network/high-availability

7 防火墙功能

OpenWrt 内置防火墙介绍

Openwrt 的防火墙实现与Linux的防火墙是通过netfilter内核模块,加上用户空间的iptables管理工具;同样是五链四张表、五元素的管理框架。
OpenWRT开发了一套与iptables同地位的netfilter管理工具fw3,这个工具侧重于从uci格式的配置文件中获取过滤信息下发到内核的netfilter中去。防火墙文件总会在/etc/init.d/firewall 启动的时候由 UCI 解码并且生成 iptables规则生效。
OpenWrt 关于 NAT、 DMZ、防火墙规则等等都是由配置文件 /etc/config/firewall 文件控制。

防火墙的修改生效,需要重启防火墙执行以下指令:

查看当前 iptables 的已启用策略语法为:

root@OpenWrt:/# iptables –L

防火墙内容解析

我们打开防火墙文件查看一下:

第一部分 默认参数

这里是防火墙默认的参数表,其内容和相应的动作可以有如下选择:
防火墙文件这方面的内容为:
syn_flood 1 表示: 是否启用防泛洪攻击。可选值: 0 关闭,1 启用。

input ACCEPT 表示: 设置 INPUT 链(chain)的过滤策略,可选值: ACCEPT 允许, REJECT拒绝。
output ACCEPT 表示: 设置 OUTPUT 链(chain)的过滤策略,可选值: ACCEPT 允许,REJECT 拒绝。
forward REJECT 是 设置 FORWARD 链(chain)的过滤策略,可选值: ACCEPT 允许,REJECT 拒绝。
disable_ipv6 1 表示: 设置关闭掉 IPv6 的防火墙策略,可选值: 0 忽略,1 关闭
这部分参考值既是系统默认的即可,无需修改。

第二部分 域 :

config zone
option name 'lan'
list network 'lan'
option input 'ACCEPT'
option output 'ACCEPT'
option forward 'ACCEPT'

config zone
option name 'wan'
list network 'wan'
list network 'wan6'
option input 'REJECT'
option output 'ACCEPT'
option forward 'REJECT'
option masq '1' #NAT转换使能
option mtu_fix '1'

config 后面是表示配置项的名称,这里”zone”为域的意思。
name 表示域的名字,必须是唯一值,可选值: wan, lan
network 表示网络列表,用来指示哪些接口被捆绑到这个域中,可选接口的名称,比如: lan,
wan, wan6
input ACCEP 允许 INPUT 链(chain)的过滤策略
output ACCEPT 允许 OUTPUT 链(chain)的过滤策略
forward ACCEPT 允许 FORWARD 链(chain)的过滤策略
masq 1 表示: 设置传输伪装,如果是 WAN 口必须为 1,实现NAT转换使能
mtu_fix 1 表示: 设置 MTU 的 MSS Clamping,如果是 WAN 口设为 1

简单来说:
mtu 是网络传输最大报文包。
mss 是网络传输数据最大值。
mss 加包头数据就等于 mtu.

这部分的设置作用如下:
zone将一个或多个接口分组,并用作forwardings, rules and redirects的源或目的地。传出流量的Masquerading(NAT)是在每个zone的基础上进行控制的。

第三部分 转发

config forwarding
option src 'lan'
option dest 'wan'

src lan 是设置转发来源
dest wan 是设置转发目标
这部分作用描述如下:
Forwarding部分控制zones之间的业务流,并且可以实现特定方向的MSS Clamping。转发规则只涵盖一个方向。为了允许两个zone之间的双向流量,需要两个转发,其中src和dest分别反向。

第四部分 规则

config rule
option name ‘Allow-DHCP-Renew’
option src ‘wan’
option proto ‘udp’
option dest_port ’68’
option target ‘ACCEPT’
option family ‘ipv4’

config rule
option name ‘Allow-Ping’
option src ‘wan’
option proto ‘icmp’
option icmp_type ‘echo-request’
option family ‘ipv4’
option target ‘ACCEPT’

config rule
option name ‘Allow-IGMP’
option src ‘wan’
option proto ‘igmp’
option family ‘ipv4’
option target ‘ACCEPT’

这里只是罗列出了几个防火墙的规则,其实防火墙规则在/etc/config/firewall 中可以有任意数量的规则,这些规则定义了数据传输的动作和行为是被允许还是拒绝。

对于防火墙规则的作用描述如下:
规则可用于定义基本的接受或拒绝规则,以允许或限制对特定端口或主机的访问。像重定向,规则被绑定到给定的source zone,并与传入的流量相匹配。

防火墙规则的相应选项的意思:

name 表示:设置当前这个 rule 的名称
target 表示:设置防火墙动作,可选值: ACCEPT 许可, REJECT 拒绝, DROP 抛弃
src 表示: 数据源的 zone 域是哪个。可选值: wan / lan
src_ip 表示:数据源的 IP 地址是哪个。
src_mac 表示:数据源的 MAC 地址是哪个。
src_port 表示:数据源的端口,可以是一个端口,或一个端口范围,但是必须

同时指定了协议类型
proto 表示: 数据源的协议类型, 可选值: tcp, udp, tcpudp, udplit, icmp, esp, ah, sctp,
或 all 表示全部
dest 表示:数据目标的 zone 域是哪个。可选值: wan / lan
dest_ip 表示:数据目标的 IP 地址。
dest_port 表示:数据目标的端口,可以是一个端口,或一个端口范围,但是必须同时指定了协议类型
family 表示:数据的协议族,可选值: ipv4, ipv6, any
rule 规则设置可以灵活,比如允许来自 WAN 口的 ping,

例:

第五部分内容 端口转发、重定向

OpenWrt 防火墙允许使用者通过 WAN 口访问特定的端口重定向给局域网的一台电脑设备(比如 WAN 口访问 80 端口(HTTP)将重定向给局域网某台网站服务器)。 端口重定向是在防火墙配置/etc/config/firewall 中定义 redirect 段策略实现的。所有匹配的来源数据将根据目标设置转发到目标主机上。 firewall 配置中可以有多个 redirect 策略,默认是没有开放任何重定向的,如果需要重定向请使用 vi 或 UCI 进行配置。
name 表示:设置当前这个 redirect 的名称
src 表示:转发源的 zone 域,一般转发都是转发从 wan 过来的访问
src_ip 表示:转发源的 IP 地址指定
src_mac 表示:转发源的 MAC 地址指定
src_port 表示:转发源的端口指定
proto 表示: 转发源的协议类型, 可选值: tcp, udp, tcpudp, udplit, icmp, esp, ah, sctp, 或
all 表示全部
dest 表示:转发目标的 zone 域
dest_ip 表示:转发目标的 IP 地址指定
dest_mac 表示:转发目标的 MAC 地址指定
dest_port 表示:转发目标的端口指定
端口重定向的可配置性很灵活。比如我们将 8080 这个端口转发给内网一台服务器的 18080 端口。

第六部分内容 IPV6

第七部分 IPSec

允许 IPSec tunnel 通过防火墙,分别 IKA SA 、IPSec SA 放行。

第八部分 扩展内容

DMZ 介绍

DMZ 是英文“ demilitarized zone”的缩写,中文名称为“隔离区”。它是为了解决安装防火墙后外部网络不能访问内部网络服务器的问题,而设立的一个非安全系统与安全系统之间的缓冲区,这个缓冲区位于企业内部网络和外部网络之间的小网络区域内,在这个小网络区域内可以放置一些必须公开的服务器设施,如企业 Web 服务器、FTP 服务器和论坛等。另一方面,通过这样一个 DMZ 区域,更加有效地保护了内部网络,因为这种网络部署,比起一般的防火墙方案,对攻击者来说又多了一道关卡。端口映射与 DMZ 的区别在于:端口映射只是映射指定的端口,DMZ 相当于映射所有的端口,并且直接把主机暴露在网关中,比端口映射方便但是不安全。
下面是关于 DMZ的一个示意图:

DMZ

结合之前简单的规则部分,这里我们给出一个将电脑 192.168.1.2 设置 DMZ 隔离区的例子:

Simple DMZ rule
The following rule redirects all WAN ports for all protocols to the internal host
192.168.1.2.
config redirect
option src wan
option proto all
option dest_ip 192.168.1.2

iptables 命令
DNAT 目的地址、目的端口的转换

iptables -t nat -A zone_wan_prerouting -p tcp \
-s 192.168.9.20/255.255.255.255\
-d 192.168.8.20/255.255.255.255\
-m tcp --sport 3333 --dport 2222\
-m comment --comment "@redirect[0]"\
-j DNAT --to-destination 192.168.10.20:22

如果遇到“源地址192.168.8.20,目的地址192.168.8.20,源端口3333,目的端口2222”的数据包,修改成“源地址192.168.168.8.20,目的地址192.168.10.20,源端口3333,目的端口22”的数据包。

iptables -t nat -A zone_wan_prerouting -p tcp\
-d 192.168.8.20/255.255.255.255\
-m tcp --dport 2222 -m comment\
--comment "@redirect[0]" -j REDIRECT --to-ports 22

如果遇到“目的地址192.168.8.20,目的端口2222,协议为tcp”的数据包,修改成“源地址保持,目的地址192.168.10.20,源端口保持,目的端口22,协议为tcp”的数据包。

SNAT 数据包的源地址转换

iptables -t nat -A zone_lan_postrouting -p tcp\
-s 192.168.9.20/255.255.255.255\
-d 192.168.10.20/255.255.255.255\
-m tcp --sport 3333 --dport 22\
-m comment --comment "@redirect[0]" \
-j SNAT --to-source 192.168.8.20:2222

当遇到“源地址192.168.9.20,目的地址192.168.10.20,源端口3333,目的端口22,协议为TCP”的数据包时,将其源地址和源端口修改为(192.168.8.20,2222)

查看 NAT 表,区别 uci 配置与 iptables 配置的关系

root@ixeCloud:/etc/config# iptables -t nat -L |tail -n 5
prerouting_wan_rule all -- anywhere anywhere /* !fw3: Custom wan prerouting rule chain */
DNAT tcp -- anywhere anywhere tcp dpt:8080 /* !fw3: port-redirect */ to:192.168.40.2:18080
REDIRECT tcp -- anywhere anywhere tcp dpt:2000 /* !fw3: port-2000 */ redir ports 22
DNAT tcp -- 192.168.9.20 192.168.8.20 tcp spt:3333 dpt:2222 /* @redirect[0] */ to:192.168.10.20:22
REDIRECT tcp -- anywhere 192.168.8.20 tcp dpt:2222 /* @redirect[0] */ redir ports 22

通过 uci 命令修改的 firewall 的内容,需要加载 firewall reload 后,防火墙参数才可以生效;而 iptables 命令修改后直接生效。
注意: 在 OpenWRT 的 web 配置页面不显示 iptables 配置的NAT内容。

8 BGP功能

BGP Routing on OpenWrt with Quagga
Quagga Routing Suite是一个开源软件套件,为 Unix 平台提供稳定的 BGPv4 实现。它由一个核心 zebra 守护进程和支持各种路由协议(包括 RIP、OSPF 和 BGP)的守护进程组成。
在 OpenWrt 上安装组件

9 端口聚合功能

重新创建虚机,添加两个接口

virt-install --name openwrt --ram 1024 --vcpus 2 --disk path=/opt/openwrt-22.03.5-x86-64-generic-ext4-combined.img --network bridge=br0,model=e1000 --network bridge=br0,model=e1000 --force --import --autostart  --vnc --vncport=5911  --vnclisten=0.0.0.0

给OpenWRT安装必要软件包,以启用bond的支持

opkg update
opkg install kmod-bonding luci-proto-bonding proto-bonding

接着从br-lan中移除eth0

brctl delif br-lan eth0
ifconfig br-lan down

在自动启动脚本中增加如下配置,以便在开机时自动创建bond网卡
需要添加的内容如下(添加至 exit 0之前),需要根据实际情况修改网卡名称(即下方的eth0和eth1为你要聚合的两个网口)

modprobe bonding mode=balance-rr miimon=100
#添加 bond 类型的虚拟接口 名称为 bond-wan
ip link add bond-wan type bond mode balance-rr 
#将eth0添加到聚合接口
ifconfig eth0 down 
ip link set eth0 master bond-wan
#将eth1添加到聚合接口
ifconfig eth1 down
ip link set eth1 master bond-wan 
ip link set bond-wan up #启动该网卡

修改 wan 接口的网卡为 bond-wan 。
同理,如果要对lan接口做聚合,可以配置bond-lan,然后修改 lan接口的网卡为 bond-lan。
如果不想用命令行添加,也可以在界面luci上添加。
网络 -> 接口 -> 添加新接口-> 新接口的协议 -> 链路聚合(通道绑定)
之后在 高级设置->从属接口 选择网卡,其他参数默认即可
配置IP和路由:

ifconfig bond-wan 10.240.4.224 netmask 255.255.255.0
route add default gw 10.240.4.1

10 创建VLAN

1) 在 “接口” 页面,切换至 “设备” 选项卡,点击左下角的 “添加设备配置”,添加一 “网桥设备”。如果是新安装的OpenWrt,也可直接编辑网桥设备 “br-lan”,在名为 “br-lan” 设备的右侧,点击 “配置” 按钮。
2) 在“常规设备选项”中,将“网桥端口”更改为eth0,此时所有eth0端口的数据将经过该网桥。

创建VLAN

3) 切换至 “网桥VLAN过滤” 选项卡,启用VLAN过滤,并新增VLAN 101、1000。eth0作为他们俩已标记的出口。设置完毕后点击“保存”按钮。这样,网桥内VLAN ID为101、1000的数据,将会被打上VLAN Tag后,从eth0端口发送。

网桥VLAN过滤

4) 在“设备”界面,可见自动新增了两个软件VLAN设备。通过eth0进入网桥“br-lan”的数据,将根据VLAN ID标签,将其转发至虚拟的br-lan.1000和br-lan.101设备。同时,br-lan.1000和br-lan.101设备发送的数据,进入网桥br-lan后,将根据设定的VLAN过滤规则,决定是否加上VLAN Tag从对应的实际硬件设备进行转发。

新增设备

基于CX-M的PXE环境部署验证 —以UEFI启动为例

1 目的

该文档旨在以CX-M设备完成PXE预启动执行环境的搭建,从而进行计算终端操作系统的自动化部署安装工作。

2 PXE介绍

PXE(Pre-boot Execution Environment)预启动执行环境是一种网络引导协议,它规范描述了一种标准化的Client/Server环境,允许终端在没有本地存储设备(如硬盘)或操作系统的情况下,通过网络连接到服务器并获取所需的启动文件来启动操作系统。

2.1 工作原理

  • PXE启动:当终端进入网卡启动时,会发送一个特殊的PXE启动请求到本地网络上的DHCP服务器。
  • DHCP服务:DHCP服务器收到PXE启动请求后,会向计算机发送DHCP响应,DHCP响应包含了计算的网络配置信息,以及PXE引导服务器的IP地址——TFTP Server(Trivial File Transfer Protocol)。
  • TFTP传输:计算机收到DHCP相应后,会使用TFTP从Server下载引导文件——pxelinux.0或者bootx64.efi。
  • 加载引导文件:计算机加载并执行从TFTP下载的引导文件。引导文件通常是一个小型的Linux内核,能够连接到PXE服务器并获取操作系统镜像。
  • 获取配置信息:引导文件连接到PXE服务器后,会通过TFTP发送请求以获取更多的配置信息。
  • 获取操作系统镜像:PXE服务器根据计算机的请求,将系统镜像发送给计算机。
  • 操作系统加载:一旦操作系统镜像文件下载完成,计算机会加载并执行该镜像文件。此时,计算机将完全从网络上运行操作系统,而无需本地硬盘上的安装。
图片1.1PXE启动流程

图1.1:PXE启动流程

注:

  1. 网卡支持PXE,目前新出的网卡基本都支持,同时需要完成BIOS的启动项配置。
  2. 传统启动模式(Legacy)下,PXE客户端会请求pxelinux.0;UEFI启动会请求bootx64.efi。
  3. 也可以采用nfsboot方式,该流程采用的时ISO镜像下载再安装的方式。

具体配置

PXE Server所需的组件全部部署在CX-M上,即一台CX-M设备即可满足PXE的需求。

3.1 安装配置TFTP

mkdir /home/admin/tftp
sudo apt install tftpd-hpa

sudo vi /etc/default/tftpd-hpa
TFTP_USERNAME=”tftp”
TFTP_DIRECTORY=”/home/admin/tftp”
TFTP_ADDRESS=”0.0.0.0:69”
TFTP_OPTIONS=”—secure -c”

admin@ASW-06:~$ sudo systemctl restart tftpd-hpa

注:如果上传下载TFTP报权限相关问题,需要通过chown tftp:tftp /home/admin/tftp/以及在配置文件中的TFTP_OPTIONS加入 -c后重启服务来解决。

测试输出如下信息即可用:

C:\Users\honghao>TFTP host 10.110.0.10 get /install.log install.log
传输成功: 1 秒 9090 字节,9090 字节/秒

3.2 准备启动文件

完整目录结构如下所示:

/home/admin/tftp/
├── boot
│   └── live-server
│       ├── initrd
│       └── vmlinuz
├── grub
│   ├── bootx64.efi
│   ├── font.pf2
│   └── grub.cfg
└── grubx64.efi

3.2.1 创建目录

mkdir /home/admin/tftp/grub
mkdir /home/admin/tftp/boot
mkdir /home/admin/tftp/boot/live-server

3.2.2 获取引导文件

apt-get download shim.signed
apt-get download grub-efi-amd64-signed
dpkg -x shim.signed shim
dpkg -x grub-efi-amd64-signed grub
cp ./grub/usr/lib/grub/x86_64-efi-signed/grubnetx64.efi.signed  /home/admin/tftp/grubx64.efi
cp ./shim/usr/lib/shim/shimx64.efi.signed  /home/admin/tftp/grub/bootx64.efi

注:

  • 如果报文件不存在错误,可通过shim.signed以及grub-efi-amd64-signed来手动下载。
  • bootx64.efi文件是UEFI系统的启动管理器,它会在计算机启动时被加载到内存中,然后启动操作系统的安装程序或引导管理器。这个文件通常位于Linux ISO image的EFI目录下,它可以被用来启动UEFI系统安装程序或启动其他操作系统的引导管理器。
  • grubx64.efi是GNU GRUB(GRand Unified Bootloader)引导管理器的UEFI版本,它是一种常用的引导程序,被广泛应用于Linux系统中。当计算机使用UEFI启动时,UEFI固件会查找EFI目录下的grubx64.efi文件,并将其加载到内存中。然后,grubx64.efi将会显示一个菜单,列出可用的操作系统和内核,允许用户选择要启动的操作系统或内核。在Linux ISO image中,grubx64.efi文件通常被用作引导管理器,用于启动Linux操作系统的安装程序。

3.2.3 获取内核镜像文件

3.2.3.1 下载镜像文件

直接从官网进行下载,以ubuntu-20.04.6-live-server-amd64.iso为例。只有live版镜像支持subiquity——Ubuntu Server安装程序,使用cloud-init进行自动安装。

3.2.3.2 复制镜像文件

sudo mount ubuntu-20.04.6-live-server-amd64.iso /media
cp /media/casper/initrd       /home/admin/tftp/boot/live-server
cp /media/casper/vmlinuz      /home/admin/tftp/boot/live-server

注:vmlinuz(可引导的、压缩的内核),initrd(系统引导过程中挂载的一个临时根文件系统)。

3.2.3.3 复制配置文件

cp /media/grub/font.pf2       /home/admin/tftp/grub
cp /media/grub/grub.cfg       /home/admin/tftp/grub

注:font.p2为grub字体文件,grub.cfg为启动配置文件。

3.3 配置HTTP Server

mkdir -p /home/admin/http/autoinstall
mkdir -p /home/admin/http/iso
touch / home/admin/http/autoinstall/user-data
touch / home/admin/http/autoinstall/meta-data
mv ubuntu-20.04.6-live-server-amd64.iso /home/admin/http/iso/
sudo nohup python -m SimpleHTTPServer 8000  &

注:

  • autoinstall 目录存放参数自动配置文件,user-data、meta-data 是cloud-init 要求的文件名。
  • iso 目录存放操作系统镜像文件。

3.4 配置启动文件

3.4.1 配置grub.cfg

vi /home/admin/tftp/grub/grub.cfg
if loadfont /boot/grub/font.pf2 ; then
	set gfxmode=auto
	insmod efi_gop
	insmod efi_uga
	insmod gfxterm
	terminal_output gfxterm
fi

set menu_color_normal=white/black
set menu_color_highlight=black/light-gray

set timeout=5
menuentry "Install Ubuntu Server" {
	set gfxpayload=keep
	linux  /boot/live-server/vmlinuz root=/dev/ram0 ramdisk_size=1500000 ip=dhcp url='http://10.230.2.200:8000/iso/ubuntu-20.04.6-live-server-amd64.iso' autoinstall ds=nocloud-net\;s=http://10.230.2.200:8000/autoinstall/ ---
	initrd	/boot/live-server/initrd
}
  1. 指定镜像文件相对于tftp根目录的路径 /boot/live-server/initrd。
  2. ip=dhcp指定内核镜像挂载后使用DHCP获取IP地址。
  3. url=指定ISO文件的网络存放路径。
  4. autoinstall ds=nocloud-net\;s=http://10.230.2.200:8000/autoinstall/ — 该配置指明参数自动填写,并指明配置文件所在路径。

3.4.2 配置cloud-init

在准备cloud.init config前。建议先手动安装一次ubuntu 20.04.6,在/var/log/installer/目录下会生成一个autoinstall-user-data,这是基于当前的系统的应答文件,我们可以以它作为基础,根据实际情况进行修改。

vi /home/admin/http/autoinstall/user-data
#cloud-config
autoinstall:
  apt:
    mirror-selection:
      primary:
      - country-mirror
      - arches: &id001
        - amd64
        - i386
        uri: http://archive.ubuntu.com/ubuntu/
      - arches: &id002
        - s390x
        - arm64
        - armhf
        - powerpc
        - ppc64el
        - riscv64
        uri: http://ports.ubuntu.com/ubuntu-ports
    preserve_sources_list: false
    security:
    - arches: *id001
      uri: http://security.ubuntu.com/ubuntu/
    - arches: *id002
      uri: http://ports.ubuntu.com/ubuntu-ports
  identity:
    hostname: ubuntu_server
    password: $6$wbUXmGdjvH5WdLtl$kF0FOfiYaAJgo1uHMH.7pcsR8VEYgeaO6F6ORn2QRVMnnBws18DbBRbDgv6uWrBrO7oGTgI7EWiznJM4osSpy1
    realname: honghao
    username: howie
  kernel:
    package: linux-generic
  keyboard:
    layout: us
    toggle: null
    variant: ''
  locale: en_US.UTF-8
  network:
    ethernets:
      enp3s0:
        dhcp4: true
    version: 2
    wifis: {}
  oem:
    install: auto
  source:
    id: ubuntu-server
    search_drivers: false
  ssh:
    allow-pw: true
    authorized-keys: []
    install-server: true
  storage:
    config:
    - ptable: gpt
      path: /dev/nvme0n1
      wipe: superblock-recursive
      preserve: false
      name: ''
      grub_device: false
      id: disk-nvme0n1
      type: disk
    - device: disk-nvme0n1
      size: 1127219200
      wipe: superblock
      flag: boot
      number: 1
      preserve: false
      grub_device: true
      offset: 1048576
      path: /dev/nvme0n1p1
      id: partition-0
      type: partition
    - fstype: fat32
      volume: partition-0
      preserve: false
      id: format-0
      type: format
    - device: disk-nvme0n1
      size: 2147483648
      wipe: superblock
      number: 2
      preserve: false
      grub_device: false
      offset: 1128267776
      path: /dev/nvme0n1p2
      id: partition-1
      type: partition
    - fstype: ext4
      volume: partition-1
      preserve: false
      id: format-1
      type: format
    - device: disk-nvme0n1
      size: 252783362048
      wipe: superblock
      number: 3
      preserve: false
      grub_device: false
      offset: 3275751424
      path: /dev/nvme0n1p3
      id: partition-2
      type: partition
    - name: ubuntu-vg
      devices:
      - partition-2
      preserve: false
      id: lvm_volgroup-0
      type: lvm_volgroup
    - name: ubuntu-lv
      volgroup: lvm_volgroup-0
      size: 107374182400B
      wipe: superblock
      preserve: false
      path: /dev/ubuntu-vg/ubuntu-lv
      id: lvm_partition-0
      type: lvm_partition
    - fstype: ext4
      volume: lvm_partition-0
      preserve: false
      id: format-2
      type: format
    - path: /
      device: format-2
      id: mount-2
      type: mount
    - path: /boot
      device: format-1
      id: mount-1
      type: mount
    - path: /boot/efi
      device: format-0
      id: mount-0
      type: mount
  updates: security
  version: 1

注:

  1. 密码需要加密,可以先用工具对密码进行加密后填入。
  2. 磁盘分区配置要注意,配置不对会导致自动安装走不下去,提示 crash。
  3. 安装过程日志在 /var/log/installer/。

3.5 安装配置DHCP Server

3.5.1 配置CX-M接口IP

ASW-06# configure terminal
ASW-06(config)# interface ethernet 1
ASW-06(config-if-1)# ip address 10.230.2.200/24

3.5.2 配置DHCP

sudo apt install isc-dhcp-server

sudo vi /etc/default/isc-dhcp-server
INTERFACEsv4=”Ethernet1”
#INTERFACESv6=””

sudo vi /etc/dhcp/dhcpd.conf
subnet 10.230.2.0  netmask 255.255.255.0 {
range 10.230.2.202  10.230.2.210;
option routers 10.230.2.200;
option broadcast-address 10.230.2.255;
default-lease-time 21600;
max-lease-time 43200;
allow leasequery;
next-server 10.230.2.200;
filename "bootx64.efi";
}
sudo systemctl restart isc-dhcp-server

验证

本次验证以DELL笔记本终端作为验证设备。

  • 配置PXE启动

启动logo界面按F12进入启动项,选择Onboard NIC启动。

图4.1:PXE启动

图4.1:PXE启动

  • 显示执行过程

PXE自动化安装过程如下所示:

图4.2:PXE启动-2.

图4.2:PXE启动-2

图4.3:PXE启动-3

图4.3:PXE启动-3

图4.4:PXE启动-4

图4.4:PXE启动-4

最终安装完成后,计算机会自动重启。

Helium智能网卡相关功能验证:OVS、vFW与SSL加解密的卸载

1 方案概述

本文主要讲解Helium智能网卡(下文统一简称为“智能网卡”)相关解决方案,验证其对VNF功能的卸载能力。整个验证过程涵盖以下三个功能点:

  • 智能网卡对OVS的卸载;
  • 智能网卡对基于虚拟机的VNF(vFW)功能卸载;
  • 智能网卡对基于容器的VNF(SSL加解密)功能卸载。

2 硬件与软件环境

验证过程中涉及到的硬件和软件环境如表2-1和表2-2所示。

验证方案物理拓扑
图2-1:验证方案物理拓扑
名称型号硬件指标数量
智能网卡EC2004Y【参见产品彩页】1
服务器X86需兼容全高尺寸网卡2
光模块25GSFP282
光纤多模10G/25G适用1

表2-1:硬件环境

软件版本备注
宿主机操作系统CentOS 7.8.2003
安装包helium-V1.0.zip从support.asterfusion.com下载

表2-2:软件环境

3 验证思路及过程

3.1 将OVS卸载到智能网卡

3.1.1 验证思路

网卡出厂时会默认安装好系统,我们需要进行管理网口配置、驱动安装调试等基本配置操作。

OVS卸载验证拓扑
图3-1:OVS卸载验证拓扑

完成以上基本配置后,在智能网卡侧运行OVS,创建测试网桥,然后在宿主机侧启动两台虚拟机连接到测试网桥上。经过验证测试,两台虚拟机之间可以通过位于智能网卡侧的OVS网桥进行通信,证明OVS卸载到智能网卡后可以正常提供服务。

3.1.2 验证过程

3.1.2.1 对宿主机和智能网卡进行基本配置
#修改cpu内核启动参数
#编辑/etc/default/grub,修改其中GRUB_CMDLINE_LINUX_DEFAULT,新增内容如下:
intel_iommu=on iommu=pt pci=assign-busses pcie_acs_override=downstream
[root@asterfusion ~]# cat /etc/default/grub
GRUB_TIMEOUT=5
GRUB_DISTRIBUTOR="$(sed 's, release .*$,,g' /etc/system-release)"
GRUB_DEFAULT=saved
GRUB_DISABLE_SUBMENU=true
GRUB_TERMINAL_OUTPUT="console"
GRUB_CMDLINE_LINUX="intel_iommu=on iommu=pt pci=assign-busses pcie_acs_override=downstream crashkernel=auto rd.lvm.lv=centos/root rd.lvm.lv=centos/swap rhgb quiet"
GRUB_DISABLE_RECOVERY="true"
#最后执行如下命令后重启宿主机
[root@asterfusion ~]#grub2-mkconfig -o /boot/grub2/grub.cfg

#智能网卡配置pci上游总线地址
root@OCTEONTX:~# ifconfig mvmgmt0 down 2>/dev/null 
root@OCTEONTX:~# echo 0 > /sys/bus/pci/devices/0000\:05\:00.0/sriov_numvfs 
root@OCTEONTX:~# rmmod mgmt_net 2>/dev/null 
root@OCTEONTX:~# rmmod pcie_ep 
root@OCTEONTX:~# rmmod dpi_dma 
root@OCTEONTX:~# echo 1 > /sys/bus/pci/devices/0000\:05\:00.0/sriov_numvfs   
root@OCTEONTX:~# modprobe dpi_dma 
# lspci -tv | grep -C2 b200获取网卡host-sid,本机为03则下面的host_sid为ox30300
root@OCTEONTX:~# modprobe pcie_ep    host_sid=0x30300 pem_num=0 epf_num=0
#配置mvmgmt0端口
root@OCTEONTX:~#modprobe mgmt_net 
root@OCTEONTX:~#ifconfig mvmgmt0 12.12.12.12  
root@OCTEONTX:~#ifconfig mvmgmt0 up

#宿主机加载网卡驱动
[root@asterfusion ~]#tar -xvf Helium-Driver-V1.0R1.tar.gz
[root@asterfusion ~]#cd Helium-ep-driver
[root@asterfusion ~]#make
[root@asterfusion ~]#insmod ./drivers/legacy/modules/driver/src/host/linux/kernel/drv/octeon_drv.ko num_vfs=4
[root@asterfusion~]#insmod ./drivers/mgmt_net/mgmt_net.ko
[root@asterfusion~]#ifconfig mvmgmt0 12.12.12.1
[root@asterfusion~]#ifconfig mvmgmt0 up

#上述配置完后确认智能网卡和宿主机虚拟网口信息
#智能网卡确认加载完成
root@OCTEONTX:~#lspci -nn -d 177d:a0f7
#宿主机确认驱动加载完成
[root@asterfusion~]#lspci | grep b203
#宿主机如果加载有问题或需要关闭更改虚拟端口,需要先卸载驱动再重新按上面步骤加载
[root@asterfusion~]#ifconfig mvmgmt0 down 
[root@asterfusion~]#rmmod mgmt_net 
[root@asterfusion~]#rmmod octeon_drv
#注意一定要先在网卡加载驱动后再在宿主机加载驱动
3.1.2.2 安装OVS及相关服务

宿主机和智能网卡都需要安装DPDK和OVS。

# 拷贝helium-V1.0.zip压缩包上传到宿主机目录,并解压。
[root@asterfusion~]: unzip helium-V1.0.zip
#宿主机安装dpdk
[root@asterfusion~]# tar -zxvf helium-v1.0/Helium-DPDK19.11-V1.0R1.tar.gz 
[root@asterfusion~]# cd helium-v1.0/dpdk-19.11 
[root@asterfusion~]# export RTE_SDK=$PWD 
[root@asterfusion~]# export RTE_TARGET=build 
[root@asterfusion~]# make config T=x86_64-native-linuxapp-gcc 
[root@asterfusion~]# make
#VF口pci地址查看
[root@asterfusion~]#lspci | grep b203
#宿主机加载vfio驱动
[root@asterfusion~]#modprobe vfio-pci
[root@asterfusion~]#echo 1 > /sys/module/vfio/parameters/enable_unsafe_noiommu_mode
[root@asterfusion~]# helium-v1.0/dpdk-19.11/usertools/dpdk-devbind.py -b vfio-pci  0000:03:02.0  0000:03:02.1 0000:03:02.2 0000:03:02.3
#宿主机安装virtio-forwarder相关包
[root@asterfusion~]yum install protobuf.x86_64 -y
[root@asterfusion~]yum install protobuf-c.x86_64 -y
[root@asterfusion~]yum install czmq.x86_64 -y 
[root@asterfusion~] helium-v1.0/Helium-VirtioForwarder-V1.0R1-intel-ivb.bin
#宿主机开启大页内存
[root@asterfusion~]# sysctl vm.nr_hugepages=20480
#开启virtio-forwarder服务
[root@asterfusion~]systemctl start virtio-forwarder.service
#新增vhost和VF端口
[root@asterfusion~]/usr/local/lib/virtio-forwarder/virtioforwarder_port_control add_sock --vhost-path="/tmp/vhost1.sock" --pci-addr="03:02.0"    --tso=on    --mtu=9000
[root@asterfusion~]/usr/local/lib/virtio-forwarder/virtioforwarder_port_control add_sock --vhost-path="/tmp/vhost2.sock" --pci-addr="03:02.1"    --tso=on    --mtu=9000
#验证添加的端口配置
[root@asterfusion~]/usr/local/lib/virtio-forwarder/virtioforwarder_stats -d 0

# 拷贝helium-V1.0.zip压缩包上传到网卡data目录,并解压。
root@OCTEONTX:/data/helium-v1.0# unzip helium-V1.0.zip
#智能网卡安装dpdk
root@OCTEONTX:/data# tar -zxvf Helium-DPDK19.11-V1.0R1.tar.gz 
root@OCTEONTX:/data# cd dpdk-19.11 
root@OCTEONTX:/data# export RTE_SDK=$PWD 
root@OCTEONTX:/data# export RTE_TARGET=build 
root@OCTEONTX:/data# make config T=arm64-octeontx2-linux-gcc 
root@OCTEONTX:/data# make -j8
#智能网卡开启大页内存
root@OCTEONTX:/data# sysctl vm.nr_hugepages=32
#绑定端口
root@OCTEONTX:/data# /data/helium-v1.0/dpdk-19.11/usertools/dpdk-devbind.py -b vfio-pci 0002:02:00.0  0002:0f:00.2 0002:0f:00.3
#智能网卡安装ovs
root@OCTEONTX:/data# chmod +x Helium-OvS-V1.0R1.bin
root@OCTEONTX:/data# ./Helium-OvS-V1.0R1.bin
3.1.2.3 验证OVS
# 智能网卡启动OVS 
root@OCTEONTX:/data# cd ovs_install 
root@OCTEONTX:/data/ovs_install# chmod +x ovs_start.sh
root@OCTEONTX:/data/ovs_install# ./ovs_start.sh
# 验证OVS和DPDK的版本
root@OCTEONTX:/data/ovs_install# ovs-vsctl get Open_vSwitch . dpdk_initialized
true
root@OCTEONTX:/data/ovs_install# ovs-vsctl get Open_vSwitch . dpdk_version
"DPDK 19.11.0"
root@OCTEONTX:/data/ovs_install# ovs-vswitchd --version
ovs-vswitchd (Open vSwitch) 2.11.1
DPDK 19.11.0
3.1.2.4 在智能网卡侧配置管理网与业务网的网桥
# 创建并配置管理网的网桥,并将智能网卡的管理网IP放到此网桥上
root@OCTEONTX:~# ovs-vsctl add-br br-m -- set bridge br-m datapath_type=netdev
root@OCTEONTX:~# ip add del dev eth4 192.168.5.45/24
root@OCTEONTX:~# ovs-vsctl add-port br-m eth4
root@OCTEONTX:~# ip link set dev br-m up
root@OCTEONTX:~# ip add add dev br-m 192.168.5.45/24
root@OCTEONTX:~# ip route add default via 192.168.5.1 dev br-m
# 创建并配置业务网的网桥,将智能网卡的物理网口eth0连接到此网桥上
#查看智能网卡物理口PCI地址
root@OCTEONTX:/data/helium-v1.0# lspci|grep a063
0002:02:00.0 Ethernet controller: Cavium, Inc. Device a063 (rev 09)
0002:03:00.0 Ethernet controller: Cavium, Inc. Device a063 (rev 09)
0002:04:00.0 Ethernet controller: Cavium, Inc. Device a063 (rev 09)
0002:05:00.0 Ethernet controller: Cavium, Inc. Device a063 (rev 09)
root@OCTEONTX:~# ovs-vsctl add-br br-net -- set bridge br-net datapath_type=netdev
root@OCTEONTX:~# ovs-vsctl add-port br-net eth0 -- set Interface eth0 type=dpdk options:dpdk-devargs=0002:02:00.0  mtu_request=9000 
root@OCTEONTX:~# ip link set dev br-net up
3.1.2.5 在宿主机侧创建两台虚拟机,连接到智能网卡侧的业务网桥
# 修改虚拟机的xml配置文件,添加一个vhost-user的虚拟网卡。
# centos-00:
<domain type='kvm' id='16'>
  <name>centos-00</name>
  <uuid>549a2cc5-0b8b-4b7a-acd5-6171d0e85000</uuid>
  <memory unit='KiB'>2194432</memory>
  <currentMemory unit='KiB'>2194304</currentMemory>
  <memoryBacking>
    <hugepages>
      <page size='2048' unit='KiB' nodeset='0'/>
    </hugepages>
  </memoryBacking>
  <vcpu placement='static'>4</vcpu>
  <resource>
    <partition>/machine</partition>
  </resource>
  <os>
    <type arch='x86_64' machine='pc-i440fx-rhel7.6.0'>hvm</type>
    <boot dev='hd'/>
  </os>
  <features>
    <acpi/>
    <apic/>
    <vmport state='off'/>
  </features>
  <cpu mode='custom' match='exact' check='full'>
    <model fallback='forbid'>Haswell-noTSX-IBRS</model>
    <vendor>Intel</vendor>
    <feature policy='require' name='vme'/>
    <feature policy='require' name='ss'/>
    <feature policy='require' name='f16c'/>
    <feature policy='require' name='rdrand'/>
    <feature policy='require' name='hypervisor'/>
    <feature policy='require' name='arat'/>
    <feature policy='require' name='tsc_adjust'/>
    <feature policy='require' name='md-clear'/>
    <feature policy='require' name='stibp'/>
    <feature policy='require' name='ssbd'/>
    <feature policy='require' name='xsaveopt'/>
    <feature policy='require' name='pdpe1gb'/>
    <feature policy='require' name='abm'/>
    <feature policy='require' name='ibpb'/>
    <numa>
      <cell id='0' cpus='0-3' memory='2194432' unit='KiB' memAccess='shared'/>
    </numa>
  </cpu>
  <clock offset='utc'>
    <timer name='rtc' tickpolicy='catchup'/>
    <timer name='pit' tickpolicy='delay'/>
    <timer name='hpet' present='no'/>
  </clock>
  <on_poweroff>destroy</on_poweroff>
  <on_reboot>restart</on_reboot>
  <on_crash>destroy</on_crash>
  <pm>
    <suspend-to-mem enabled='no'/>
    <suspend-to-disk enabled='no'/>
  </pm>
  <devices>
    <emulator>/usr/libexec/qemu-kvm</emulator>
    <disk type='file' device='disk'>
      <driver name='qemu' type='qcow2'/>
      <source file='/home/CentOS-7-x86_64-GenericCloud-01.qcow2'/>
      <backingStore/>
      <target dev='hda' bus='ide'/>
      <alias name='ide0-0-0'/>
      <address type='drive' controller='0' bus='0' target='0' unit='0'/>
    </disk>
    <controller type='usb' index='0' model='ich9-ehci1'>
      <alias name='usb'/>
      <address type='pci' domain='0x0000' bus='0x00' slot='0x05' function='0x7'/>
    </controller>
    <controller type='usb' index='0' model='ich9-uhci1'>
      <alias name='usb'/>
      <master startport='0'/>
      <address type='pci' domain='0x0000' bus='0x00' slot='0x05' function='0x0' multifunction='on'/>
    </controller>
    <controller type='usb' index='0' model='ich9-uhci2'>
      <alias name='usb'/>
      <master startport='2'/>
      <address type='pci' domain='0x0000' bus='0x00' slot='0x05' function='0x1'/>
    </controller>
    <controller type='usb' index='0' model='ich9-uhci3'>
      <alias name='usb'/>
      <master startport='4'/>
      <address type='pci' domain='0x0000' bus='0x00' slot='0x05' function='0x2'/>
    </controller>
    <controller type='pci' index='0' model='pci-root'>
      <alias name='pci.0'/>
    </controller>
    <controller type='pci' index='1' model='pci-bridge'>
      <model name='pci-bridge'/>
      <target chassisNr='1'/>
      <alias name='pci.1'/>
      <address type='pci' domain='0x0000' bus='0x00' slot='0x08' function='0x0'/>
    </controller>
    <controller type='pci' index='2' model='pci-bridge'>
      <model name='pci-bridge'/>
      <target chassisNr='2'/>
      <alias name='pci.2'/>
      <address type='pci' domain='0x0000' bus='0x00' slot='0x09' function='0x0'/>
    </controller>
    <controller type='pci' index='3' model='pci-bridge'>
      <model name='pci-bridge'/>
      <target chassisNr='3'/>
      <alias name='pci.3'/>
      <address type='pci' domain='0x0000' bus='0x00' slot='0x0a' function='0x0'/>
    </controller>
    <controller type='ide' index='0'>
      <alias name='ide'/>
      <address type='pci' domain='0x0000' bus='0x00' slot='0x01' function='0x1'/>
    </controller>
    <controller type='virtio-serial' index='0'>
      <alias name='virtio-serial0'/>
      <address type='pci' domain='0x0000' bus='0x00' slot='0x06' function='0x0'/>
    </controller>
    <interface type='vhostuser'>
      <source type='unix' path='/tmp/vhost1.sock' mode='server'/>
      <model type='virtio'/>
      <mtu size='9000'/>
    </interface>
    <serial type='pty'>
      <source path='/dev/pts/4'/>
      <target type='isa-serial' port='0'>
        <model name='isa-serial'/>
      </target>
      <alias name='serial0'/>
    </serial>
    <console type='pty' tty='/dev/pts/4'>
      <source path='/dev/pts/4'/>
      <target type='serial' port='0'/>
      <alias name='serial0'/>
    </console>
    <channel type='spicevmc'>
      <target type='virtio' name='com.redhat.spice.0' state='disconnected'/>
      <alias name='channel0'/>
      <address type='virtio-serial' controller='0' bus='0' port='1'/>
    </channel>
    <input type='mouse' bus='ps2'>
      <alias name='input0'/>
    </input>
    <input type='keyboard' bus='ps2'>
      <alias name='input1'/>
    </input>
    <graphics type='spice' port='5900' autoport='yes' listen='127.0.0.1'>
      <listen type='address' address='127.0.0.1'/>
      <image compression='off'/>
    </graphics>
    <sound model='ich6'>
      <alias name='sound0'/>
      <address type='pci' domain='0x0000' bus='0x00' slot='0x04' function='0x0'/>
    </sound>
    <video>
      <model type='qxl' ram='65536' vram='65536' vgamem='16384' heads='1' primary='yes'/>
      <alias name='video0'/>
      <address type='pci' domain='0x0000' bus='0x00' slot='0x02' function='0x0'/>
    </video>
    <redirdev bus='usb' type='spicevmc'>
      <alias name='redir0'/>
      <address type='usb' bus='0' port='1'/>
    </redirdev>
    <redirdev bus='usb' type='spicevmc'>
      <alias name='redir1'/>
      <address type='usb' bus='0' port='2'/>
    </redirdev>
    <memballoon model='virtio'>
      <alias name='balloon0'/>
      <address type='pci' domain='0x0000' bus='0x00' slot='0x07' function='0x0'/>
    </memballoon>
  </devices>
  <seclabel type='dynamic' model='dac' relabel='yes'>
    <label>+107:+107</label>
    <imagelabel>+107:+107</imagelabel>
  </seclabel>
</domain>


# centos-01:
<domain type='kvm' id='15'>
  <name>centos-01</name>
  <uuid>549a2cc5-0b8b-4b7a-acd5-6171d0e85001</uuid>
  <memory unit='KiB'>2194432</memory>
  <currentMemory unit='KiB'>2194304</currentMemory>
  <memoryBacking>
    <hugepages>
      <page size='2048' unit='KiB' nodeset='0'/>
    </hugepages>
  </memoryBacking>
  <vcpu placement='static'>4</vcpu>
  <resource>
    <partition>/machine</partition>
  </resource>
  <os>
    <type arch='x86_64' machine='pc-i440fx-rhel7.6.0'>hvm</type>
    <boot dev='hd'/>
  </os>
  <features>
    <acpi/>
    <apic/>
    <vmport state='off'/>
  </features>
  <cpu mode='custom' match='exact' check='full'>
    <model fallback='forbid'>Haswell-noTSX-IBRS</model>
    <vendor>Intel</vendor>
    <feature policy='require' name='vme'/>
    <feature policy='require' name='ss'/>
    <feature policy='require' name='f16c'/>
    <feature policy='require' name='rdrand'/>
    <feature policy='require' name='hypervisor'/>
    <feature policy='require' name='arat'/>
    <feature policy='require' name='tsc_adjust'/>
    <feature policy='require' name='md-clear'/>
    <feature policy='require' name='stibp'/>
    <feature policy='require' name='ssbd'/>
    <feature policy='require' name='xsaveopt'/>
    <feature policy='require' name='pdpe1gb'/>
    <feature policy='require' name='abm'/>
    <feature policy='require' name='ibpb'/>
    <numa>
      <cell id='0' cpus='0-3' memory='2194432' unit='KiB' memAccess='shared'/>
    </numa>
  </cpu>
  <clock offset='utc'>
    <timer name='rtc' tickpolicy='catchup'/>
    <timer name='pit' tickpolicy='delay'/>
    <timer name='hpet' present='no'/>
  </clock>
  <on_poweroff>destroy</on_poweroff>
  <on_reboot>restart</on_reboot>
  <on_crash>destroy</on_crash>
  <pm>
    <suspend-to-mem enabled='no'/>
    <suspend-to-disk enabled='no'/>
  </pm>
  <devices>
    <emulator>/usr/libexec/qemu-kvm</emulator>
    <disk type='file' device='disk'>
      <driver name='qemu' type='qcow2'/>
      <source file='/home/CentOS-7-x86_64-GenericCloud-02.qcow2'/>
      <backingStore/>
      <target dev='hda' bus='ide'/>
      <alias name='ide0-0-0'/>
      <address type='drive' controller='0' bus='0' target='0' unit='0'/>
    </disk>
    <controller type='usb' index='0' model='ich9-ehci1'>
      <alias name='usb'/>
      <address type='pci' domain='0x0000' bus='0x00' slot='0x05' function='0x7'/>
    </controller>
    <controller type='usb' index='0' model='ich9-uhci1'>
      <alias name='usb'/>
      <master startport='0'/>
      <address type='pci' domain='0x0000' bus='0x00' slot='0x05' function='0x0' multifunction='on'/>
    </controller>
    <controller type='usb' index='0' model='ich9-uhci2'>
      <alias name='usb'/>
      <master startport='2'/>
      <address type='pci' domain='0x0000' bus='0x00' slot='0x05' function='0x1'/>
    </controller>
    <controller type='usb' index='0' model='ich9-uhci3'>
      <alias name='usb'/>
      <master startport='4'/>
      <address type='pci' domain='0x0000' bus='0x00' slot='0x05' function='0x2'/>
    </controller>
    <controller type='pci' index='0' model='pci-root'>
      <alias name='pci.0'/>
    </controller>
    <controller type='ide' index='0'>
      <alias name='ide'/>
      <address type='pci' domain='0x0000' bus='0x00' slot='0x01' function='0x1'/>
    </controller>
    <controller type='virtio-serial' index='0'>
      <alias name='virtio-serial0'/>
      <address type='pci' domain='0x0000' bus='0x00' slot='0x06' function='0x0'/>
    </controller>
    <interface type='vhostuser'>
       <source type='unix' path='/tmp/vhost2.sock' mode='server'/>
      <model type='virtio'/>
      <mtu size='9000'/> 
</interface>
    <serial type='pty'>
      <source path='/dev/pts/5'/>
      <target type='isa-serial' port='0'>
        <model name='isa-serial'/>
      </target>
      <alias name='serial0'/>
    </serial>
    <console type='pty' tty='/dev/pts/5'>
      <source path='/dev/pts/5'/>
      <target type='serial' port='0'/>
      <alias name='serial0'/>
    </console>
    <channel type='spicevmc'>
      <target type='virtio' name='com.redhat.spice.0' state='disconnected'/>
      <alias name='channel0'/>
      <address type='virtio-serial' controller='0' bus='0' port='1'/>
    </channel>
    <input type='mouse' bus='ps2'>
      <alias name='input0'/>
    </input>
    <input type='keyboard' bus='ps2'>
      <alias name='input1'/>
    </input>
    <graphics type='spice' port='5901' autoport='yes' listen='127.0.0.1'>
      <listen type='address' address='127.0.0.1'/>
      <image compression='off'/>
    </graphics>
    <sound model='ich6'>
      <alias name='sound0'/>
      <address type='pci' domain='0x0000' bus='0x00' slot='0x04' function='0x0'/>
    </sound>
    <video>
      <model type='qxl' ram='65536' vram='65536' vgamem='16384' heads='1' primary='yes'/>
      <alias name='video0'/>
      <address type='pci' domain='0x0000' bus='0x00' slot='0x02' function='0x0'/>
    </video>
    <redirdev bus='usb' type='spicevmc'>
      <alias name='redir0'/>
      <address type='usb' bus='0' port='1'/>
    </redirdev>
    <redirdev bus='usb' type='spicevmc'>
      <alias name='redir1'/>
      <address type='usb' bus='0' port='2'/>
    </redirdev>
    <memballoon model='virtio'>
      <alias name='balloon0'/>
      <address type='pci' domain='0x0000' bus='0x00' slot='0x07' function='0x0'/>
    </memballoon>
  </devices>
  <seclabel type='dynamic' model='dac' relabel='yes'>
    <label>+107:+107</label>
    <imagelabel>+107:+107</imagelabel>
  </seclabel>
</domain>

#相关镜像CentOS-7-x86_64-GenericCloud-XXXX.qcow2需要自己从网上下载。
# 创建两台CentOS7虚拟机并启动。
[root@asterfusion ~]# virsh define centos-00.xml
[root@asterfusion ~]# virsh define centos-01.xml
[root@asterfusion ~]# virsh start centos-00
[root@asterfusion ~]# virsh start centos-01
[root@asterfusion ~]# virsh list --all
 Id    Name                           State
----------------------------------------------------
 13    centos-00                      running
 14    centos-01                      running

# 将虚拟机连接到宿主机侧的管理网桥。
[root@asterfusion ~]# ip link add centos-00-m type veth peer name centos-00-m-s
[root@asterfusion ~]# ip link add centos-01-m type veth peer name centos-01-m-s
[root@asterfusion ~]# ovs-vsctl add-br br-m
[root@asterfusion ~]# ip link set dev br-m up
[root@asterfusion ~]# ip address add dev br-m 192.168.5.145/24
[root@asterfusion ~]# ovs-vsctl add-port br-m eno2
[root@asterfusion ~]# ip link set dev eno2 up
[root@asterfusion ~]# ovs-vsctl add-port br-m centos-00-m-s
[root@asterfusion ~]# ovs-vsctl add-port br-m centos-01-m-s
[root@asterfusion ~]# virsh attach-interface centos-00 --type direct --source centos-00-m --config
[root@asterfusion ~]# virsh attach-interface centos-00 --type direct --source centos-00-m --live
[root@asterfusion ~]# virsh attach-interface centos-01 --type direct --source centos-01-m --config
[root@asterfusion ~]# virsh attach-interface centos-01 --type direct --source centos-01-m --live
[root@asterfusion ~]# ip link set dev centos-00-m up
[root@asterfusion ~]# ip link set dev centos-01-m up
[root@asterfusion ~]# ip link set dev centos-00-m-s up
[root@asterfusion ~]# ip link set dev centos-01-m-s up

# 分别给两台虚拟机配置业务IP。
# centos-00:
[root@centos-00 ~]# ip link set dev eth0 up
[root@centos-00 ~]# ip add add dev eth0 172.0.0.100/24
# centos-01:
[root@centos-01 ~]# ip link set dev eth0 up
[root@centos-01 ~]# ip add add dev eth0 172.0.0.200/24

# 分别给两台虚拟机配置管理IP。
# centos-00:
[root@centos-00 ~]# ip link set dev eth1 up
[root@centos-00 ~]# ip add add dev eth1 192.168.5.155/24
[root@centos-00 ~]# ip route add default via 192.168.5.1 dev eth1
# centos-01:
[root@centos-01 ~]# ip link set dev eth1 up
[root@centos-01 ~]# ip add add dev eth1 192.168.5.165/24
[root@centos-01 ~]# ip route add default via 192.168.5.1 dev eth1
#查看智能网卡侧的VF口PCI地址,列出的VF口是从第二条开始和宿主机VF口一一对应。
root@OCTEONTX:/data/helium-v1.0# lspci -nn -d 177d:a0f7
0002:0f:00.1 System peripheral [0880]: Cavium, Inc. Device [177d:a0f7]
0002:0f:00.2 System peripheral [0880]: Cavium, Inc. Device [177d:a0f7]
0002:0f:00.3 System peripheral [0880]: Cavium, Inc. Device [177d:a0f7]
0002:0f:00.4 System peripheral [0880]: Cavium, Inc. Device [177d:a0f7]
0002:0f:00.5 System peripheral [0880]: Cavium, Inc. Device [177d:a0f7]
# 在智能网卡侧将虚拟机使用的两个VF绑定到业务网桥br-net。
root@OCTEONTX:~# ovs-vsctl add-port br-net sdp1 -- set Interface sdp1 type=dpdk options:dpdk-devargs=0002:0f:00.2 mtu_request=9000  
root@OCTEONTX:~# ovs-vsctl add-port br-net sdp2 -- set Interface sdp2 type=dpdk options:dpdk-devargs=0002:0f:00.3 mtu_request=9000

3.1.3 验证卸载结果

# 经过验证两台虚拟机能够经过智能网卡侧的网桥br-net正常通信。
# centos-00:
[root@centos-00 ~]# ping 172.0.0.200 -c 4
PING 172.0.0.200 (172.0.0.200) 56(84) bytes of data.
64 bytes from 172.0.0.200: icmp_seq=1 ttl=64 time=0.220 ms
64 bytes from 172.0.0.200: icmp_seq=2 ttl=64 time=0.164 ms
64 bytes from 172.0.0.200: icmp_seq=3 ttl=64 time=0.140 ms
64 bytes from 172.0.0.200: icmp_seq=4 ttl=64 time=0.132 ms

--- 172.0.0.200 ping statistics ---
4 packets transmitted, 4 received, 0% packet loss, time 3000ms
rtt min/avg/max/mdev = 0.132/0.164/0.220/0.034 ms
[root@centos-00 ~]#
# centos-01:
[root@centos-01 ~]# ping 172.0.0.100 -c 4
PING 172.0.0.100 (172.0.0.100) 56(84) bytes of data.
64 bytes from 172.0.0.100: icmp_seq=1 ttl=64 time=0.159 ms
64 bytes from 172.0.0.100: icmp_seq=2 ttl=64 time=0.163 ms
64 bytes from 172.0.0.100: icmp_seq=3 ttl=64 time=0.179 ms
64 bytes from 172.0.0.100: icmp_seq=4 ttl=64 time=0.180 ms

--- 172.0.0.100 ping statistics ---
4 packets transmitted, 4 received, 0% packet loss, time 2999ms
rtt min/avg/max/mdev = 0.159/0.170/0.180/0.013 ms


3.2 基于虚拟机的vFW卸载

3.2.1 验证思路

为了验证智能网卡对基于虚拟机的VNF卸载能力,本方案将在宿主机侧启动两台虚拟机作为租户的业务实例,在智能网卡侧运行CentOS虚拟机,配置相应的iptables规则作为VPC网关与防火墙。

基于虚拟机的vFW卸载拓扑
图3-2:基于虚拟机的vFW卸载拓扑

经过验证测试,成功地将防火墙功能卸载至智能网卡。由上图可知,租户的VPC网段为172.0.0.0/24,实例的网关设置为VPC网关172.0.0.1。当智能网卡上运行的防火墙收到业务实例访问其他网段的流量时,会对流量按预设规则进行过滤转发,而且在转发到业务网络前会进行一次SNAT,使得租户VPC内的实例可以访问到业务网络。

3.2.2 验证过程

本小节的所有操作,都是基于 3.1 小节的配置环境进行,因此基础的操作步骤不再赘述。

3.2.2.1 在智能网卡侧配置网桥vm-net,并将宿主机侧的两台虚机连接到此网桥
# 在智能网卡侧创建网桥vm-net。
root@OCTEONTX:~# ovs-vsctl add-br vm-net -- set bridge vm-net datapath_type=netdev
	
# 将VF从br-net网桥上删除。
root@OCTEONTX:~# ovs-vsctl del-port br-net sdp1
root@OCTEONTX:~# ovs-vsctl del-port br-net sdp2

# 将VF连接到vm-net网桥。
root@OCTEONTX:~# ovs-vsctl add-port vm-net sdp1 -- set Interface sdp1 type=dpdk options:dpdk-devargs=0002:0f:00.2 mtu_request=9000
root@OCTEONTX:~# ovs-vsctl add-port vm-net sdp2 -- set Interface sdp2 type=dpdk options:dpdk-devargs=0002:0f:00.3 mtu_request=9000

3.2.2.2 在智能网卡侧创建虚拟机,并分别连接到网桥vm-net和br-net

# 在智能网卡侧安装虚拟化软件包。
root@OCTEONTX:~# apt install -y qemu qama-utils qemu-efi-arm qemu-efi-aarch64 qemu-system-arm qemu-system-common qemu-system-data qemu-system-gui
	
# 准备虚拟机的镜像和xml文件,结果如下:
root@OCTEONTX:/data# mkdir libvirt && cd libvirt
root@OCTEONTX:/data/libvirt# tree
.
|-- images
|   |-- CentOS-7-aarch64-GenericCloud-2009.qcow2
|   `-- QEMU_EFI.fd
`-- xml
    |-- firewall-00.xml
    `-- default-net.xml

2 directories, 4 files
root@OCTEONTX:/data/libvirt# cat xml/centos-00.xml
<domain type='qemu'>
  <name>firewall-00</name>
  <uuid>dc042799-4e06-466f-8fce-71ac2105f786</uuid>
  <metadata>
    <libosinfo:libosinfo xmlns:libosinfo="http://libosinfo.org/xmlns/libvirt/domain/1.0">
      <libosinfo:os id="http://centos.org/centos/7.0"/>
    </libosinfo:libosinfo>
  </metadata>
  <memory unit='KiB'>2097152</memory>
  <currentMemory unit='KiB'>2097152</currentMemory>
  <vcpu placement='static'>2</vcpu>
  <os>
    <type arch='aarch64' machine='virt-4.2'>hvm</type>
    <loader readonly='yes' type='pflash'>/usr/share/AAVMF/AAVMF_CODE.fd</loader>
    <nvram>/var/lib/libvirt/qemu/nvram/centos-00_VARS.fd</nvram>
    <boot dev='hd'/>
  </os>
  <features>
    <acpi/>
    <gic version='2'/>
  </features>
  <cpu mode='custom' match='exact' check='none'>
    <model fallback='allow'>cortex-a57</model>
  </cpu>
  <clock offset='utc'/>
  <on_poweroff>destroy</on_poweroff>
  <on_reboot>restart</on_reboot>
  <on_crash>destroy</on_crash>
  <devices>
    <emulator>/usr/bin/qemu-system-aarch64</emulator>
    <disk type='file' device='disk'>
      <driver name='qemu' type='qcow2'/>
      <source file='/data/libvirt/images/CentOS-7-aarch64-GenericCloud-2009.qcow2'/>
      <target dev='vda' bus='virtio'/>
      <address type='pci' domain='0x0000' bus='0x04' slot='0x00' function='0x0'/>
    </disk>
    <controller type='pci' index='0' model='pcie-root'/>
    <controller type='pci' index='1' model='pcie-root-port'>
      <model name='pcie-root-port'/>
      <target chassis='1' port='0x8'/>
      <address type='pci' domain='0x0000' bus='0x00' slot='0x01' function='0x0' multifunction='on'/>
    </controller>
    <controller type='pci' index='2' model='pcie-root-port'>
      <model name='pcie-root-port'/>
      <target chassis='2' port='0x9'/>
      <address type='pci' domain='0x0000' bus='0x00' slot='0x01' function='0x1'/>
    </controller>
    <controller type='pci' index='3' model='pcie-root-port'>
      <model name='pcie-root-port'/>
      <target chassis='3' port='0xa'/>
      <address type='pci' domain='0x0000' bus='0x00' slot='0x01' function='0x2'/>
    </controller>
    <controller type='pci' index='4' model='pcie-root-port'>
      <model name='pcie-root-port'/>
      <target chassis='4' port='0xb'/>
      <address type='pci' domain='0x0000' bus='0x00' slot='0x01' function='0x3'/>
    </controller>
    <controller type='pci' index='5' model='pcie-root-port'>
      <model name='pcie-root-port'/>
      <target chassis='5' port='0xc'/>
      <address type='pci' domain='0x0000' bus='0x00' slot='0x01' function='0x4'/>
    </controller>
    <controller type='pci' index='6' model='pcie-root-port'>
      <model name='pcie-root-port'/>
      <target chassis='6' port='0xd'/>
      <address type='pci' domain='0x0000' bus='0x00' slot='0x01' function='0x5'/>
    </controller>
    <controller type='pci' index='7' model='pcie-root-port'>
      <model name='pcie-root-port'/>
      <target chassis='7' port='0xe'/>
      <address type='pci' domain='0x0000' bus='0x00' slot='0x01' function='0x6'/>
    </controller>
    <controller type='virtio-serial' index='0'>
      <address type='pci' domain='0x0000' bus='0x03' slot='0x00' function='0x0'/>
    </controller>
    <serial type='pty'>
      <target type='system-serial' port='0'>
        <model name='pl011'/>
      </target>
    </serial>
    <console type='pty'>
      <target type='serial' port='0'/>
    </console>
    <channel type='unix'>
      <target type='virtio' name='org.qemu.guest_agent.0'/>
      <address type='virtio-serial' controller='0' bus='0' port='1'/>
    </channel>
    <memballoon model='virtio'>
      <address type='pci' domain='0x0000' bus='0x05' slot='0x00' function='0x0'/>
    </memballoon>
    <rng model='virtio'>
      <backend model='random'>/dev/urandom</backend>
      <address type='pci' domain='0x0000' bus='0x06' slot='0x00' function='0x0'/>
    </rng>
  </devices>
</domain>
#相关镜像CentOS-7-aarch64-GenericCloud-XXXX.qcow2需要自己从网上下载。
# 创建虚拟机并启动。
root@OCTEONTX:/data/libvirt# virsh define firwall-00.xml
root@OCTEONTX:/data/libvirt# virsh start firewall-00
root@OCTEONTX:/data/libvirt# virsh list --all
Id   Name        State
---------------------------
30   firewall-00   running

# 将虚拟机分别连接网桥vm-net、br-net和br-m。
root@OCTEONTX:/data/libvirt# ip link add fw-if-in type veth peer name fw-if-in-sw
root@OCTEONTX:/data/libvirt# ip link add fw-if-ou type veth peer name fw-if-ou-sw
root@OCTEONTX:/data/libvirt# ip link add fw-m type veth peer name fw-m-sw
root@OCTEONTX:/data/libvirt# ip link set dev fw-m up
root@OCTEONTX:/data/libvirt# ip link set dev fw-m-sw up
root@OCTEONTX:/data/libvirt# ip link set dev fw-if-in up
root@OCTEONTX:/data/libvirt# ip link set dev fw-if-in-sw up
root@OCTEONTX:/data/libvirt# ip link set dev fw-if-ou up
root@OCTEONTX:/data/libvirt# ip link set dev fw-if-ou-sw up
root@OCTEONTX:/data/libvirt# ovs-vsctl add-port vm-net fw-if-in-sw
root@OCTEONTX:/data/libvirt# ovs-vsctl add-port br-net fw-if-ou-sw
root@OCTEONTX:/data/libvirt# ovs-vsctl add-port br-m fw-m-sw
root@OCTEONTX:/data/libvirt# virsh attach-interface firewall-00 --type direct --source fw-if-in --config
root@OCTEONTX:/data/libvirt# virsh attach-interface firewall-00 --type direct --source fw-if-in --live
root@OCTEONTX:/data/libvirt# virsh attach-interface firewall-00 --type direct --source fw-if-ou  --config
root@OCTEONTX:/data/libvirt# virsh attach-interface firewall-00 --type direct --source fw-if-ou  --live
root@OCTEONTX:/data/libvirt# virsh attach-interface firewall-00 --type direct --source fw-m  --config
root@OCTEONTX:/data/libvirt# virsh attach-interface firewall-00 --type direct --source fw-m  --live
#为br-net配置网关IP
root@OCTEONTX:/data/libvirt#ip address  add dev br-net 10.0.0.1/24

3.2.2.3 在智能网卡侧的虚拟机上配置防火墙规则

# 配置虚拟机各个网卡的IP地址。
root@OCTEONTX:~# virsh console firewall-00
Connected to domain firewall-00
Escape character is ^]

[root@firewall ~]# ip link set dev eth0 up
[root@firewall ~]# ip link set dev eth1 up
[root@firewall ~]# ip link set dev eth2 up
[root@firewall ~]# ip add add dev eth0 172.0.0.1/24
[root@firewall ~]# ip add add dev eth1 10.0.0.45/24
[root@firewall ~]# ip add add dev eth2 192.168.5.155/24
[root@firewall ~]# ip route add default via 10.0.0.1 dev eth1

# 开启虚拟机的报文转发功能。
[root@firewall ~]# echo '1' > /proc/sys/net/ipv4/ip_forward

# 设置防火墙的测试规则:丢弃实例172.0.0.100的所有报文(也即从宿主机上的第一个虚机发出的报文)。
[root@firewall ~]# iptables -I FORWARD  -s 172.0.0.100 -j DROP
[root@firewall ~]# iptables -nvL
Chain INPUT (policy ACCEPT 332K packets, 135M bytes)
 pkts bytes target     prot opt in     out     source               destination         

Chain FORWARD (policy ACCEPT 7158 packets, 545K bytes)
 pkts bytes target     prot opt in     out     source               destination         
 7305  544K DROP       all  --  *      *       172.0.0.100          0.0.0.0/0           

Chain OUTPUT (policy ACCEPT 20823 packets, 1740K bytes)
 pkts bytes target     prot opt in     out     source               destination         

# 设置防火墙的SNAT规则。
[root@firewall ~]# iptables -t nat -A POSTROUTING -o eth1 -s 172.0.0.0/24 -j SNAT --to-source 10.0.0.45
[root@firewall ~]#iptables -nvL -t nat
Chain PREROUTING (policy ACCEPT 11048 packets, 828K bytes)
 pkts bytes target     prot opt in     out     source               destination         

Chain INPUT (policy ACCEPT 16 packets, 784 bytes)
 pkts bytes target     prot opt in     out     source               destination         

Chain OUTPUT (policy ACCEPT 9639 packets, 725K bytes)
 pkts bytes target     prot opt in     out     source               destination         

Chain POSTROUTING (policy ACCEPT 9639 packets, 725K bytes)
 pkts bytes target     prot opt in     out     source               destination         
 6188  470K SNAT       all  --  *      eth1    172.0.0.0/24         0.0.0.0/0            to:10.0.0.45

3.2.3 验证卸载结果

# 在宿主机上的虚机centos-00上Ping位于业务网络上的“外网网关”10.0.0.1,无法通信。
[root@centos-00 ~]# ip route del default via 192.168.5.1 dev eth1
[root@centos-00 ~]# ip route add default via 172.0.0.1 dev eth0
[root@centos-00 ~]# route -n
Kernel IP routing table
Destination     Gateway         Genmask         Flags Metric Ref    Use Iface
0.0.0.0         172.0.0.1       0.0.0.0         UG    0      0        0 eth0
172.0.0.0       0.0.0.0         255.255.255.0   U     0      0        0 eth0
192.168.5.0     0.0.0.0         255.255.255.0   U     0      0        0 eth1
[root@centos-00 ~]# ping 10.0.0.1 -c 4
PING 10.0.0.1 (10.0.0.1) 56(84) bytes of data.

--- 10.0.0.1 ping statistics ---
4 packets transmitted, 0 received, 100% packet loss, time 2999ms
[root@centos-00 ~]#

# 在宿主机上的虚机centos-01上Ping位于业务网络上的“外网网关”10.0.0.1,通信正常。
[root@centos-00 ~]# ip route del default via 192.168.5.1 dev eth1
[root@centos-00 ~]# ip route add default via 172.0.0.1 dev eth0
[root@centos-01 ~]# route -n
Kernel IP routing table
Destination     Gateway         Genmask         Flags Metric Ref    Use Iface
0.0.0.0         172.0.0.1       0.0.0.0         UG    0      0        0 eth0
172.0.0.0       0.0.0.0         255.255.255.0   U     0      0        0 eth0
192.168.5.0     0.0.0.0         255.255.255.0   U     0      0        0 eth1
[root@centos-01 ~]# ping 10.0.0.1 -c 4
PING 10.0.0.1 (10.0.0.1) 56(84) bytes of data.
64 bytes from 10.0.0.1: icmp_seq=1 ttl=63 time=1.07 ms
64 bytes from 10.0.0.1: icmp_seq=2 ttl=63 time=1.04 ms
64 bytes from 10.0.0.1: icmp_seq=3 ttl=63 time=1.04 ms
64 bytes from 10.0.0.1: icmp_seq=4 ttl=63 time=1.04 ms

--- 10.0.0.1 ping statistics ---
4 packets transmitted, 4 received, 0% packet loss, time 3003ms
rtt min/avg/max/mdev = 1.042/1.052/1.075/0.041 ms

3.3 基于容器的SSL加解密卸载

3.3.1 验证思路

为了验证智能网卡对基于容器的VNF卸载能力,本方案将在宿主机侧启动两台虚拟机作为WEB后端,在智能网卡侧运行nginx容器作为SSL加解密的前端和负载均衡器,用https://10.0.0.50/这个域名对业务网的其他用户提供HTTPS服务。

基于容器的SSL加解密卸载拓扑
图3-3基于容器的SSL加解密卸载拓扑

经过验证测试,成功地将SSL加解密功能卸载至智能网卡。当nginx容器从智能网卡的25G业务口收到来自客户端10.0.0.1访问https://10.0.0.50/的HTTPS流量时,会将其转换为HTTP流量发送至位于宿主机的WEB节点中,后端WEB节点的选择采用轮询算法,因此在客户端10.0.0.1上多次访问,会交替收到WEB-00和WEB-01响应的页面。

3.3.2 验证过程

本小节的所有操作,都是基于 3.2 小节的配置环境进行,因此基础的操作步骤不再赘述。

3.3.2.1 在宿主机侧启动两台虚拟机,并分别连接到管理网和业务网
# 修改xml文件,将3.1小节创建的虚拟机重命名后用作WEB后端。
[root@asterfusion ~]# virsh shutdown centos-00
[root@asterfusion ~]# virsh shutdown centos-01
[root@asterfusion ~]# virsh domrename centos-00 WEB-00.xml
[root@asterfusion ~]# virsh domrename centos-01 WEB-01.xml
[root@asterfusion ~]# virsh start WEB-00
[root@asterfusion ~]# virsh start WEB-01
[root@asterfusion ~]# virsh list --all
 Id    Name                           State
----------------------------------------------------
 13    WEB-00                      running
 14    WEB-01                      running
# 重新给两台虚拟机配置管理IP。
# WEB-00:
[root@WEB-00 ~]# ip link set dev eth1 up
[root@WEB-00 ~]# ip add add dev eth1 192.168.5.155/24
[root@WEB-00 ~]# ip link set dev eth0 up
[root@WEB-00 ~]# ip add add dev eth0 172.0.0.100/24
[root@WEB-00 ~]# ip route add default via 172.0.0.1  dev eth0

# WEB-01:
[root@WEB-01 ~]# ip link set dev eth1 up
[root@WEB-01 ~]# ip add add dev eth1 192.168.5.165/24
[root@WEB-01 ~]# ip link set dev eth0 up
[root@WEB-01 ~]# ip add add dev eth0 172.0.0.200/24
[root@WEB-01 ~]# ip route add default via 172.0.0.1 dev eth1
3.3.2.2 将宿主机侧的两台虚拟机配置为WEB后端
# 分别在两台虚拟上安装httpd服务并创建index页面。
# WEB-00:
[root@WEB-00 ~]# setenforce  0
[root@WEB-00 ~]# yum update && yum install -y httpd
[root@WEB-00 ~]# cd /var/www/html/
[root@WEB-00 html]# echo "I'm end server: 172.0.0.100" > index.html
[root@WEB-00 html]# systemctl restart httpd
[root@WEB-00 html]# systemctl enable httpd
# WEB-01:
[root@WEB-01 ~]# getenforce 
Disabled
[root@WEB-01 ~]# yum update && yum install -y httpd
[root@WEB-01 ~]# cd /var/www/html/
[root@WEB-01 html]# echo "I'm end server: 172.0.0.200" > index.html
[root@WEB-01 html]# systemctl restart httpd
[root@WEB-01 html]# systemctl enable httpd
3.3.2.3 在智能网卡侧创建两个网桥用于前后端网络IP的挂载
# 删除3.2节用不到的端口及网桥。
root@OCTEONTX:~# ovs-vsctl del-port vm-net fw-if-in-sw
root@OCTEONTX:~# ovs-vsctl del-port br-net fw-if-ou-sw
root@OCTEONTX:~# ovs-vsctl del-port br-m fw-m-sw
root@OCTEONTX:~#  ip link delete fw-if-in type veth peer name fw-if-in-sw
root@OCTEONTX:~#  ip link delete fw-if-ou type veth peer name fw-if-ou-sw
root@OCTEONTX:~#  ip link delete  fw-m type veth peer name fw-m-sw

root@OCTEONTX:~# ipconfig  vm-net 172.0.0.50/24
root@OCTEONTX:~# ipconfig br-net 10.0.0.50/24
3.3.2.4 在智能网卡侧进行基于容器的SSL加解密卸载
# 准备nginx的目录以及配置文件。
root@OCTEONTX:~# cd /data/
root@OCTEONTX:/data# mkdir nginx && cd nginx
root@OCTEONTX:/data/nginx# mkdir config data logs ssl
root@OCTEONTX:/data/nginx# ll
total 20K
drwxr-xr-x 3 root root 4.0K Sep 18 01:54 config
drwxr-xr-x 2 root root 4.0K Sep 17 08:06 data
drwxr-xr-x 2 root root 4.0K Sep 18 02:15 logs
drwxr-xr-x 2 root root 4.0K Sep 18 02:02 ssl

# 创建自签名证书。
root@OCTEONTX:/data/nginx# cd ssl/
root@OCTEONTX:/data/nginx/ssl# openssl genrsa -des3 -out server.key 2048
root@OCTEONTX:/data/nginx/ssl# openssl req -new -key server.key -out server.csr
root@OCTEONTX:/data/nginx/ssl# openssl rsa -in server.key -out server_nopwd.key
root@OCTEONTX:/data/nginx/ssl# openssl x509 -req -days 365 -in server.csr -signkey 

# 准备完成后的nginx目录以及相关配置。
root@OCTEONTX:/data/nginx# tree
.
|-- config
|   |-- conf.d
|   |   `-- default.conf
|   `-- nginx.conf
|-- data
|   `-- index.html
|-- logs
|   |-- access.log
|   `-- error.log
|-- ssl
|   |-- server.crt
|   |-- server.csr
|   |-- server.key
|   `-- server_nopwd.key
`-- start-n.sh

5 directories, 10 files
root@OCTEONTX:/data/nginx# cat data/index.html 
I'm SSL Proxer
root@OCTEONTX:/data/nginx# cat config/conf.d/default.conf 
upstream end_server {                                                         
    server 172.0.0.100:80 weight=1 max_fails=3 fail_timeout=15s;                                                
    server 172.0.0.200:80 weight=1 max_fails=3 fail_timeout=15s;                                                
}
server {
    listen 443 ssl;
    server_name	localhost;

    ssl_certificate /ssl/server.crt;
    ssl_certificate_key /ssl/server_nopwd.key;

    ssl_session_cache shared:SSL:1m;
    ssl_session_timeout 5m;

     ssl_protocols SSLv2 SSLv3 TLSv1.2;

     ssl_ciphers HIGH:!aNULL:!MD5;
     ssl_prefer_server_ciphers  on;

     location / {
        root /usr/share/nginx/html;
        index index.html index.htm;
        proxy_pass http://end_server/;
        proxy_set_header Host $host:$server_port;
     }

    error_page 500 502 503 504 /50x.html;
    location = /50x.html {
        root /usr/share/nginx/html;
    }
    
    proxy_ignore_client_abort on;    
}

# 在智能网卡的操作系统上运行nginx容器。
root@OCTEONTX:/data/nginx# docker run -d --network host --name nginx-00 -v /data/nginx/data:/usr/share/nginx/html:rw -v /data/nginx/config/nginx.conf:/etc/nginx/nginx.conf/:rw -v /data/nginx/config/conf.d/default.conf:/etc/nginx/conf.d/default.conf:rw -v /data/nginx/logs:/var/log/nginx/:rw -v /data/nginx/ssl:/ssl/:rw nginx

3.3.3 验证卸载结果

# 从业务网中的一台服务器访问https://10.0.0.50/,卸载成功则会返回后端WEB提供的页面。
[root@compute-01 ~]# ip a | grep -i "enp2s0f0"
8: enp2s0f0: <BROADCAST,MULTICAST,UP,LOWER_UP> mtu 1500 qdisc mq state UP group default qlen 1000
inet 10.0.0.1/24 scope global enp2s0f0
[root@compute-01 ~]# curl --insecure https://10.0.0.50/
I'm end server: 172.0.0.100
[root@compute-01 ~]# curl --insecure https://10.0.0.50/
I'm end server: 172.0.0.200

4 在服务器与智能网卡中运行VNF的异同

VNF通常以虚拟机或者容器的形式进行部署。关于安装部署,对于服务器与Helium智能网卡基本没区别,只要有对应版本的可以安装运行,配置方式、命令行等基本一致。

关于软件资源,由于目前x86架构的服务器占比极高,各种操作系统、容器服务、Hypervisor软件、镜像、应用等均会提供x86版本。对于Helium智能网卡这个arm架构平台,在操作系统、容器服务、Hypervisor等方面,大多数流行的产品也已经提供了arm版本。但是,对于各种应用软件、容器镜像等只有少部分支持arm版本,如果客户原先跑在x86平台的VNF软件没有arm版本,则需要先由研发完成移植、测试等工作。

移植工作涉及到代码层面,因此一定是需要研发进行的。因为从x86向arm进行代码移植有两个方面的问题,一是这两种CPU在处理某些类型的溢出时,行为不同,二是这两种CPU采用不同的指令集,即复杂指令集与精简指令集,因此他们的机器指令不能完全一一对应,如果项目嵌入汇编进行加速,则代码的移植会更麻烦。

5 总结

通过前文所述的验证测试操作,证明Helium智能网卡可以完成对OVS的卸载、对基于虚拟机的VNF(vFW)功能的卸载、对基于容器的VNF(SSL加解密)功能的卸载。未来再配合Helium智能网卡SoC的协处理器,不仅能对VNF进行卸载,还能进一步提升VNF应用的处理性能。

操作指南:基于WireGuard的FullMesh VPN组网方案

1 目标

本文档将简要介绍开源VPN协议WireGuard,与基于WireGuard实现Full-Mesh组网的开源项目Netmaker的基本概念,以及安装部署的具体方法。

2 概要介绍

2.1 关于WireGuard

WireGuard是由Jason Donenfeld等人用C语言编写的一个开源VPN协议,被视为下一代VPN协议,旨在解决许多困扰IPSec/IKEv2、OpenVPN或L2TP等其他VPN协议的问题。它与Tinc和MeshBird等现代VPN产品有一些相似之处,即加密技术先进、配置简单。

从2020年1月开始,它已经并入了Linux内核的5.6版本,这意味着大多数Linux发行版的用户将拥有一个开箱即用的WireGuard。

WireGuard与其他VPN协议的性能测试对比
图2-1:WireGuard与其他VPN协议的性能测试对比

上图是WireGuard官方给出的与目前市面上常用的VPN协议的性能测试对比,测试过程使用万兆物理网卡,服务器的Linux内核版本为4.6.1。可以看到WireGuard的带宽基本接近网卡物理带宽,网络时延在几个对比的协议中是最低的。

关于WireGuard的特性,总结如下:

  • 基于UDP协议;
  • 核心部分:加密密钥路由
    • 公钥和IP地址列表(AllowedIPs)关联起来;
    • 每一个WG接口都有一个私钥和一个Peer列表;
    • 每一个Peer都有一个公钥和IP地址列表;
  • 发送包时,AllowedIPs字段起到路由表的功能:Peer的每个AllowedIPs,都会生成一条静态路由到设备;
  • 接收包时,AllowedIPs字段起到权限管理的功能:Packet的Source IP位于服务端的 AllowedIPs 列表时则接收,否则丢弃。

在了解完WireGuard基本概念后,再来看下在实际应用中,如何利用WireGuard来组建比较复杂的网络拓扑,这里介绍3个典型的组网拓扑。

  • 点对点(Point-to-point

这是最简单的拓扑,所有的节点要么在同一个局域网,要么直接通过公网访问,因此WireGuard可以直接连接到对端,不需要中继节点进行跳转。

  • 中心辐射型(Hub-and-Spoke

在WireGuard的概念中没有Server和Client之分,所有的节点都是Peer。通常进行组网的做法是找一个拥有公网IP的服务器作为中继节点,也就是VPN网关,然后各个节点之间的通信都由VPN网关进行转发。为了方便理解,我们可以把这种架构中的VPN网关当作Server,其他的节点当作Client,但实际上是不区分Server和Client的,架构示例如下图所示。

WireGuard Hub-and-Spoke
图2-2:WireGuard Hub-and-Spoke

这种架构的缺点相当明显,当Peer越来越多时,VPN网关就会变成垂直扩展的瓶颈。并且,通过VPN网关转发流量需要由公网IP和较大的带宽,成本较高。最后,从性能层面考虑,通过VPN网关转发流量会带来很高的延迟与单点故障的风险。

  • 全连接网络(FullMesh)
WireGuard FullMesh
图2-3:WireGuard FullMesh

在全互联的架构下,任意一个Peer和其他所有Peer都是直连的,无需经由一个VPN网关来中转流量,基本解决了中心辐射型架构的所有不足。在WireGuard的场景下实现全互联组网,需要在每一个Peer的配置文件中声明除本机以外的所有Peer。这个逻辑并不难理解,难点在于配置的繁琐程度,尤其是在组网变得比较大时,某一个Peer的变更,会带来非常大的配置工作量。

因此,如今已经有很多开源工具被开发出来,以实现WireGuard FullMesh组网的配置和管理,后文中会详细介绍如何通过Netmaker这样一款开源工具实现基于WireGuard的FullMesh组网。

2.2 关于Netmaker

Netmaker是一个用来配置WireGuard全互联模式的可视化工具,它的功能非常强大,支持NAT穿透、UDP打洞、多租户,客户端也几乎适配了所有平台,包括Linux、Mac和Windows,并且还可以通过WireGuard原生客户端连接智能手机(Android和iPhone)。

其最新版本的基准测试结果显示,基于Netmaker的WireGuard网络速度比其他全互联模式的VPN(例如Tailscale和ZeroTier)网络速度快50%以上。

Netmaker 架构图
图2-4:Netmaker 架构图

Netmaker使用的是C/S架构,即客户端/服务器架构。NetmakerServer包含两个核心组件:用来管理网络的可视化界面,以及与客户端通信的gRPCServer。也可以选择部署DNS服务器(CoreDNS)来管理私有DNS。

客户端(netclient)是一个二进制文件,可以在绝大多数Linux发行版、macOS和Windows中运行,它的功能就是自动管理WireGuard,动态更新Peer的配置。客户端会周期性地向NetmakerServer签到,以保持本机Peer的配置为最新状态,然后与所有的Peer建立点对点连接,即全互联组网。

3 系统环境

本次验证环境中,使用4台虚拟机进行FullMesh组网测试。其中,一台Ubuntu用作Netmaker的服务器端,另外三台CentOS用作客户端。

3.1 服务器端

操作系统:Ubuntu 20.04.4 LTS;

内核版本:5.15.0-46-generic;

WireGuard版本:1.0.20220627;

Docker CE版本:20.10.12;

Netmaker版本:0.12.0。

3.2 客户端

操作系统:CentOS Linux release 7.9.2009(Core);

内核版本:3.10.0-1160.66.1.el7.x86_64;

WireGuard版本:1.0.20200513;

NetClient版本:0.12.0。

4 安装部署

4.1 安装配置WireGuard

在组网中的所有Client中,都需要完成WireGuard的安装,此处仅展示node-01的安装步骤,其他Client的安装配置同理。

4.1.1 安装内核模块

[root@node-01 ~]# yum install https://dl.fedoraproject.org/pub/epel/epel-release-latest-7.noarch.rpm https://www.elrepo.org/elrepo-release-7.el7.elrepo.noarch.rpm
[root@node-01 ~]# yum install kmod-wireguard wireguard-tools
[root@node-01 ~]# reboot
...
[root@node-01 ~]# modprobe wireguard

4.1.2 开启IP转发

[root@node-01 ~]# cat <<'EOF'>> /etc/sysctl.conf
net.ipv4.ip_forward = 1
net.ipv4.conf.all.proxy_arp = 1
EOF
[root@node-01 ~]# sysctl -p /etc/sysctl.conf

4.2 安装配置Netmaker服务器端

本小结中的配置步骤,仅需要在Netmaker服务器端完成,Client端无需配置。

4.2.1 配置DockerCE容器运行环境

root@open-source:~# yum-config-manager --add-repo  https://download.docker.com/linux/centos/docker-ce.repo
root@open-source:~# yum remove -y docker docker-common docker-selinux docker-engine
root@open-source:~# yum update
root@open-source:~# yum install -y yum-utils device-mapper-persistent-data lvm2
root@open-source:~# yum install -y docker-ce docker-ce-cli containerd.io docker-compose-plugin
root@open-source:~# systemctl enable docker
root@open-source:~# systemctl retart docker

4.2.2 准备DockerCompose配置文件

root@open-source:~# cat docker-compose.yml
version: "3.4"

services:
  netmaker:
    container_name: netmaker
    image: gravitl/netmaker:v0.12.0
    volumes:
      - dnsconfig:/root/config/dnsconfig
      - sqldata:/root/data
    cap_add: 
      - NET_ADMIN
      - NET_RAW
      - SYS_MODULE
    sysctls:
      - net.ipv4.ip_forward=1
      - net.ipv4.conf.all.src_valid_mark=1
    restart: always
    environment:
      SERVER_HOST: "192.168.4.44"
      SERVER_HTTP_HOST: "192.168.4.44"
      SERVER_GRPC_HOST: "192.168.4.44"
      COREDNS_ADDR: "192.168.4.44"
      SERVER_API_CONN_STRING: "192.168.4.44:8081"
      SERVER_GRPC_CONN_STRING: "192.168.4.44:50051"
      GRPC_SSL: "off"
      DNS_MODE: "on"
      API_PORT: "8081"
      GRPC_PORT: "50051"
      CLIENT_MODE: "on"
      MASTER_KEY: "36lGTBLyp8itKCYeh7mzTYWej9RgF0"
      CORS_ALLOWED_ORIGIN: "*"
      DISPLAY_KEYS: "on"
      DATABASE: "sqlite"
      NODE_ID: "netmaker-server-1"
      MQ_HOST: "mq"
      HOST_NETWORK: "off"
      MANAGE_IPTABLES: "on"
      PORT_FORWARD_SERVICES: "mq"
      VERBOSITY: "1"
    ports:
      - "51821-51830:51821-51830/udp"
      - "8081:8081"
      - "50051:50051"
  netmaker-ui:
    container_name: netmaker-ui
    depends_on:
      - netmaker
    image: gravitl/netmaker-ui:v0.12.0
    links:
      - "netmaker:api"
    ports:
      - "8082:80"
    environment:
      BACKEND_URL: "http://192.168.4.44:8081"
    restart: always
  coredns:
    depends_on:
      - netmaker 
    image: coredns/coredns
    command: -conf /root/dnsconfig/Corefile
    container_name: coredns
    restart: always
    volumes:
      - dnsconfig:/root/dnsconfig
  caddy:
    image: caddy:latest
    container_name: caddy
    restart: unless-stopped
    network_mode: host
    volumes:
      - /root/Caddyfile:/etc/caddy/Caddyfile
      - caddy_data:/data
      - caddy_conf:/config
  mq:
    image: eclipse-mosquitto:2.0.14
    container_name: mq
    restart: unless-stopped
    ports:
      - "1883:1883"
    volumes:
      - /root/mosquitto.conf:/mosquitto/config/mosquitto.conf
      - mosquitto_data:/mosquitto/data
      - mosquitto_logs:/mosquitto/log
volumes:
  caddy_data: {}
  caddy_conf: {}
  sqldata: {}
  dnsconfig: {}
  mosquitto_data: {}
  mosquitto_logs: {}

root@open-source:~# 

4.2.3 启动Netmaker的容器组

root@open-source:~# docker-compose up -d
Creating network "root_default" with the default driver
Creating mq ... 
Creating netmaker ... 
Creating caddy    ... 
Creating netmaker-ui ... 
Creating coredns     ... 
root@open-source:~# 

4.2.4 创建Full-Mesh网络

Netmaker主页面
图4-1:Netmaker主页面
创建一个用于测试的网络
图4-2:创建一个用于测试的网络
创建完成后的Networks栏目状态
图4-3:创建完成后的Networks栏目状态
创建用于加入测试网络的Access Key
图4-4:创建用于加入测试网络的Access Key
Access Key Details
图4-5:Access Key Details

4.3 安装配置Netmaker客户端

4.3.1 下载Netclient客户端,使用Access Token加入测试网络

Node-01:
[root@node-01 ~]# wget https://github.com/gravitl/netmaker/releases/download/v0.12.0/netclient
[root@node-01 ~]# chmod +x netclient
[root@node-01 ~]# ./netclient join -t eyJncnBjY29ubiI6IjE5Mi4xNjguNC40NDo1MDA1MSIsImdycGNzc2wiOiJvZmYiLCJjb21tc25ldHdvcmsiOiJ6TFk5c2dLQyIsIm5ldHdvcmsiOiJhc3RlcmZ1c2lvbiIsImtleSI6IkhmZkd5ZjJMTkVCcXBGRkgiLCJsb2NhbHJhbmdlIjoiIn0=
2022/08/12 14:34:10 [netclient] joining asterfusion at 192.168.4.44:50051
2022/08/12 14:34:10 [netclient] node created on remote server...updating configs
2022/08/12 14:34:10 [netclient] retrieving peers
2022/08/12 14:34:10 [netclient] starting wireguard
2022/08/12 14:34:10 [netclient] waiting for interface...
2022/08/12 14:34:10 [netclient] interface ready - netclient.. ENGAGE
2022/08/12 14:34:12 [netclient] restarting netclient.service
2022/08/12 14:34:13 [netclient] joined asterfusion
[root@node-01 ~]# 
Node-02:
[root@node-02 ~]# ./netclient join -t eyJncnBjY29ubiI6IjE5Mi4xNjguNC40NDo1MDA1MSIsImdycGNzc2wiOiJvZmYiLCJjb21tc25ldHdvcmsiOiJ6TFk5c2dLQyIsIm5ldHdvcmsiOiJhc3RlcmZ1c2lvbiIsImtleSI6IkhmZkd5ZjJMTkVCcXBGRkgiLCJsb2NhbHJhbmdlIjoiIn0=
2022/08/12 14:41:49 [netclient] joining asterfusion at 192.168.4.44:50051
2022/08/12 14:41:49 [netclient] node created on remote server...updating configs
2022/08/12 14:41:49 [netclient] retrieving peers
2022/08/12 14:41:49 [netclient] starting wireguard
2022/08/12 14:41:49 [netclient] waiting for interface...
2022/08/12 14:41:49 [netclient] interface ready - netclient.. ENGAGE
2022/08/12 14:41:50 [netclient] restarting netclient.service
2022/08/12 14:41:52 [netclient] joined asterfusion
[root@node-02 ~]# 
Node-03:
[root@node-03 ~]# ./netclient join -t eyJncnBjY29ubiI6IjE5Mi4xNjguNC40NDo1MDA1MSIsImdycGNzc2wiOiJvZmYiLCJjb21tc25ldHdvcmsiOiJ6TFk5c2dLQyIsIm5ldHdvcmsiOiJhc3RlcmZ1c2lvbiIsImtleSI6IkhmZkd5ZjJMTkVCcXBGRkgiLCJsb2NhbHJhbmdlIjoiIn0=
2022/08/12 14:42:06 [netclient] joining asterfusion at 192.168.4.44:50051
2022/08/12 14:42:06 [netclient] node created on remote server...updating configs
2022/08/12 14:42:06 [netclient] retrieving peers
2022/08/12 14:42:06 [netclient] starting wireguard
2022/08/12 14:42:06 [netclient] waiting for interface...
2022/08/12 14:42:06 [netclient] interface ready - netclient.. ENGAGE
2022/08/12 14:42:08 [netclient] restarting netclient.service
2022/08/12 14:42:09 [netclient] joined asterfusion
[root@node-03 ~]#

4.3.2 在控制器界面中检查网络状态

在WEB界面中检查网络状态
图4-6:在WEB界面中检查网络状态

4.4 组网测试

4.4.1 在客户端节点检查WG信息与路由信息

Node-01:
[root@node-01 ~]# wg
interface: nm-asterfusion
  public key: qmPw+9r2+S94EjMAkNwMm9YV8ZDoSay8Fyi1HgyqFlg=
  private key: (hidden)
  listening port: 51821

peer: KnwIOGgWWCvXDqgrWfpc0xvlSf7GN/LjvUeJlpJhMy0=
  endpoint: 192.168.4.103:51821
  allowed ips: 10.20.20.3/32
  latest handshake: 2 seconds ago
  transfer: 304 B received, 272 B sent
  persistent keepalive: every 20 seconds

peer: rsAp8gC+vW63ET7YPpFT2oWMgrelFM1nO+9pAS2KLmQ=
  endpoint: 192.168.4.102:51821
  allowed ips: 10.20.20.2/32
  latest handshake: 5 seconds ago
  transfer: 304 B received, 272 B sent
  persistent keepalive: every 20 seconds

interface: nm-zLY9sgKC
  public key: B9QORmZw9PmhsHwDmZzxyzXZKxMTmx2qCAmlRWIzGG0=
  private key: (hidden)
  listening port: 55829
[root@node-01 ~]# route -n
Kernel IP routing table
Destination     Gateway         Genmask         Flags Metric Ref    Use Iface
0.0.0.0         192.168.4.1     0.0.0.0         UG    100    0        0 ens192
10.20.20.0      0.0.0.0         255.255.255.0   U     0      0        0 nm-asterfusion
10.20.20.2      0.0.0.0         255.255.255.255 UH    0      0        0 nm-asterfusion
10.20.20.3      0.0.0.0         255.255.255.255 UH    0      0        0 nm-asterfusion
172.17.0.0      0.0.0.0         255.255.0.0     U     0      0        0 docker0
192.168.4.0     0.0.0.0         255.255.255.0   U     100    0        0 ens192
[root@node-01 ~]#
Node-02:
[root@node-02 ~]# wg
interface: nm-asterfusion
  public key: rsAp8gC+vW63ET7YPpFT2oWMgrelFM1nO+9pAS2KLmQ=
  private key: (hidden)
  listening port: 51821

peer: KnwIOGgWWCvXDqgrWfpc0xvlSf7GN/LjvUeJlpJhMy0=
  endpoint: 192.168.4.103:51821
  allowed ips: 10.20.20.3/32
  latest handshake: 10 seconds ago
  transfer: 304 B received, 272 B sent
  persistent keepalive: every 20 seconds

peer: qmPw+9r2+S94EjMAkNwMm9YV8ZDoSay8Fyi1HgyqFlg=
  endpoint: 192.168.4.101:51821
  allowed ips: 10.20.20.1/32
  latest handshake: 13 seconds ago
  transfer: 92 B received, 180 B sent
  persistent keepalive: every 20 seconds

interface: nm-zLY9sgKC
  public key: asu7DXf5slyqN7xjzo1BQ+OinxbG2ECgf38SSY6u9xM=
  private key: (hidden)
  listening port: 37758
[root@node-02 ~]# route -n
Kernel IP routing table
Destination     Gateway         Genmask         Flags Metric Ref    Use Iface
0.0.0.0         192.168.4.1     0.0.0.0         UG    100    0        0 ens192
10.20.20.0      0.0.0.0         255.255.255.0   U     0      0        0 nm-asterfusion
10.20.20.1      0.0.0.0         255.255.255.255 UH    0      0        0 nm-asterfusion
10.20.20.3      0.0.0.0         255.255.255.255 UH    0      0        0 nm-asterfusion
172.17.0.0      0.0.0.0         255.255.0.0     U     0      0        0 docker0
192.168.4.0     0.0.0.0         255.255.255.0   U     100    0        0 ens192
[root@node-02 ~]#
Node-03:
[root@node-03 ~]# wg
interface: nm-asterfusion
  public key: KnwIOGgWWCvXDqgrWfpc0xvlSf7GN/LjvUeJlpJhMy0=
  private key: (hidden)
  listening port: 51821

peer: qmPw+9r2+S94EjMAkNwMm9YV8ZDoSay8Fyi1HgyqFlg=
  endpoint: 192.168.4.101:51821
  allowed ips: 10.20.20.1/32
  latest handshake: 15 seconds ago
  transfer: 92 B received, 180 B sent
  persistent keepalive: every 20 seconds

peer: rsAp8gC+vW63ET7YPpFT2oWMgrelFM1nO+9pAS2KLmQ=
  endpoint: 192.168.4.102:51821
  allowed ips: 10.20.20.2/32
  latest handshake: 15 seconds ago
  transfer: 92 B received, 180 B sent
  persistent keepalive: every 20 seconds

interface: nm-zLY9sgKC
  public key: tKLd9l1H8NmZmvv5C8amrt5FJNGc/rmfv8pxY1eWdis=
  private key: (hidden)
  listening port: 44378
[root@node-03 ~]# route -n
Kernel IP routing table
Destination     Gateway         Genmask         Flags Metric Ref    Use Iface
0.0.0.0         192.168.4.1     0.0.0.0         UG    100    0        0 ens192
10.20.20.0      0.0.0.0         255.255.255.0   U     0      0        0 nm-asterfusion
10.20.20.1      0.0.0.0         255.255.255.255 UH    0      0        0 nm-asterfusion
10.20.20.2      0.0.0.0         255.255.255.255 UH    0      0        0 nm-asterfusion
172.17.0.0      0.0.0.0         255.255.0.0     U     0      0        0 docker0
192.168.4.0     0.0.0.0         255.255.255.0   U     100    0        0 ens192
[root@node-03 ~]#

4.4.2 客户端之间使用VPN网段IP进行互Ping测试

[root@node-01 ~]# ping 10.20.20.1
PING 10.20.20.1 (10.20.20.1) 56(84) bytes of data.
64 bytes from 10.20.20.1: icmp_seq=1 ttl=64 time=0.046 ms
64 bytes from 10.20.20.1: icmp_seq=2 ttl=64 time=0.041 ms
^C
--- 10.20.20.1 ping statistics ---
2 packets transmitted, 2 received, 0% packet loss, time 999ms
rtt min/avg/max/mdev = 0.041/0.043/0.046/0.007 ms
[root@node-01 ~]# ping 10.20.20.2
PING 10.20.20.2 (10.20.20.2) 56(84) bytes of data.
64 bytes from 10.20.20.2: icmp_seq=1 ttl=64 time=0.637 ms
64 bytes from 10.20.20.2: icmp_seq=2 ttl=64 time=0.912 ms
^C
--- 10.20.20.2 ping statistics ---
2 packets transmitted, 2 received, 0% packet loss, time 1001ms
rtt min/avg/max/mdev = 0.637/0.774/0.912/0.140 ms
[root@node-01 ~]# ping 10.20.20.3
PING 10.20.20.3 (10.20.20.3) 56(84) bytes of data.
64 bytes from 10.20.20.3: icmp_seq=1 ttl=64 time=0.738 ms
64 bytes from 10.20.20.3: icmp_seq=2 ttl=64 time=0.760 ms
^C
--- 10.20.20.3 ping statistics ---
2 packets transmitted, 2 received, 0% packet loss, time 1000ms
rtt min/avg/max/mdev = 0.738/0.749/0.760/0.011 ms
[root@node-01 ~]#

5 参考文档

更多内容请关注:A-Lab

对星融元产品感兴趣?

立即联系!

返回顶部

© 星融元数据技术(苏州)有限公司 苏ICP备17070048号-2