查看VTEP信息
admin@Leaf1:~$ show evpn status

交换机路由信息
admin@Leaf1:~$ ip route show


下面信息显示Server2的路由转发到了Leaf1

admin@Leaf1:~$ ip neigh show nud all | grep Vlan

admin@Leaf1:~$ sudo bridge fdb|grep vxlan

admin@Leaf1:~$ show ip route vrf Vnet123
查看Leaf2的路由信息
查看VTEP信息
admin@Leaf2:~$ show evpn status

交换机路由信息
admin@Leaf2:~$ ip route show

下面信息显示Server2的路由转发到了Leaf1
admin@Leaf2:~$ ip neigh show nud all | grep Vlan

admin@Leaf2:~$ sudo bridge fdb |grep vxlan

admin@Leaf2:~$ show ip route vrf Vnet123
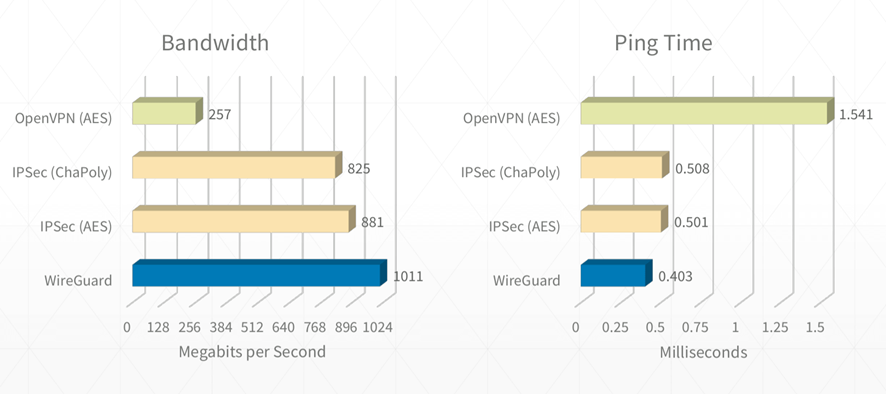
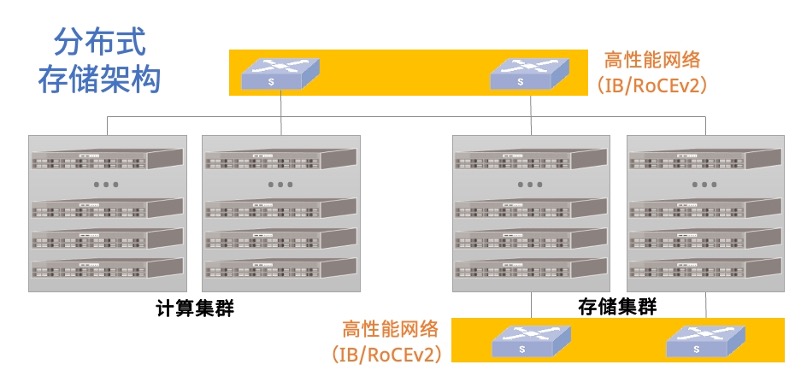
RDMA(Remote Direct Memory Access)技术是一种基于网络的内存访问技术,它允许内存数据在计算机之间直接传输,无需CPU或操作系统的参与。目前,RDMA技术被广泛应用于超算、AI训练、存储等网络密集型场景。虽然RDMA技术的性能十分可观,但是需要专用的RDMA网卡,为了兼容普通网卡,IBTA提出了一种RDMA的软件实现方式——SoftRoCE。SoftRoCE整体由软件实现,底层使用普通的以太网卡,和硬件方案相比性能较差,但优势在于能用普通以太网卡与RDMA网卡通信。
配置主机
cat > /etc/keepalived/keepalived.conf <<-EOF
! Configuration File for keepalived

! failover E1 and I1 at the same time
vrrp_sync_group G1 {
  group {
    I1
  }
}

! internal
vrrp_instance I1 {
  state master
  interface br-lan
  virtual_router_id 51
  priority 101
  advert_int 1
  virtual_ipaddress {
    10.240.4.226/24
  }
  authentication {
    auth_type PASS
    auth_pass s3cret
  }
  nopreempt
}
EOF

配置备机:
cat > /etc/keepalived/keepalived.conf <<-EOF
! Configuration File for keepalived

! failover E1 and I1 at the same time
vrrp_sync_group G1 {
  group {
    I1
  }
}

! internal
vrrp_instance I1 {
  state backup
  interface br-lan
  virtual_router_id 51
  priority 50
  advert_int 1
  virtual_ipaddress {
    10.240.4.226/24
  }
  authentication {
    auth_type PASS
    auth_pass s3cret
  }
  nopreempt
} EOF
重新启动服务:
/etc/init.d/keepalived restart
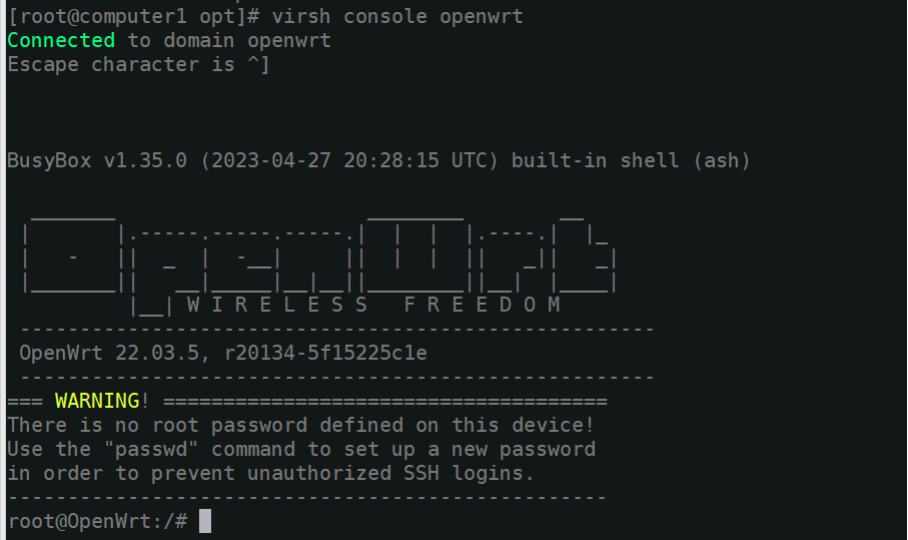
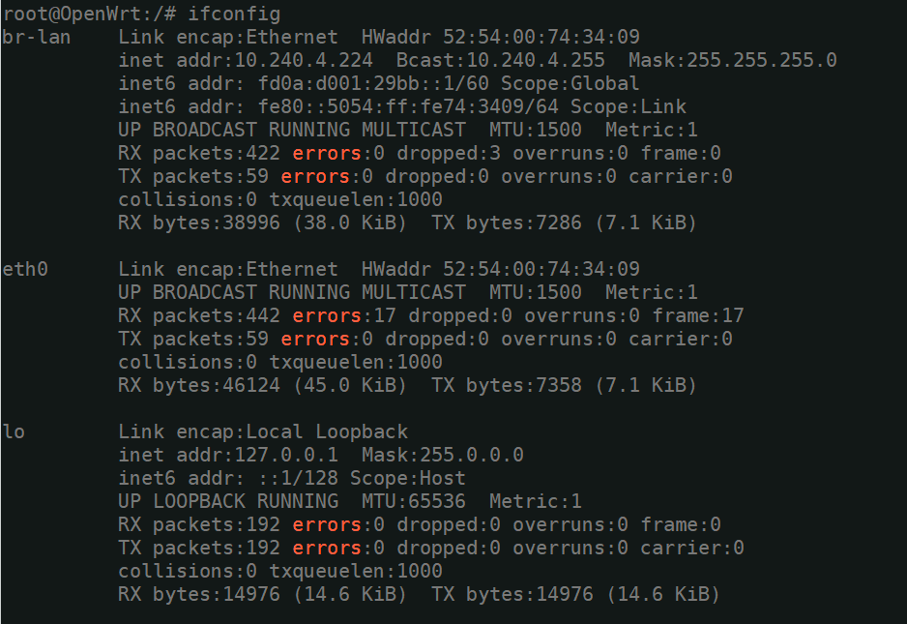
在主路由上面 ip a 命令可以看到 vip 地址已经有了,电脑ping 这个地址可以通了 主机IP 10.240.4.224/24,备机IP 10.240.4.225/24 主机关闭该服务后IP只有10.240.4.224/24,虚拟IP丢失。
root@OpenWrt:/# /etc/init.d/keepalived stop
查看备机加载了虚拟IP:10.240.4.226/24
root@OpenWrt:/# ip a|grep br-lan
br-lan: <BROADCAST,MULTICAST,UP,LOWER_UP> mtu 1500 qdisc noqueue state UP group default
inet 10.240.4.225/24 brd 10.240.4.255 scope global br-lan
inet 10.240.4.226/24 scope global secondary br-lan
主机重启该服务后虚拟IP重新加载
root@OpenWrt:/# /etc/init.d/keepalived restart 备机同时则虚拟IP丢失 root@OpenWrt:/# ip a|grep br-lan br-lan: mtu 1500 qdisc noqueue state UP group default inet 10.240.4.225/24 brd 10.240.4.255 scope global br-lan
name 表示:设置当前这个 rule 的名称 target 表示:设置防火墙动作,可选值: ACCEPT 许可, REJECT 拒绝, DROP 抛弃 src 表示: 数据源的 zone 域是哪个。可选值: wan / lan src_ip 表示:数据源的 IP 地址是哪个。 src_mac 表示:数据源的 MAC 地址是哪个。 src_port 表示:数据源的端口,可以是一个端口,或一个端口范围,但是必须
同时指定了协议类型 proto 表示: 数据源的协议类型, 可选值: tcp, udp, tcpudp, udplit, icmp, esp, ah, sctp, 或 all 表示全部 dest 表示:数据目标的 zone 域是哪个。可选值: wan / lan dest_ip 表示:数据目标的 IP 地址。 dest_port 表示:数据目标的端口,可以是一个端口,或一个端口范围,但是必须同时指定了协议类型 family 表示:数据的协议族,可选值: ipv4, ipv6, any rule 规则设置可以灵活,比如允许来自 WAN 口的 ping,
例:
config rule
option name Allow-Ping
option src wan
option proto icmp
option icmp_type echo-request
option family ipv4
option target ACCEPT
第五部分内容 端口转发、重定向
# 8080 代理
config redirect
option target 'DNAT'
option name 'port-redirect'
option src 'wan'
option src_dport '8080'
option dest 'lan'
option dest_ip '192.168.40.2'
option dest_port '18080'
# port 2000 ssh login local machine
config redirect
option target 'DNAT'
option name 'port-2000'
list proto 'tcp'
option src 'wan'
option src_dport '2000'
option dest 'lan'
option dest_port '22'
OpenWrt 防火墙允许使用者通过 WAN 口访问特定的端口重定向给局域网的一台电脑设备(比如 WAN 口访问 80 端口(HTTP)将重定向给局域网某台网站服务器)。 端口重定向是在防火墙配置/etc/config/firewall 中定义 redirect 段策略实现的。所有匹配的来源数据将根据目标设置转发到目标主机上。 firewall 配置中可以有多个 redirect 策略,默认是没有开放任何重定向的,如果需要重定向请使用 vi 或 UCI 进行配置。 name 表示:设置当前这个 redirect 的名称 src 表示:转发源的 zone 域,一般转发都是转发从 wan 过来的访问 src_ip 表示:转发源的 IP 地址指定 src_mac 表示:转发源的 MAC 地址指定 src_port 表示:转发源的端口指定 proto 表示: 转发源的协议类型, 可选值: tcp, udp, tcpudp, udplit, icmp, esp, ah, sctp, 或 all 表示全部 dest 表示:转发目标的 zone 域 dest_ip 表示:转发目标的 IP 地址指定 dest_mac 表示:转发目标的 MAC 地址指定 dest_port 表示:转发目标的端口指定 端口重定向的可配置性很灵活。比如我们将 8080 这个端口转发给内网一台服务器的 18080 端口。
第六部分内容 IPV6
config rule
option name 'Allow-DHCPv6'
option src 'wan'
option proto 'udp'
option src_ip 'fc00::/6'
option dest_ip 'fc00::/6'
option dest_port '546'
option family 'ipv6'
option target 'ACCEPT'

config rule
option name 'Allow-MLD'
option src 'wan'
option proto 'icmp'
option src_ip 'fe80::/10'
list icmp_type '130/0'
list icmp_type '131/0'
list icmp_type '132/0'
list icmp_type '143/0'
option family 'ipv6'
option target 'ACCEPT'

config rule
option name 'Allow-ICMPv6-Input'
option src 'wan'
option proto 'icmp'
list icmp_type 'echo-request'
list icmp_type 'echo-reply'
list icmp_type 'destination-unreachable'
list icmp_type 'packet-too-big'
list icmp_type 'time-exceeded'
list icmp_type 'bad-header'
list icmp_type 'unknown-header-type'
list icmp_type 'router-solicitation'
list icmp_type 'neighbour-solicitation'
list icmp_type 'router-advertisement'
list icmp_type 'neighbour-advertisement'
option limit '1000/sec'
option family 'ipv6'
option target 'ACCEPT'

config rule
option name 'Allow-ICMPv6-Forward'
option src 'wan'
option dest '*'
option proto 'icmp'
list icmp_type 'echo-request'
list icmp_type 'echo-reply'
list icmp_type 'destination-unreachable'
list icmp_type 'packet-too-big'
list icmp_type 'time-exceeded'
list icmp_type 'bad-header'
list icmp_type 'unknown-header-type'
option limit '1000/sec'
option family 'ipv6'
option target 'ACCEPT'
第七部分 IPSec
config rule
option name 'Allow-IPSec-ESP'
option src 'wan'
option dest 'lan'
option proto 'esp'
option target 'ACCEPT'

config rule
option name 'Allow-ISAKMP'
option src 'wan'
option dest 'lan'
option dest_port '500'
option proto 'udp'
option target 'ACCEPT'
允许 IPSec tunnel 通过防火墙,分别 IKA SA 、IPSec SA 放行。
第八部分 扩展内容
config include
option path '/etc/firewall.user'

config include 'miniupnpd'
option type 'script'
option path '/usr/share/miniupnpd/firewall.include'
option family 'any'
option reload '1'
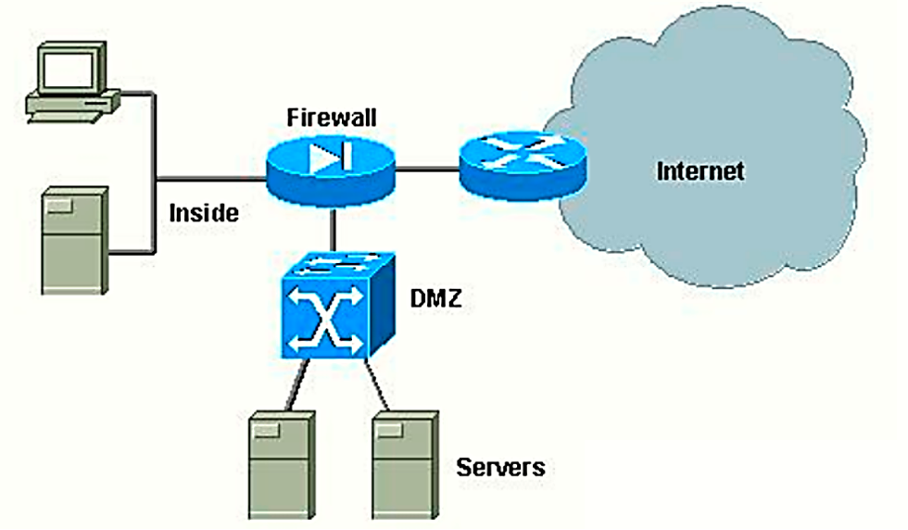
Simple DMZ rule The following rule redirects all WAN ports for all protocols to the internal host 192.168.1.2. config redirect option src wan option proto all option dest_ip 192.168.1.2
modprobe bonding mode=balance-rr miimon=100
#添加 bond 类型的虚拟接口 名称为 bond-wan
ip link add bond-wan type bond mode balance-rr
#将eth0添加到聚合接口
ifconfig eth0 down
ip link set eth0 master bond-wan
#将eth1添加到聚合接口
ifconfig eth1 down
ip link set eth1 master bond-wan
ip link set bond-wan up #启动该网卡
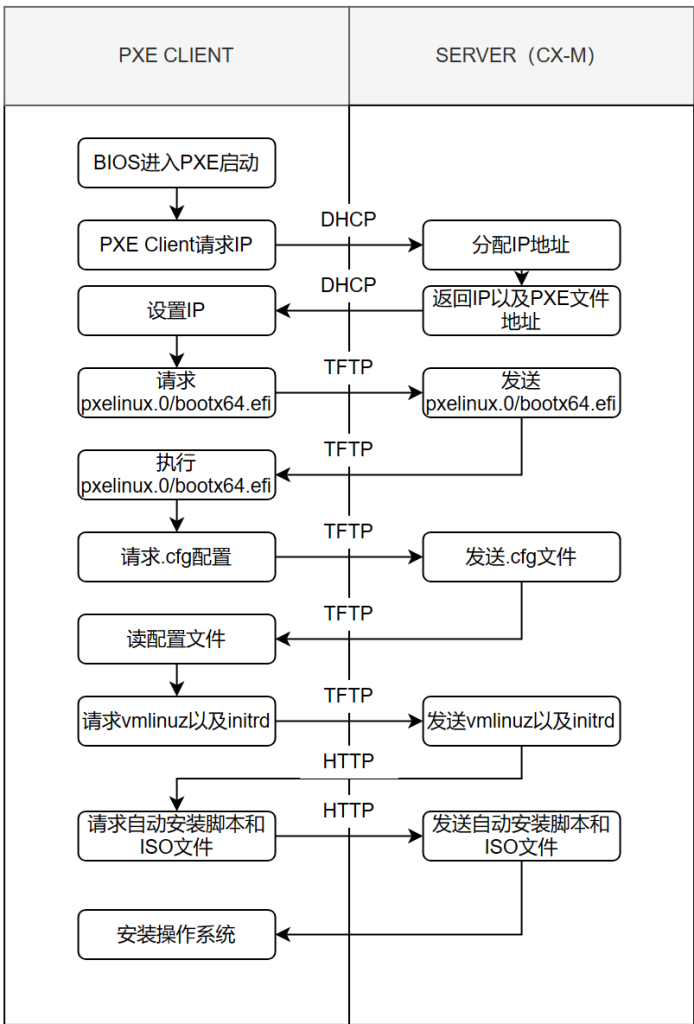
vi /home/admin/tftp/grub/grub.cfg
if loadfont /boot/grub/font.pf2 ; then
	set gfxmode=auto
	insmod efi_gop
	insmod efi_uga
	insmod gfxterm
	terminal_output gfxterm
fi

set menu_color_normal=white/black
set menu_color_highlight=black/light-gray

set timeout=5
menuentry "Install Ubuntu Server" {
	set gfxpayload=keep
	linux  /boot/live-server/vmlinuz root=/dev/ram0 ramdisk_size=1500000 ip=dhcp url='http://10.230.2.200:8000/iso/ubuntu-20.04.6-live-server-amd64.iso' autoinstall ds=nocloud-net\;s=http://10.230.2.200:8000/autoinstall/ ---
	initrd	/boot/live-server/initrd
}
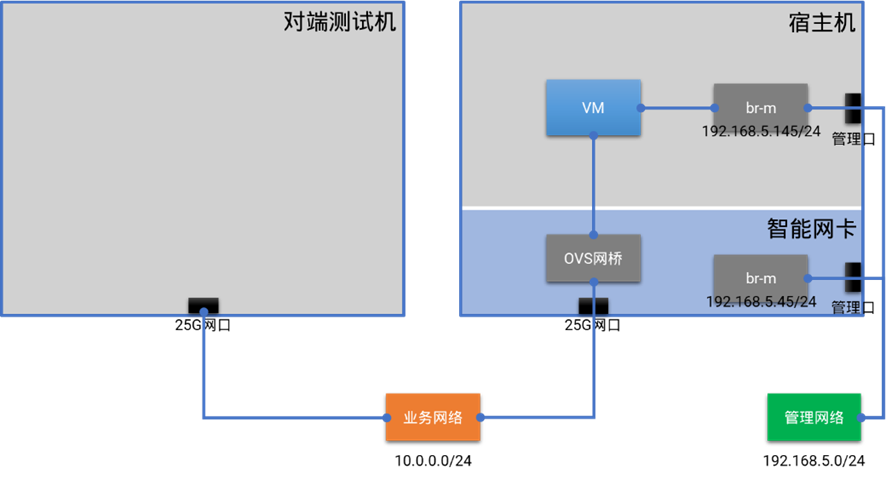
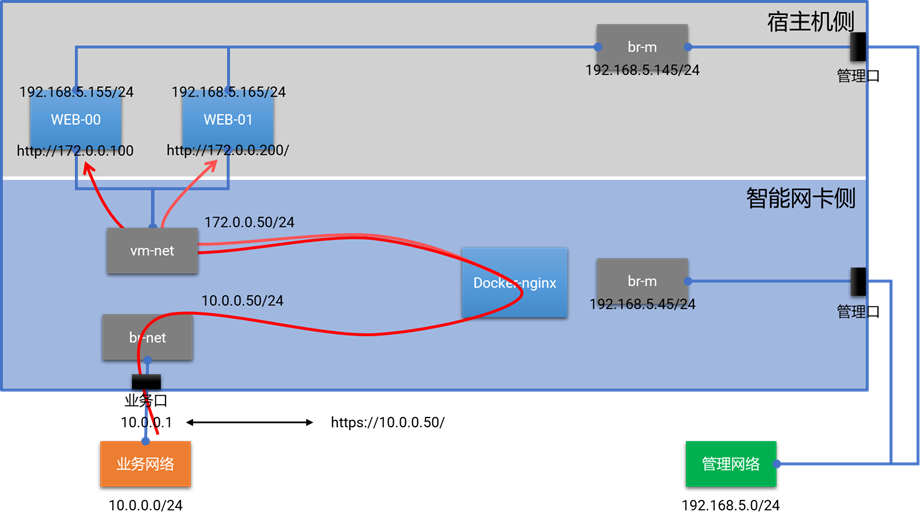
# 创建并配置管理网的网桥,并将智能网卡的管理网IP放到此网桥上
root@OCTEONTX:~# ovs-vsctl add-br br-m -- set bridge br-m datapath_type=netdev
root@OCTEONTX:~# ip add del dev eth4 192.168.5.45/24
root@OCTEONTX:~# ovs-vsctl add-port br-m eth4
root@OCTEONTX:~# ip link set dev br-m up
root@OCTEONTX:~# ip add add dev br-m 192.168.5.45/24
root@OCTEONTX:~# ip route add default via 192.168.5.1 dev br-m
# 创建并配置业务网的网桥,将智能网卡的物理网口eth0连接到此网桥上
#查看智能网卡物理口PCI地址
root@OCTEONTX:/data/helium-v1.0# lspci|grep a063
0002:02:00.0 Ethernet controller: Cavium, Inc. Device a063 (rev 09)
0002:03:00.0 Ethernet controller: Cavium, Inc. Device a063 (rev 09)
0002:04:00.0 Ethernet controller: Cavium, Inc. Device a063 (rev 09)
0002:05:00.0 Ethernet controller: Cavium, Inc. Device a063 (rev 09)
root@OCTEONTX:~# ovs-vsctl add-br br-net -- set bridge br-net datapath_type=netdev
root@OCTEONTX:~# ovs-vsctl add-port br-net eth0 -- set Interface eth0 type=dpdk options:dpdk-devargs=0002:02:00.0  mtu_request=9000
root@OCTEONTX:~# ip link set dev br-net up
# 修改xml文件,将3.1小节创建的虚拟机重命名后用作WEB后端。
[root@asterfusion ~]# virsh shutdown centos-00
[root@asterfusion ~]# virsh shutdown centos-01
[root@asterfusion ~]# virsh domrename centos-00 WEB-00.xml
[root@asterfusion ~]# virsh domrename centos-01 WEB-01.xml
[root@asterfusion ~]# virsh start WEB-00
[root@asterfusion ~]# virsh start WEB-01
[root@asterfusion ~]# virsh list --all
Id Name State
----------------------------------------------------
13 WEB-00 running
14 WEB-01 running
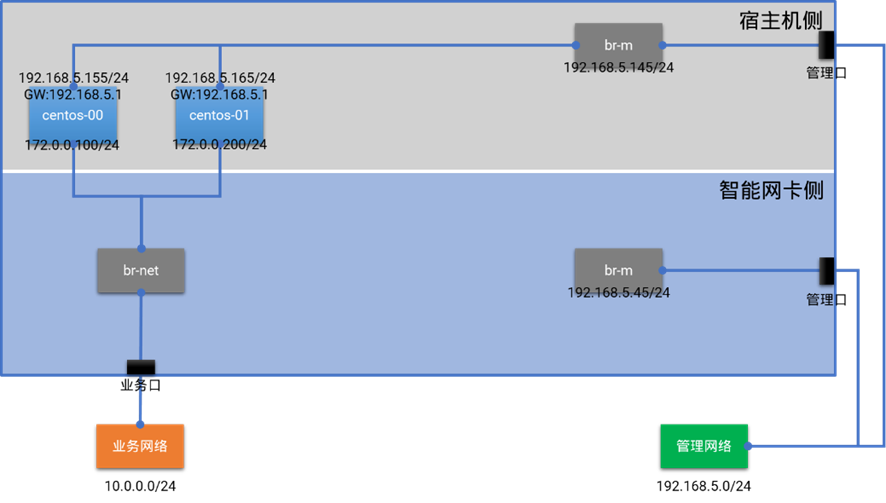
# 重新给两台虚拟机配置管理IP。
# WEB-00:
[root@WEB-00 ~]# ip link set dev eth1 up
[root@WEB-00 ~]# ip add add dev eth1 192.168.5.155/24
[root@WEB-00 ~]# ip link set dev eth0 up
[root@WEB-00 ~]# ip add add dev eth0 172.0.0.100/24
[root@WEB-00 ~]# ip route add default via 172.0.0.1 dev eth0
# WEB-01:
[root@WEB-01 ~]# ip link set dev eth1 up
[root@WEB-01 ~]# ip add add dev eth1 192.168.5.165/24
[root@WEB-01 ~]# ip link set dev eth0 up
[root@WEB-01 ~]# ip add add dev eth0 172.0.0.200/24
[root@WEB-01 ~]# ip route add default via 172.0.0.1 dev eth1
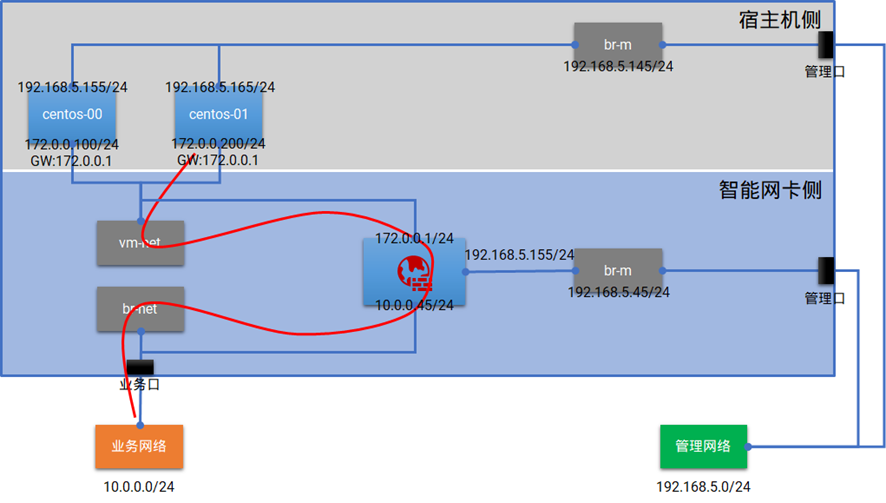
# 删除3.2节用不到的端口及网桥。
root@OCTEONTX:~# ovs-vsctl del-port vm-net fw-if-in-sw
root@OCTEONTX:~# ovs-vsctl del-port br-net fw-if-ou-sw
root@OCTEONTX:~# ovs-vsctl del-port br-m fw-m-sw
root@OCTEONTX:~#  ip link delete fw-if-in type veth peer name fw-if-in-sw
root@OCTEONTX:~#  ip link delete fw-if-ou type veth peer name fw-if-ou-sw
root@OCTEONTX:~#  ip link delete  fw-m type veth peer name fw-m-sw

root@OCTEONTX:~# ipconfig  vm-net 172.0.0.50/24
root@OCTEONTX:~# ipconfig br-net 10.0.0.50/24
# 配置编译环境
root@OCTEONTX:~# apt-get install libpopt0 libpopt-dev libnl-3-200 libnl-3-dev libnl-genl-3-dev libpcap-dev
root@OCTEONTX:~# tar xvf linux-custom.tgz
root@OCTEONTX:~# ln -s `pwd`/linux-custom /lib/modules/`uname -r`/build

# 编译DPDK
root@OCTEONTX:~# cd /var/dpvs/
root@OCTEONTX:/var/dpvs# tar xvf dpdk-19.11.0_raw.tar.bz2
root@OCTEONTX:/var/dpvs# cd dpdk-19.11.0
root@OCTEONTX:/var/dpvs/dpdk-19.11.0# export TARGET="arm64-octeontx2-linux-gcc"
root@OCTEONTX:/var/dpvs/dpdk-19.11.0# export RTE_SDK=`pwd`
root@OCTEONTX:/var/dpvs/dpdk-19.11.0# export RTE_TARGET="build"
root@OCTEONTX:/var/dpvs/dpdk-19.11.0# export PATH="${PATH}:$RTE_SDK/usertools"
root@OCTEONTX:/var/dpvs/dpdk-19.11.0# make config T=arm64-octeontx2-linux-gcc
root@OCTEONTX:/var/dpvs/dpdk-19.11.0# sed -i 's/CONFIG_RTE_LIBRTE_PMD_PCAP=n/CONFIG_RTE_LIBRTE_PMD_PCAP=y/g' $RTE_SDK/build/.config
root@OCTEONTX:/var/dpvs/dpdk-19.11.0# make -j

# 编译DPVS
root@OCTEONTX:~# cd /var/dpvs/
root@OCTEONTX:/var/dpvs# tar xvf dpvs.tar
root@OCTEONTX:/var/dpvs# cd dpvs/
root@OCTEONTX:/var/dpvs/dpvs# patch -p1 < dpvs_5346e4c645c_with_dpdk.patch
root@OCTEONTX:/var/dpvs/dpvs# make -j
root@OCTEONTX:/var/dpvs/dpvs# make install

# 加载内核模块、设置大页内存、为指定端口绑定DPDK驱动
root@OCTEONTX:~# cd /var/dpvs
root@OCTEONTX:/var/dpvs# insmod /var/dpvs/dpdk-19.11.0/build/build/kernel/linux/kni/rte_kni.ko carrier=on
root@OCTEONTX:/var/dpvs# echo 128 > /sys/kernel/mm/hugepages/hugepages-2048kB/nr_hugepages
root@OCTEONTX:/var/dpvs# mount -t hugetlbfs nodev /mnt/huge -o pagesize=2M
root@OCTEONTX:/var/dpvs# dpdk-devbind.py -b vfio-pci 0002:02:00.0
root@OCTEONTX:/var/dpvs# dpdk-devbind.py -b vfio-pci 0002:07:00.0
root@OCTEONTX:/var/dpvs# dpdk-devbind.py -s

Network devices using DPDK-compatible driver
============================================
0002:02:00.0 'Device a063' drv=vfio-pci unused=
0002:07:00.0 'Device a063' drv=vfio-pci unused=

Network devices using kernel driver
===================================
0000:01:10.0 'Device a059' if= drv=octeontx2-cgx unused=vfio-pci
0000:01:10.1 'Device a059' if= drv=octeontx2-cgx unused=vfio-pci
0000:01:10.2 'Device a059' if= drv=octeontx2-cgx unused=vfio-pci
......
root@OCTEONTX:/var/dpvs#
3.2.3 在DPU扣卡上配置负载均衡服务
root@OCTEONTX:/var/dpvs# ./dpvs/bin/dpvs -- -w 0002:02:00.0 -w 0002:07:00.0
root@OCTEONTX:/var/dpvs#
root@OCTEONTX:/var/dpvs# ./dpvs/bin/dpip link set dpdk0 link up
root@OCTEONTX:/var/dpvs# ./dpvs/bin/dpip link set dpdk1 link up
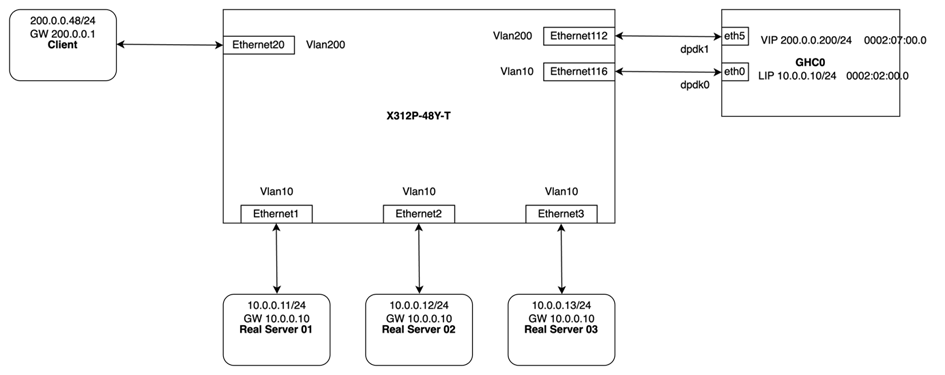
root@OCTEONTX:/var/dpvs# ./dpvs/bin/dpip addr add 10.0.0.10/32 dev dpdk0 sapool
root@OCTEONTX:/var/dpvs# ./dpvs/bin/dpip addr add 200.0.0.200/32 dev dpdk1
root@OCTEONTX:/var/dpvs# ./dpvs/bin/dpip route add 10.0.0.0/24 dev dpdk0
root@OCTEONTX:/var/dpvs# ./dpvs/bin/dpip route add 200.0.0.0/24 dev dpdk1
root@OCTEONTX:/var/dpvs#
root@OCTEONTX:/var/dpvs# ./dpvs/bin/ipvsadm -A -t 200.0.0.200:80 -s rr
root@OCTEONTX:/var/dpvs# ./dpvs/bin/ipvsadm -a -t 200.0.0.200:80 -r 10.0.0.11 -b
root@OCTEONTX:/var/dpvs# ./dpvs/bin/ipvsadm -a -t 200.0.0.200:80 -r 10.0.0.12 -b
root@OCTEONTX:/var/dpvs# ./dpvs/bin/ipvsadm -a -t 200.0.0.200:80 -r 10.0.0.13 -b
root@OCTEONTX:/var/dpvs# ./dpvs/bin/ipvsadm --add-laddr -z 10.0.0.10 -t 200.0.0.200:80 -F dpdk0
root@OCTEONTX:/var/dpvs#
root@OCTEONTX:/var/dpvs# ./dpvs/bin/ipvsadm -G
VIP:VPORT TOTAL SNAT_IP CONFLICTS CONNS
200.0.0.200:80 1
10.0.0.10 0 0
root@OCTEONTX:/var/dpvs# ./dpvs/bin/ipvsadm -ln
IP Virtual Server version 0.0.0 (size=0)
Prot LocalAddress:Port Scheduler Flags
-> RemoteAddress:Port Forward Weight ActiveConn InActConn
TCP 200.0.0.200:80 rr
-> 10.0.0.11:80 FullNat 1 0 0
-> 10.0.0.12:80 FullNat 1 0 0
-> 10.0.0.13:80 FullNat 1 0 0
root@OCTEONTX:/var/dpvs#
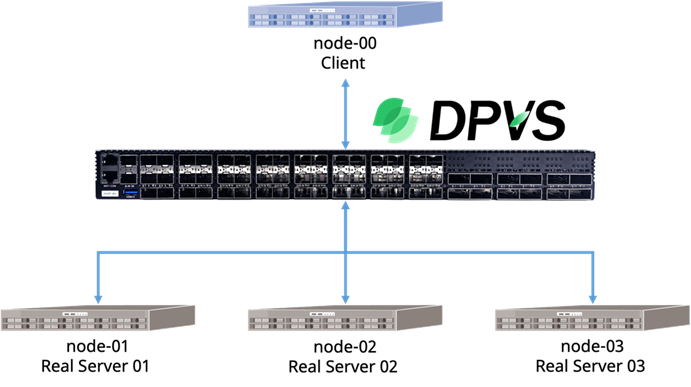
3.2.4 配置3台Real Server的网络和Web服务
# Real Server 01
[root@node-01 ~]# ip a
1: lo: <LOOPBACK,UP,LOWER_UP> mtu 65536 qdisc noqueue state UNKNOWN group default qlen 1000
    link/loopback 00:00:00:00:00:00 brd 00:00:00:00:00:00
    inet 127.0.0.1/8 scope host lo
       valid_lft forever preferred_lft forever
    inet6 ::1/128 scope host
       valid_lft forever preferred_lft forever
2: eth0: <BROADCAST,MULTICAST,UP,LOWER_UP> mtu 1500 qdisc mq state UP group default qlen 1000
    link/ether b8:59:9f:42:36:69 brd ff:ff:ff:ff:ff:ff
    inet 10.0.0.11/24 brd 10.0.0.255 scope global eth0
       valid_lft forever preferred_lft forever
    inet6 fe80::ba59:9fff:fe42:3669/64 scope link
       valid_lft forever preferred_lft forever
[root@node-01 ~]# route -n
Kernel IP routing table
Destination     Gateway         Genmask         Flags Metric Ref    Use Iface
0.0.0.0         10.0.0.10       0.0.0.0         UG    0      0        0 eth0
10.0.0.0        0.0.0.0         255.255.255.0   U     0      0        0 eth0
[root@node-01 ~]# cat index.html
Real Server 01
[root@node-01 ~]# python -m SimpleHTTPServer 80
Serving HTTP on 0.0.0.0 port 80 ...
10.0.0.10 - - [23/Dec/2022 02:57:18] "GET / HTTP/1.1" 200 –

# Real Server 02
[root@node-02 ~]# ip a
1: lo: <LOOPBACK,UP,LOWER_UP> mtu 65536 qdisc noqueue state UNKNOWN group default qlen 1000
    link/loopback 00:00:00:00:00:00 brd 00:00:00:00:00:00
    inet 127.0.0.1/8 scope host lo
       valid_lft forever preferred_lft forever
    inet6 ::1/128 scope host
       valid_lft forever preferred_lft forever
2: eth0: <BROADCAST,MULTICAST,UP,LOWER_UP> mtu 1500 qdisc mq state UP group default qlen 1000
    link/ether 68:91:d0:64:02:f1 brd ff:ff:ff:ff:ff:ff
    inet 10.0.0.12/24 brd 10.0.0.255 scope global eth0
       valid_lft forever preferred_lft forever
    inet6 fe80::6a91:d0ff:fe64:2f1/64 scope link
       valid_lft forever preferred_lft forever
[root@node-02 ~]# route -n
Kernel IP routing table
Destination     Gateway         Genmask         Flags Metric Ref    Use Iface
0.0.0.0         10.0.0.10       0.0.0.0         UG    0      0        0 eth0
10.0.0.0        0.0.0.0         255.255.255.0   U     0      0        0 eth0
[root@node-02 ~]# python -m SimpleHTTPServer 80
Serving HTTP on 0.0.0.0 port 80 ...
10.0.0.10 - - [23/Dec/2022 08:16:40] "GET / HTTP/1.1" 200 –

# Real Server 03
[root@node-03 ~]# ip a
1: lo: <LOOPBACK,UP,LOWER_UP> mtu 65536 qdisc noqueue state UNKNOWN group default qlen 1000
    link/loopback 00:00:00:00:00:00 brd 00:00:00:00:00:00
    inet 127.0.0.1/8 scope host lo
       valid_lft forever preferred_lft forever
    inet6 ::1/128 scope host
       valid_lft forever preferred_lft forever
2: eth0: <BROADCAST,MULTICAST,UP,LOWER_UP> mtu 1500 qdisc mq master ac state UP group default qlen 1000
    link/ether b8:59:9f:c7:73:cb brd ff:ff:ff:ff:ff:ff
    inet6 fe80::ba59:9fff:fec7:73cb/64 scope link
       valid_lft forever preferred_lft forever
[root@node-03 ~]# route -n
Kernel IP routing table
Destination     Gateway         Genmask         Flags Metric Ref    Use Iface
0.0.0.0         10.0.0.10       0.0.0.0         UG    0      0        0 eth1
10.0.0.0        0.0.0.0         255.255.255.0   U     0      0        0 eth1
[root@node-03 ~]# python -m SimpleHTTPServer 80
Serving HTTP on 0.0.0.0 port 80 ...
10.0.0.10 - - [23/Dec/2022 08:16:39] "GET / HTTP/1.1" 200 -
3.2.5 配置Client的网络
[root@node-00 ~]# ip a
1: lo: <LOOPBACK,UP,LOWER_UP> mtu 65536 qdisc noqueue state UNKNOWN group default qlen 1000
    link/loopback 00:00:00:00:00:00 brd 00:00:00:00:00:00
    inet 127.0.0.1/8 scope host lo
       valid_lft forever preferred_lft forever
    inet6 ::1/128 scope host
       valid_lft forever preferred_lft forever
2: eth0: <BROADCAST,MULTICAST,UP,LOWER_UP> mtu 1500 qdisc mq state UP group default qlen 1000
    link/ether b8:59:9f:42:36:68 brd ff:ff:ff:ff:ff:ff
    inet 200.0.0.48/24 brd 200.0.0.255 scope global eth0
       valid_lft forever preferred_lft forever
    inet6 fe80::ba59:9fff:fe42:3668/64 scope link
       valid_lft forever preferred_lft forever
[root@node-00 ~]# route -n
Kernel IP routing table
Destination     Gateway         Genmask         Flags Metric Ref    Use Iface
0.0.0.0         200.0.0.1       0.0.0.0         UG    0      0        0 eth0
200.0.0.0       0.0.0.0         255.255.255.0   U     0      0        0 eth0
[root@node-00 ~]#
3.3 卸载结果验证
# 在Client端,使用curl访问http://<VIP>来验证DPVS的负载均衡效果
[root@node-00 ~]# curl http://200.0.0.200
Real Server 01
[root@node-00 ~]# curl http://200.0.0.200
Real Server 02
[root@node-00 ~]# curl http://200.0.0.200
Real Server 03

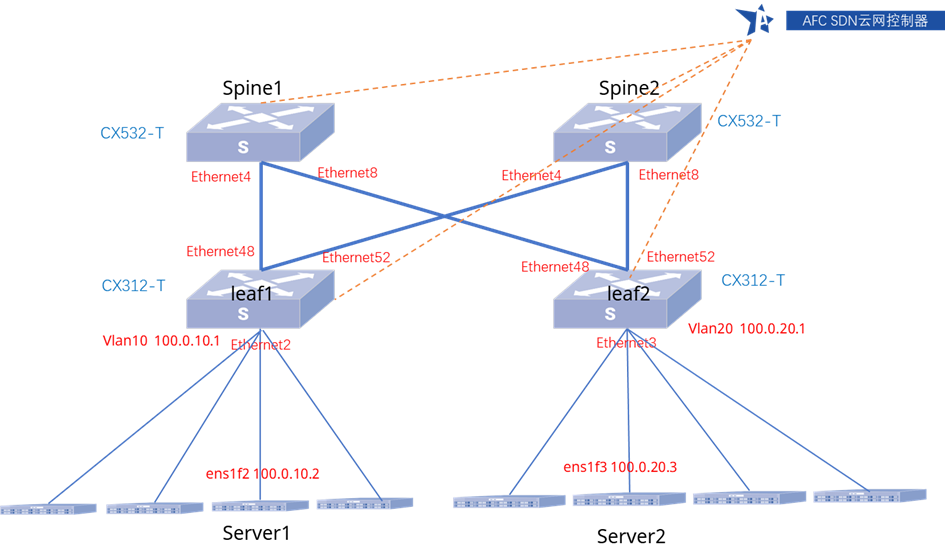

 [root@server1 ~]# route add -net 100.0.20.0 netmask 255.255.255.0 gw 100.0.10.1 dev ens1f2
Server:2
[root@server1 ~]# route add -net 100.0.20.0 netmask 255.255.255.0 gw 100.0.10.1 dev ens1f2
Server:2
 [root@server1 ~]# route add -net 100.0.10.0 netmask 255.255.255.0 gw 100.0.20.1 dev ens1f3
 [root@server1 ~]# ping 100.0.10.2

 交换机路由信息
admin@Leaf1:~$ ip route show
交换机路由信息
admin@Leaf1:~$ ip route show
 下面信息显示Server2的路由转发到了Leaf1
admin@Leaf1:~$ ip neigh show nud all | grep Vlan
下面信息显示Server2的路由转发到了Leaf1
admin@Leaf1:~$ ip neigh show nud all | grep Vlan
 admin@Leaf1:~$ sudo bridge fdb|grep vxlan
 admin@Leaf1:~$ show ip route vrf Vnet123

 交换机路由信息
admin@Leaf2:~$ ip route show
交换机路由信息
admin@Leaf2:~$ ip route show
 下面信息显示Server2的路由转发到了Leaf1
admin@Leaf2:~$ ip neigh show nud all | grep Vlan
下面信息显示Server2的路由转发到了Leaf1
admin@Leaf2:~$ ip neigh show nud all | grep Vlan
 admin@Leaf2:~$ sudo bridge fdb |grep vxlan
 admin@Leaf2:~$ show ip route vrf Vnet123