配置指导:如何从0到1构建分布式GPU计算试验环境
随着AI、大模型的快速发展,传统的集中式计算已无法应对激增的数据处理需求,而分布式计算是指将一个计算任务分解成多个子任务,由多个计算节点并行地进行计算,并将结果汇总得到最终结果的计算方式,能够更高效、更稳定、更灵活地处理大规模数据和复杂计算任务,在各行各业中得到了广泛的应用。
那如何从零到一搭建分布式计算的环境呢?本文将从硬件选型,到服务器侧的基础配置、GPU驱动安装和集合通讯库配置,以及无损以太网的启用,直至大模型导入和训练测试,带您跑通搭建分布式训练环境的全流程。
1 硬件准备
1.1 GPU服务器选型
GPU拥有大量的计算核心,可以同时处理多个数据任务,是构成智算中心的关键硬件。
从智算中心方案的整体设计层面来看:GPU服务器集群和存储服务器集群分别通过计算网络(Scale-out网络)和存储网络连接。另外两张管理网中,业务管理网用于GPU服务器互联,进行AIOS管理面通信,带外管理则连接整个智算中心的所有设备,用于运维接入管理。
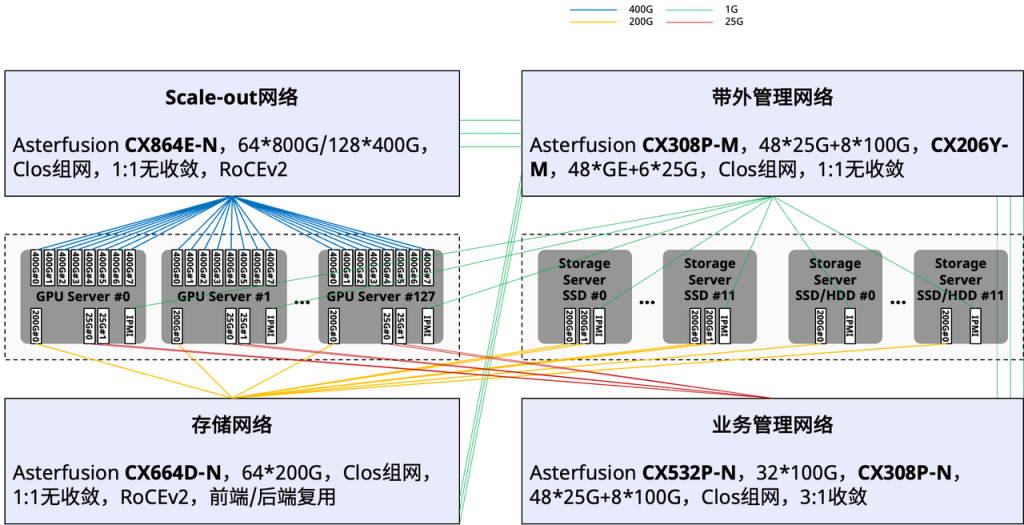
图1:智算中心方案的概要设计拓扑
明确了智算中心的整体设计后,我们将对比通用计算服务器与GPU服务器的内部硬件连接拓扑图,来具体了解GPU服务器的选型逻辑:


图2(上):通用计算服务器内部的硬件连接拓扑
图3(下):GPU服务器内部的硬件连接拓扑
图2是一台通用计算服务器内部的硬件连接拓扑,这台服务器的核心是两块AMD的EPYC CPU,根据IO Chiplet扩展出了若干接口,辅助CPU充分释放通用计算能力。
图3是一台GPU服务器内部的硬件连接拓扑,这台服务器配备了8块A100 GPU,8张用于计算通信的RDMA网卡,以及2张用于存储通信的RDMA网卡,所有的IO组件设计,都是为了让这8块GPU充分释放算力。
通过上面两张硬件连接拓扑图可以看到,通用服务器和GPU服务器从基本的硬件构造上就有着非常大的差异,一个是围绕通用CPU来构建,另一个是围绕着GPU来构建的。因此,在硬件选型阶段,就需要注意差别,通常来讲通用服务器是没有办法复用改造成一台高性能的GPU服务器,PCIe接口数量、服务器空间、散热设计、电源等方面都不能满足要求。
当通过计算任务确定算力需求,进而确定了所需要的GPU型号和数量之后,我们也就可以再继续规划整个GPU集群的组网了。
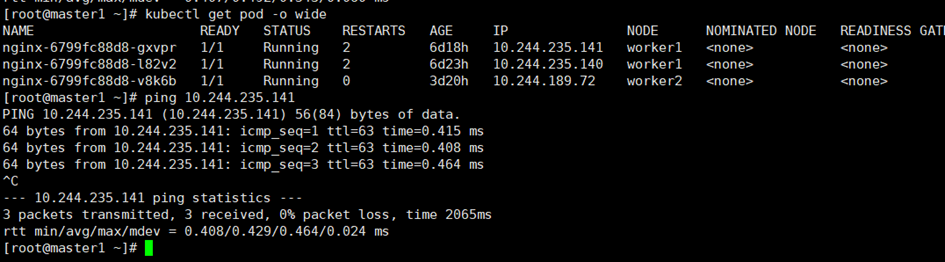
由于资源限制,本次实验验证中,使用三台通用服务器稍加改造进行后续的并行训练和推理测试。
计算节点的硬件配置如下:
CPU:Intel(R) Xeon(R) CPU E5-2678 v3 @ 2.50GHz * 2
GPU:NVIDIA GeForce RTX 4060 Ti 16G * 1
内存:128G
存储:10T HDD * 2
网卡:MGMT、CX5
其他部分:
散热:GPU为全高尺寸,但服务器只有2U,所以只能拆掉上盖板;
电源:通用服务器通常没有预留足够的供电接口,因此需要使用外置电源对GPU进行额外供电;
电源选择的是Great Wall 额定650W X6,功率上可以同时满足3块GPU(RTX4060Ti需要外接150W的供电)的供电要求,并且支持3个8pin接口,用来分别连接三块GPU。
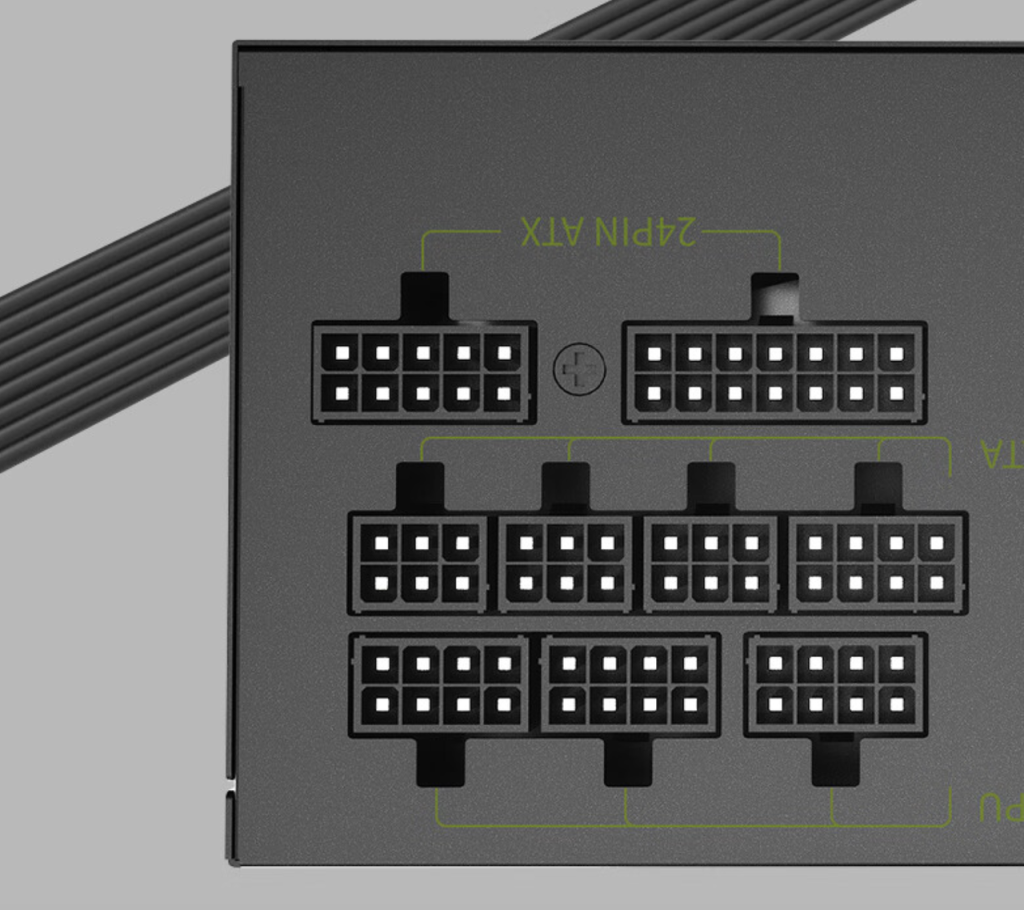
图4:电源选型示意图
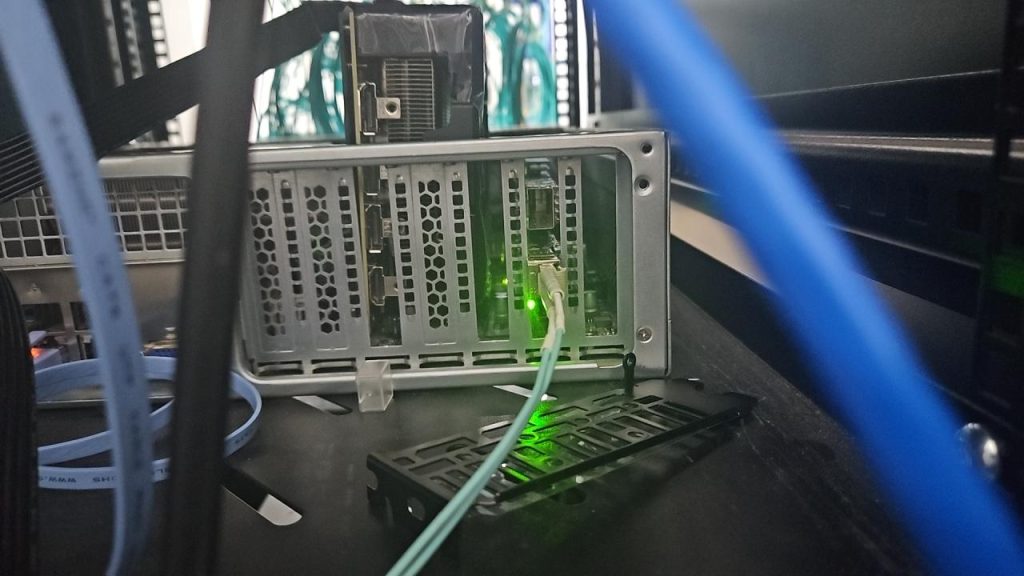
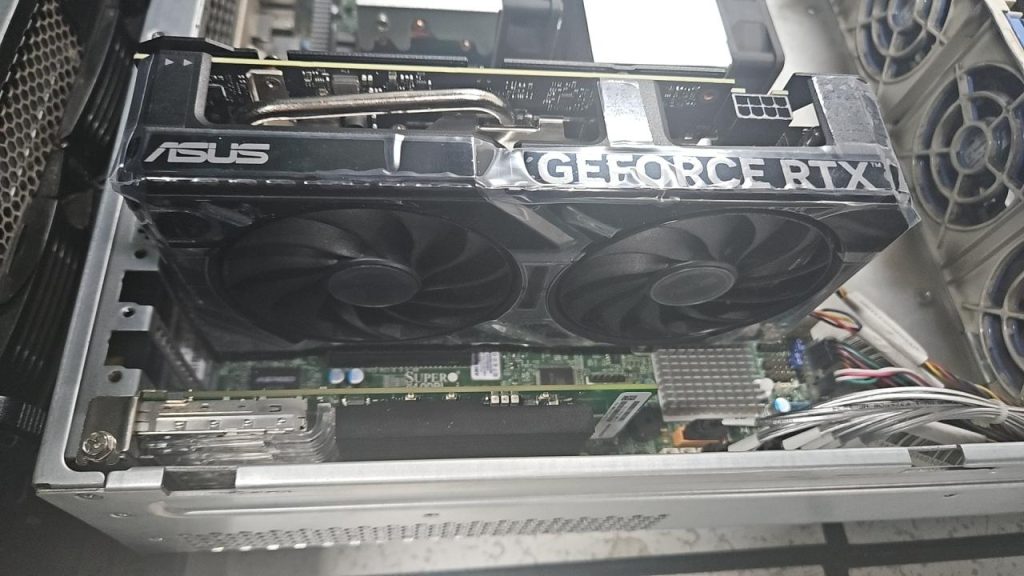
图5:GPU和RDMA网卡上机安装后的实拍图
1.2 高性能计算网选型
智算中心的管理网相较于传统的通用计算数据中心来说,没有太大差异。比较特殊的就是Scale-out计算网络和存储网络,这两张网络承载的业务流量决定了交换机设备的选型需求:支持RDMA、低时延、高吞吐。
如下图所示,在组网连接方面也有所不同,这里会通过将GPU分组(图中#L0~7一组,#L8~15一组),组成只有一跳的高带宽互联域(HB域),并通过针对智算场景优化的Rail交换机连接,实现了高效的数据传输和计算协同。
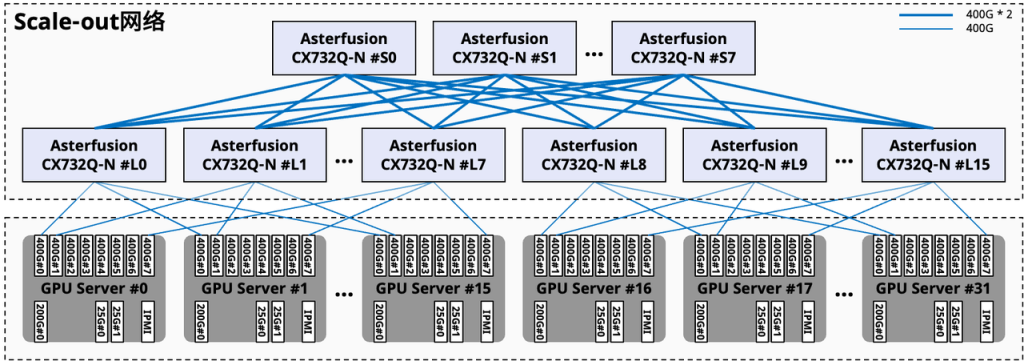
图6:组网连接示意
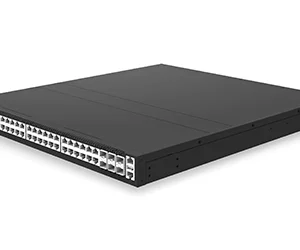
这次实验验证中,计算网的交换机选用星融元Asterfusion®️ CX-N系列超低时延交换机,具体型号为CX308P-48Y-N。
| 型号 | 业务接口 | 交换容量 |
| CX864E-N | 64 x 800GE OSFP,2 x 10GE SFP+ | 102.4Tbps |
| CX732Q-N | 32 x 400GE QSFP-DD, 2 x 10GE SFP+ | 25.6Tbps |
| CX664D-N | 64 x 200GE QSFP56, 2 x 10GE SFP+ | 25.6Tbps |
| CX564P-N | 64 x 100GE QSFP28, 2 x 10GE SFP+ | 12.8Tbps |
| CX532P-N | 32 x 100GE QSFP28, 2 x 10GE SFP+ | 6.4Tbps |
| CX308P-48Y-N | 48 x 25GE SFP28, 8 x 100GE QSFP28 | 4.0Tbps |
提升大模型训练效率
CX-N数据中心交换机的单机转发时延(400ns)低至业界平均水平的1/4~1/5,将网络时延在AI/ML应用端到端时延中的占比降至最低,同时多维度的高可靠设计确保网络在任何时候都不中断,帮助大模型的训练大幅度降低训练时间、提升整体效率。
全系列标配RoCEv2能力
区别于传统厂家多等级License权限管理方式,CX-N数据中心交换机所有应用场景License权限一致,全系列标配RoCEv2能力,提供PFC、ECN、Easy RoCE等一系列面向生产环境的增强网络特性,用户无须为此类高级特性额外付出网络建设成本,帮助用户获得更高的ROI。
开放、中立的AI/ML网络
星融元AI/ML网络解决方案的开放性确保用户能够重用已有的系统(K8s、Prometheus等)对网络进行管理,无需重复投入;星融元以“中立的网络供应商参与AI生态”的理念为用户提供专业的网络方案,帮助用户规避“全栈方案锁定”的风险。
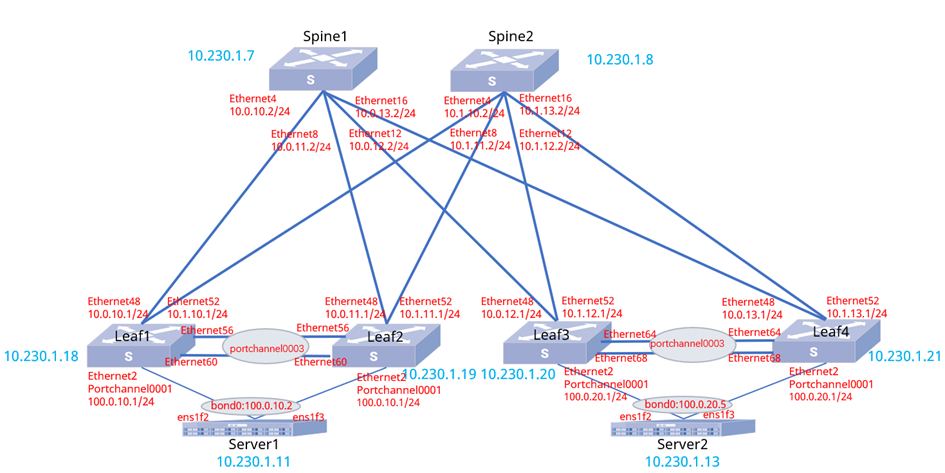
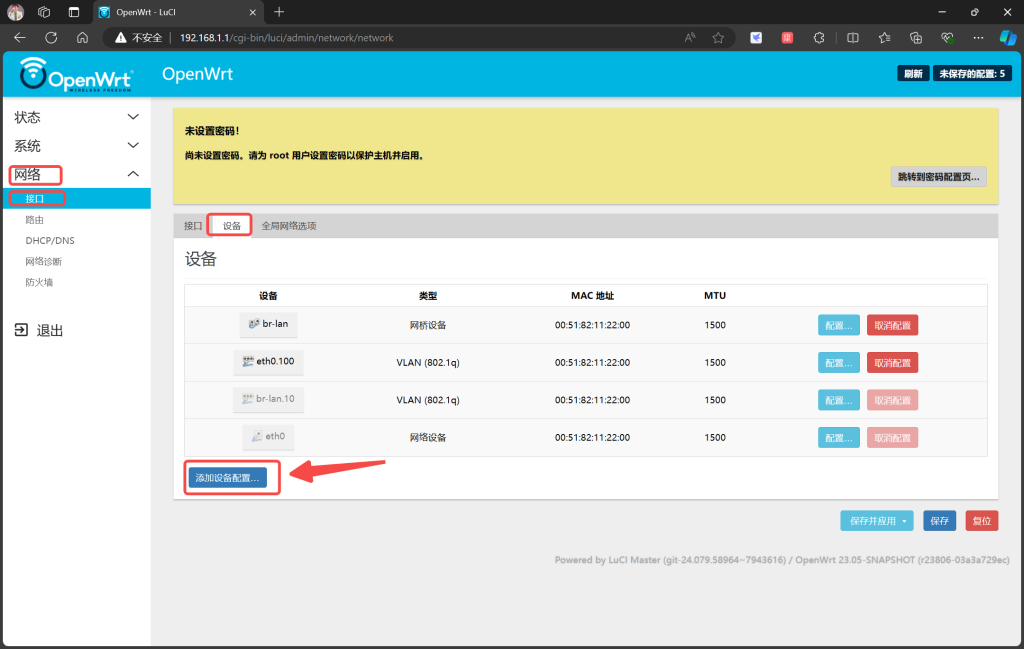
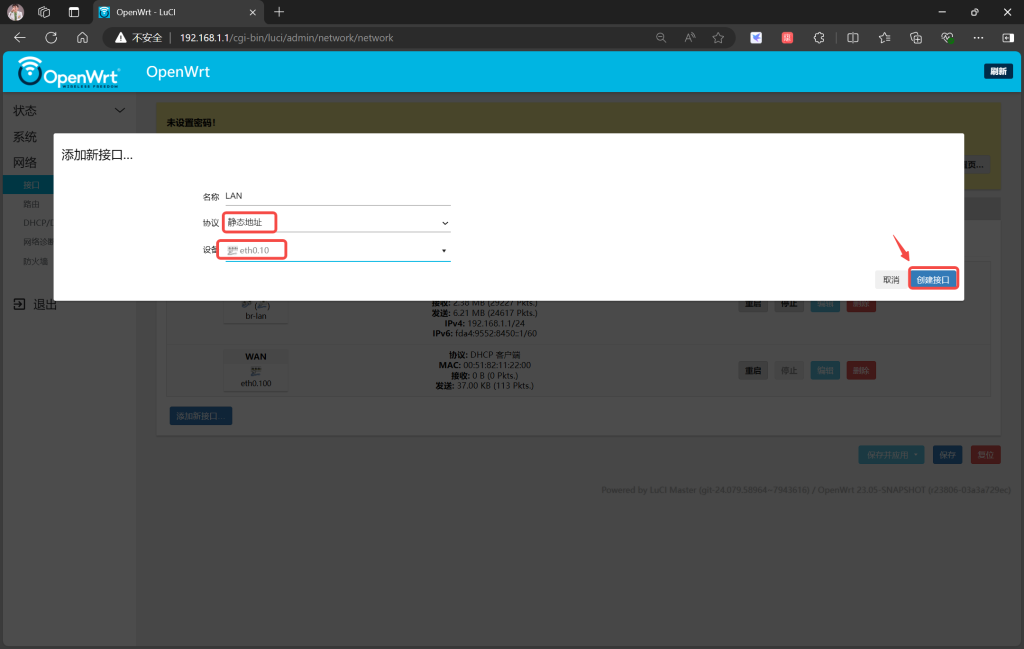
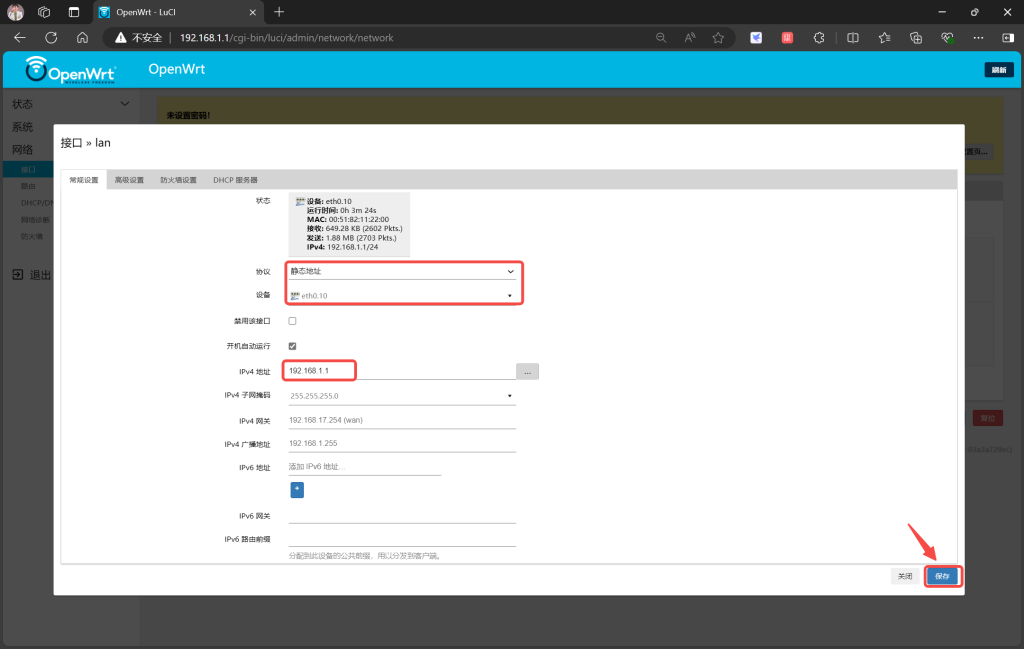
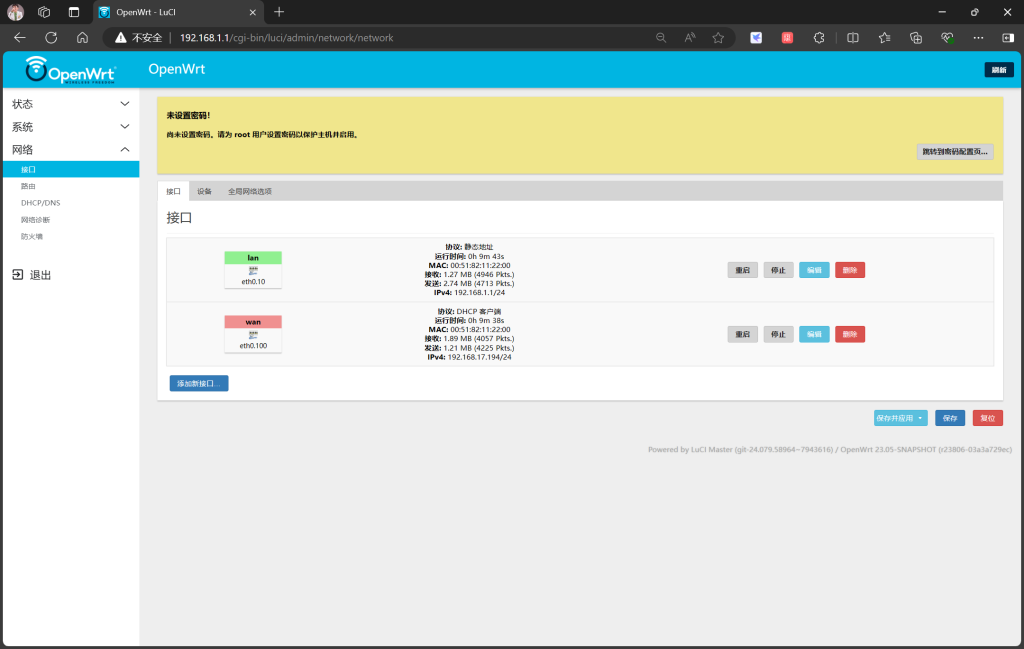
最终,实验环节的组网拓扑和基础配置如下所示。
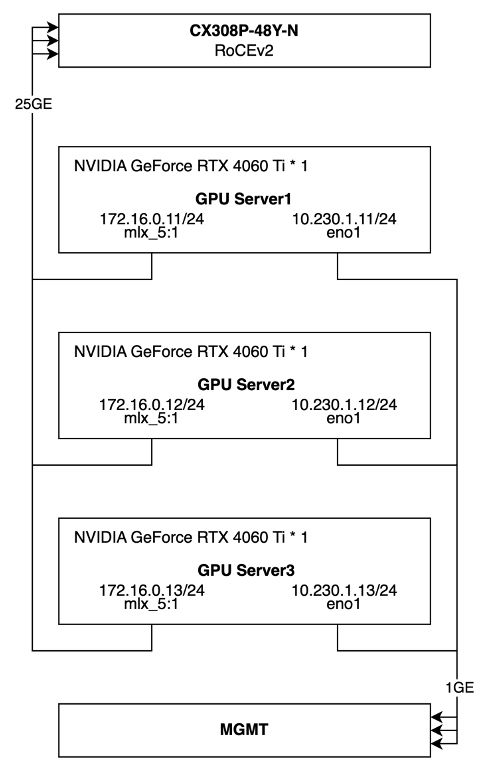
图7:实验拓扑和基础配置示意
2 软件准备
以上,我们已经完成了硬件选型,接下来我们将进行软件层面的配置:部署 RoCEv2 交换机、配置GPU 服务器、安装 GPU 驱动和集合通讯库。
2.1 RoCEv2交换机
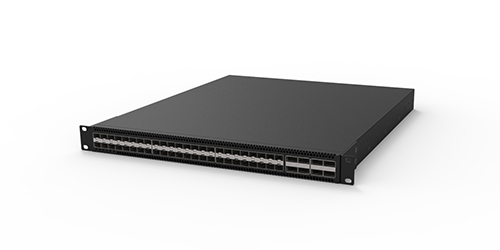
图8:CX308P-48Y-N设备图
本次并行训练的环境中设备数量较少,组网相对简单:
1. 将CX5网卡的25GE业务接口连接到CX308P;
2. 在交换机上一键启用全局RoCE的无损配置;
3. 将三个25G业务口划分到一个VLAN下组成一个二层网络;
如前文提到,CX-N数据中心交换机全系列标配RoCEv2能力,配合星融元AsterNOS网络操作系统,只需要两行命令行便可配置所有必要的QoS规则和参数,具体命令行如下:
noone@MacBook-Air ~ % ssh admin@10.230.1.17
Linux AsterNOS 5.10.0-8-2-amd64 #1 SMP Debian 5.10.46-4 (2021-08-03) x86_64
    _          _                _   _   ___   ____
   / \    ___ | |_   ___  _ __ | \ | | / _ \ / ___|
  / _ \  / __|| __| / _ \| '__||  \| || | | |\___ \
 / ___ \ \__ \| |_ |  __/| |   | |\  || |_| | ___) |
/_/   \_\|___/ \__| \___||_|   |_| \_| \___/ |____/

------- Asterfusion Network Operating System -------

Help:    http://www.asterfusion.com/

Last login: Sun Sep 29 17:10:46 2024 from 172.16.20.241

AsterNOS# configure terminal
AsterNOS(config)# qos roce lossless
AsterNOS(config)# qos service-policy roce_lossless
AsterNOS(config)# end
AsterNOS# show qos roce
                    operational    description
------------------  -------------  ---------------------------------------------------
status              bind           qos roce binding status
mode                lossless       Roce Mode
cable-length        40m            Cable Length(in meters) for Roce Lossless Config
congestion-control
- congestion-mode   ECN            congestion-control
- enabled-tc        3,4            Congestion config enabled Traffic Class
- max-threshold     750000         Congestion config max-threshold
- min-threshold     15360          Congestion config max-threshold
pfc
- pfc-priority      3,4            switch-prio on which PFC is enabled
- rx-enabled        enable         PFC Rx Enabled status
- tx-enabled        enable         PFC Tx Enabled status
trust
- trust-mode        dscp           Trust Setting on the port for packet classification

 RoCE DSCP->SP mapping configurations
==========================================
dscp                       switch-prio
-----------------------  -------------
0,1,2,3,4,5,6,7                      0
10,11,12,13,14,15,8,9                1
16,17,18,19,20,21,22,23              2
24,25,26,27,28,29,30,31              3
32,33,34,35,36,37,38,39              4
40,41,42,43,44,45,46,47              5
48,49,50,51,52,53,54,55              6
56,57,58,59,60,61,62,63              7

 RoCE SP->TC mapping and ETS configurations
================================================
  switch-prio  mode    weight
-------------  ------  --------
            6  SP
            7  SP

 RoCE pool config
======================
name                     switch-prio
-----------------------  -------------
egress_lossy_profile     0 1 2 5 6
ingress_lossy_profile    0 1 2 5 6
egress_lossless_profile  3 4
roce_lossless_profile    3 4
2.2 GPU服务器基础配置
以下所有操作,在三台服务器上都需要执行,本文档中的配置步骤以server3为例。
2.2.1 关闭防火墙和SELinux
[root@server3 ~]# systemctl stop firewalld
[root@server3 ~]# systemctl disable firewalld
[root@server3 ~]# setenforce 0
[root@server3 ~]# sed -i 's/SELINUX=enforcing/SELINUX=disabled/g' /etc/sysconfig/selinux
2.2.2 配置服务器间免密登陆
[root@server3 ~]# ssh-keygen
[root@server3 ~]# ssh-copy-id root@server1
[root@server3 ~]# ssh-copy-id root@server2
2.2.3 配置服务器软件源
[root@server3 ~]# ll /etc/yum.repos.d/
总用量 80
-rw-r--r-- 1 root root 2278 9月  19 08:00 CentOS-Base.repo
-rw-r--r-- 1 root root  232 9月  19 08:00 cuda-rhel7.repo
-rw-r--r-- 1 root root  210 9月  19 08:00 cudnn-local-rhel7-8.9.7.29.repo
drwxr-xr-x 2 root root 4096 9月  19 07:58 disable.d
-rw-r--r-- 1 root root  664 9月  19 08:00 epel.repo
-rw-r--r-- 1 root root  381 9月  19 08:00 hashicorp.repo
-rw-r--r-- 1 root root  218 9月  19 08:00 kubernetes.repo
-rw-r--r-- 1 root root  152 9月  19 08:00 MariaDB.repo
-rw-r--r-- 1 root root  855 9月  19 08:00 remi-modular.repo
-rw-r--r-- 1 root root  456 9月  19 08:00 remi-php54.repo
-rw-r--r-- 1 root root 1314 9月  19 08:00 remi-php70.repo
-rw-r--r-- 1 root root 1314 9月  19 08:00 remi-php71.repo
-rw-r--r-- 1 root root 1314 9月  19 08:00 remi-php72.repo
-rw-r--r-- 1 root root 1314 9月  19 08:00 remi-php73.repo
-rw-r--r-- 1 root root 1314 9月  19 08:00 remi-php74.repo
-rw-r--r-- 1 root root 1314 9月  19 08:00 remi-php80.repo
-rw-r--r-- 1 root root 1314 9月  19 08:00 remi-php81.repo
-rw-r--r-- 1 root root 1314 9月  19 08:00 remi-php82.repo
-rw-r--r-- 1 root root 2605 9月  19 08:00 remi.repo
-rw-r--r-- 1 root root  750 9月  19 08:00 remi-safe.repo
[root@server3 ~]# more /etc/yum.repos.d/*.repo
::::::::::::::
/etc/yum.repos.d/CentOS-Base.repo
::::::::::::::
# CentOS-Base.repo
#
# The mirror system uses the connecting IP address of the client and the
# update status of each mirror to pick mirrors that are updated to and
# geographically close to the client.  You should use this for CentOS updates
# unless you are manually picking other mirrors.
#
# If the mirrorlist= does not work for you, as a fall back you can try the
# remarked out baseurl= line instead.
#
#

[base]
name=CentOS-7 - Base - mirrors.aliyun.com
failovermethod=priority
baseurl=http://mirrors.aliyun.com/centos/7/os/x86_64/
        http://mirrors.aliyuncs.com/centos/7/os/x86_64/
        http://mirrors.cloud.aliyuncs.com/centos/7/os/x86_64/
gpgcheck=1
gpgkey=http://mirrors.aliyun.com/centos/RPM-GPG-KEY-CentOS-7

#released updates
[updates]
name=CentOS-7 - Updates - mirrors.aliyun.com
failovermethod=priority
baseurl=http://mirrors.aliyun.com/centos/7/updates/x86_64/
        http://mirrors.aliyuncs.com/centos/7/updates/x86_64/
        http://mirrors.cloud.aliyuncs.com/centos/7/updates/x86_64/
gpgcheck=1
gpgkey=http://mirrors.aliyun.com/centos/RPM-GPG-KEY-CentOS-7

#additional packages that may be useful
[extras]
name=CentOS-7 - Extras - mirrors.aliyun.com
failovermethod=priority
baseurl=http://mirrors.aliyun.com/centos/7/extras/x86_64/
        http://mirrors.aliyuncs.com/centos/7/extras/x86_64/
        http://mirrors.cloud.aliyuncs.com/centos/7/extras/x86_64/
gpgcheck=1
gpgkey=http://mirrors.aliyun.com/centos/RPM-GPG-KEY-CentOS-7

#additional packages that extend functionality of existing packages
[centosplus]
name=CentOS-7 - Plus - mirrors.aliyun.com
failovermethod=priority
baseurl=http://mirrors.aliyun.com/centos/7/centosplus/x86_64/
        http://mirrors.aliyuncs.com/centos/7/centosplus/x86_64/
        http://mirrors.cloud.aliyuncs.com/centos/7/centosplus/x86_64/
gpgcheck=1
enabled=0
gpgkey=http://mirrors.aliyun.com/centos/RPM-GPG-KEY-CentOS-7

#contrib - packages by Centos Users
[contrib]
name=CentOS-7 - Contrib - mirrors.aliyun.com
failovermethod=priority
baseurl=http://mirrors.aliyun.com/centos/7/contrib/x86_64/
        http://mirrors.aliyuncs.com/centos/7/contrib/x86_64/
        http://mirrors.cloud.aliyuncs.com/centos/7/contrib/x86_64/
gpgcheck=1
enabled=0
gpgkey=http://mirrors.aliyun.com/centos/RPM-GPG-KEY-CentOS-7
::::::::::::::
/etc/yum.repos.d/cuda-rhel7.repo
::::::::::::::
[cuda-rhel7-x86_64]
name=cuda-rhel7-x86_64
baseurl=https://developer.download.nvidia.com/compute/cuda/repos/rhel7/x86_64
enabled=1
gpgcheck=1
gpgkey=https://developer.download.nvidia.com/compute/cuda/repos/rhel7/x86_64/D42D0685.pub
::::::::::::::
/etc/yum.repos.d/cudnn-local-rhel7-8.9.7.29.repo
::::::::::::::
[cudnn-local-rhel7-8.9.7.29]
name=cudnn-local-rhel7-8.9.7.29
baseurl=file:///var/cudnn-local-repo-rhel7-8.9.7.29
enabled=1
gpgcheck=1
gpgkey=file:///var/cudnn-local-repo-rhel7-8.9.7.29/90F10142.pub
obsoletes=0
::::::::::::::
/etc/yum.repos.d/epel.repo
::::::::::::::
[epel]
name=Extra Packages for Enterprise Linux 7 - $basearch
baseurl=http://mirrors.aliyun.com/epel/7/$basearch
failovermethod=priority
enabled=1
gpgcheck=0
gpgkey=file:///etc/pki/rpm-gpg/RPM-GPG-KEY-EPEL-7

[epel-debuginfo]
name=Extra Packages for Enterprise Linux 7 - $basearch - Debug
baseurl=http://mirrors.aliyun.com/epel/7/$basearch/debug
failovermethod=priority
enabled=0
gpgkey=file:///etc/pki/rpm-gpg/RPM-GPG-KEY-EPEL-7
gpgcheck=0

[epel-source]
name=Extra Packages for Enterprise Linux 7 - $basearch - Source
baseurl=http://mirrors.aliyun.com/epel/7/SRPMS
failovermethod=priority
enabled=0
gpgkey=file:///etc/pki/rpm-gpg/RPM-GPG-KEY-EPEL-7
gpgcheck=0
::::::::::::::
/etc/yum.repos.d/hashicorp.repo
::::::::::::::
[hashicorp]
name=Hashicorp Stable - $basearch
baseurl=https://rpm.releases.hashicorp.com/RHEL/$releasever/$basearch/stable
enabled=0
gpgcheck=1
gpgkey=https://rpm.releases.hashicorp.com/gpg

[hashicorp-test]
name=Hashicorp Test - $basearch
baseurl=https://rpm.releases.hashicorp.com/RHEL/$releasever/$basearch/test
enabled=0
gpgcheck=1
gpgkey=https://rpm.releases.hashicorp.com/gpg
::::::::::::::
/etc/yum.repos.d/kubernetes.repo
::::::::::::::
[kubernetes]
name=Kubernetes
baseurl=https://mirrors.aliyun.com/kubernetes-new/core/stable/v1.28/rpm/
enabled=1
gpgcheck=1
gpgkey=https://mirrors.aliyun.com/kubernetes-new/core/stable/v1.28/rpm/repodata/repomd.xml.key
::::::::::::::
/etc/yum.repos.d/MariaDB.repo
::::::::::::::
[mariadb]
name = MariaDB
baseurl = https://mirror.mariadb.org/yum/11.2/centos74-amd64
gpgkey = https://yum.mariadb.org/RPM-GPG-KEY-MariaDB
gpgcheck = 0
::::::::::::::
/etc/yum.repos.d/remi-modular.repo
::::::::::::::
# Repository: https://rpms.remirepo.net/
# Blog:       https://blog.remirepo.net/
# Forum:      https://forum.remirepo.net/

[remi-modular]
name=Remi's Modular repository for Enterprise Linux 7 - $basearch
#baseurl=http://rpms.remirepo.net/enterprise/7/modular/$basearch/
#mirrorlist=https://rpms.remirepo.net/enterprise/7/modular/httpsmirror
mirrorlist=http://cdn.remirepo.net/enterprise/7/modular/mirror
enabled=0
gpgcheck=1
gpgkey=file:///etc/pki/rpm-gpg/RPM-GPG-KEY-remi

[remi-modular-test]
name=Remi's Modular testing repository for Enterprise Linux 7 - $basearch
#baseurl=http://rpms.remirepo.net/enterprise/7/modular-test/$basearch/
#mirrorlist=https://rpms.remirepo.net/enterprise/7/modular-test/httpsmirror
mirrorlist=http://cdn.remirepo.net/enterprise/7/modular-test/mirror
enabled=0
gpgcheck=1
gpgkey=file:///etc/pki/rpm-gpg/RPM-GPG-KEY-remi

::::::::::::::
/etc/yum.repos.d/remi-php54.repo
::::::::::::::
# This repository only provides PHP 5.4 and its extensions
# NOTICE: common dependencies are in "remi-safe"

[remi-php54]
name=Remi's PHP 5.4 RPM repository for Enterprise Linux 7 - $basearch
#baseurl=http://rpms.remirepo.net/enterprise/7/php54/$basearch/
#mirrorlist=https://rpms.remirepo.net/enterprise/7/php54/httpsmirror
mirrorlist=http://cdn.remirepo.net/enterprise/7/php54/mirror
enabled=0
gpgcheck=1
gpgkey=file:///etc/pki/rpm-gpg/RPM-GPG-KEY-remi

::::::::::::::
/etc/yum.repos.d/remi-php70.repo
::::::::::::::
# This repository only provides PHP 7.0 and its extensions
# NOTICE: common dependencies are in "remi-safe"

[remi-php70]
name=Remi's PHP 7.0 RPM repository for Enterprise Linux 7 - $basearch
#baseurl=http://rpms.remirepo.net/enterprise/7/php70/$basearch/
#mirrorlist=https://rpms.remirepo.net/enterprise/7/php70/httpsmirror
mirrorlist=http://cdn.remirepo.net/enterprise/7/php70/mirror
enabled=0
gpgcheck=1
gpgkey=file:///etc/pki/rpm-gpg/RPM-GPG-KEY-remi

[remi-php70-debuginfo]
name=Remi's PHP 7.0 RPM repository for Enterprise Linux 7 - $basearch - debuginfo
baseurl=http://rpms.remirepo.net/enterprise/7/debug-php70/$basearch/
enabled=0
gpgcheck=1
gpgkey=file:///etc/pki/rpm-gpg/RPM-GPG-KEY-remi

[remi-php70-test]
name=Remi's PHP 7.0 test RPM repository for Enterprise Linux 7 - $basearch
#baseurl=http://rpms.remirepo.net/enterprise/7/test70/$basearch/
#mirrorlist=https://rpms.remirepo.net/enterprise/7/test70/httpsmirror
mirrorlist=http://cdn.remirepo.net/enterprise/7/test70/mirror
enabled=0
gpgcheck=1
gpgkey=file:///etc/pki/rpm-gpg/RPM-GPG-KEY-remi

[remi-php70-test-debuginfo]
name=Remi's PHP 7.0 test RPM repository for Enterprise Linux 7 - $basearch - debuginfo
baseurl=http://rpms.remirepo.net/enterprise/7/debug-test70/$basearch/
enabled=0
gpgcheck=1
gpgkey=file:///etc/pki/rpm-gpg/RPM-GPG-KEY-remi
::::::::::::::
/etc/yum.repos.d/remi-php71.repo
::::::::::::::
# This repository only provides PHP 7.1 and its extensions
# NOTICE: common dependencies are in "remi-safe"

[remi-php71]
name=Remi's PHP 7.1 RPM repository for Enterprise Linux 7 - $basearch
#baseurl=http://rpms.remirepo.net/enterprise/7/php71/$basearch/
#mirrorlist=https://rpms.remirepo.net/enterprise/7/php71/httpsmirror
mirrorlist=http://cdn.remirepo.net/enterprise/7/php71/mirror
enabled=0
gpgcheck=1
gpgkey=file:///etc/pki/rpm-gpg/RPM-GPG-KEY-remi

[remi-php71-debuginfo]
name=Remi's PHP 7.1 RPM repository for Enterprise Linux 7 - $basearch - debuginfo
baseurl=http://rpms.remirepo.net/enterprise/7/debug-php71/$basearch/
enabled=0
gpgcheck=1
gpgkey=file:///etc/pki/rpm-gpg/RPM-GPG-KEY-remi

[remi-php71-test]
name=Remi's PHP 7.1 test RPM repository for Enterprise Linux 7 - $basearch
#baseurl=http://rpms.remirepo.net/enterprise/7/test71/$basearch/
#mirrorlist=https://rpms.remirepo.net/enterprise/7/test71/httpsmirror
mirrorlist=http://cdn.remirepo.net/enterprise/7/test71/mirror
enabled=0
gpgcheck=1
gpgkey=file:///etc/pki/rpm-gpg/RPM-GPG-KEY-remi

[remi-php71-test-debuginfo]
name=Remi's PHP 7.1 test RPM repository for Enterprise Linux 7 - $basearch - debuginfo
baseurl=http://rpms.remirepo.net/enterprise/7/debug-test71/$basearch/
enabled=0
gpgcheck=1
gpgkey=file:///etc/pki/rpm-gpg/RPM-GPG-KEY-remi
::::::::::::::
/etc/yum.repos.d/remi-php72.repo
::::::::::::::
# This repository only provides PHP 7.2 and its extensions
# NOTICE: common dependencies are in "remi-safe"

[remi-php72]
name=Remi's PHP 7.2 RPM repository for Enterprise Linux 7 - $basearch
#baseurl=http://rpms.remirepo.net/enterprise/7/php72/$basearch/
#mirrorlist=https://rpms.remirepo.net/enterprise/7/php72/httpsmirror
mirrorlist=http://cdn.remirepo.net/enterprise/7/php72/mirror
enabled=0
gpgcheck=1
gpgkey=file:///etc/pki/rpm-gpg/RPM-GPG-KEY-remi

[remi-php72-debuginfo]
name=Remi's PHP 7.2 RPM repository for Enterprise Linux 7 - $basearch - debuginfo
baseurl=http://rpms.remirepo.net/enterprise/7/debug-php72/$basearch/
enabled=0
gpgcheck=1
gpgkey=file:///etc/pki/rpm-gpg/RPM-GPG-KEY-remi

[remi-php72-test]
name=Remi's PHP 7.2 test RPM repository for Enterprise Linux 7 - $basearch
#baseurl=http://rpms.remirepo.net/enterprise/7/test72/$basearch/
#mirrorlist=https://rpms.remirepo.net/enterprise/7/test72/httpsmirror
mirrorlist=http://cdn.remirepo.net/enterprise/7/test72/mirror
enabled=0
gpgcheck=1
gpgkey=file:///etc/pki/rpm-gpg/RPM-GPG-KEY-remi

[remi-php72-test-debuginfo]
name=Remi's PHP 7.2 test RPM repository for Enterprise Linux 7 - $basearch - debuginfo
baseurl=http://rpms.remirepo.net/enterprise/7/debug-test72/$basearch/
enabled=0
gpgcheck=1
gpgkey=file:///etc/pki/rpm-gpg/RPM-GPG-KEY-remi
::::::::::::::
/etc/yum.repos.d/remi-php73.repo
::::::::::::::
# This repository only provides PHP 7.3 and its extensions
# NOTICE: common dependencies are in "remi-safe"

[remi-php73]
name=Remi's PHP 7.3 RPM repository for Enterprise Linux 7 - $basearch
#baseurl=http://rpms.remirepo.net/enterprise/7/php73/$basearch/
#mirrorlist=https://rpms.remirepo.net/enterprise/7/php73/httpsmirror
mirrorlist=http://cdn.remirepo.net/enterprise/7/php73/mirror
enabled=1
gpgcheck=1
gpgkey=file:///etc/pki/rpm-gpg/RPM-GPG-KEY-remi

[remi-php73-debuginfo]
name=Remi's PHP 7.3 RPM repository for Enterprise Linux 7 - $basearch - debuginfo
baseurl=http://rpms.remirepo.net/enterprise/7/debug-php73/$basearch/
enabled=0
gpgcheck=1
gpgkey=file:///etc/pki/rpm-gpg/RPM-GPG-KEY-remi

[remi-php73-test]
name=Remi's PHP 7.3 test RPM repository for Enterprise Linux 7 - $basearch
#baseurl=http://rpms.remirepo.net/enterprise/7/test73/$basearch/
#mirrorlist=https://rpms.remirepo.net/enterprise/7/test73/httpsmirror
mirrorlist=http://cdn.remirepo.net/enterprise/7/test73/mirror
enabled=0
gpgcheck=1
gpgkey=file:///etc/pki/rpm-gpg/RPM-GPG-KEY-remi

[remi-php73-test-debuginfo]
name=Remi's PHP 7.3 test RPM repository for Enterprise Linux 7 - $basearch - debuginfo
baseurl=http://rpms.remirepo.net/enterprise/7/debug-test73/$basearch/
enabled=0
gpgcheck=1
gpgkey=file:///etc/pki/rpm-gpg/RPM-GPG-KEY-remi
::::::::::::::
/etc/yum.repos.d/remi-php74.repo
::::::::::::::
# This repository only provides PHP 7.4 and its extensions
# NOTICE: common dependencies are in "remi-safe"

[remi-php74]
name=Remi's PHP 7.4 RPM repository for Enterprise Linux 7 - $basearch
#baseurl=http://rpms.remirepo.net/enterprise/7/php74/$basearch/
#mirrorlist=https://rpms.remirepo.net/enterprise/7/php74/httpsmirror
mirrorlist=http://cdn.remirepo.net/enterprise/7/php74/mirror
enabled=0
gpgcheck=1
gpgkey=file:///etc/pki/rpm-gpg/RPM-GPG-KEY-remi

[remi-php74-debuginfo]
name=Remi's PHP 7.4 RPM repository for Enterprise Linux 7 - $basearch - debuginfo
baseurl=http://rpms.remirepo.net/enterprise/7/debug-php74/$basearch/
enabled=0
gpgcheck=1
gpgkey=file:///etc/pki/rpm-gpg/RPM-GPG-KEY-remi

[remi-php74-test]
name=Remi's PHP 7.4 test RPM repository for Enterprise Linux 7 - $basearch
#baseurl=http://rpms.remirepo.net/enterprise/7/test74/$basearch/
#mirrorlist=https://rpms.remirepo.net/enterprise/7/test74/httpsmirror
mirrorlist=http://cdn.remirepo.net/enterprise/7/test74/mirror
enabled=0
gpgcheck=1
gpgkey=file:///etc/pki/rpm-gpg/RPM-GPG-KEY-remi

[remi-php74-test-debuginfo]
name=Remi's PHP 7.4 test RPM repository for Enterprise Linux 7 - $basearch - debuginfo
baseurl=http://rpms.remirepo.net/enterprise/7/debug-test74/$basearch/
enabled=0
gpgcheck=1
gpgkey=file:///etc/pki/rpm-gpg/RPM-GPG-KEY-remi
::::::::::::::
/etc/yum.repos.d/remi-php80.repo
::::::::::::::
# This repository only provides PHP 8.0 and its extensions
# NOTICE: common dependencies are in "remi-safe"

[remi-php80]
name=Remi's PHP 8.0 RPM repository for Enterprise Linux 7 - $basearch
#baseurl=http://rpms.remirepo.net/enterprise/7/php80/$basearch/
#mirrorlist=https://rpms.remirepo.net/enterprise/7/php80/httpsmirror
mirrorlist=http://cdn.remirepo.net/enterprise/7/php80/mirror
enabled=0
gpgcheck=1
gpgkey=file:///etc/pki/rpm-gpg/RPM-GPG-KEY-remi

[remi-php80-debuginfo]
name=Remi's PHP 8.0 RPM repository for Enterprise Linux 7 - $basearch - debuginfo
baseurl=http://rpms.remirepo.net/enterprise/7/debug-php80/$basearch/
enabled=0
gpgcheck=1
gpgkey=file:///etc/pki/rpm-gpg/RPM-GPG-KEY-remi

[remi-php80-test]
name=Remi's PHP 8.0 test RPM repository for Enterprise Linux 7 - $basearch
#baseurl=http://rpms.remirepo.net/enterprise/7/test80/$basearch/
#mirrorlist=https://rpms.remirepo.net/enterprise/7/test80/httpsmirror
mirrorlist=http://cdn.remirepo.net/enterprise/7/test80/mirror
enabled=0
gpgcheck=1
gpgkey=file:///etc/pki/rpm-gpg/RPM-GPG-KEY-remi

[remi-php80-test-debuginfo]
name=Remi's PHP 8.0 test RPM repository for Enterprise Linux 7 - $basearch - debuginfo
baseurl=http://rpms.remirepo.net/enterprise/7/debug-test80/$basearch/
enabled=0
gpgcheck=1
gpgkey=file:///etc/pki/rpm-gpg/RPM-GPG-KEY-remi
::::::::::::::
/etc/yum.repos.d/remi-php81.repo
::::::::::::::
# This repository only provides PHP 8.1 and its extensions
# NOTICE: common dependencies are in "remi-safe"

[remi-php81]
name=Remi's PHP 8.1 RPM repository for Enterprise Linux 7 - $basearch
#baseurl=http://rpms.remirepo.net/enterprise/7/php81/$basearch/
#mirrorlist=https://rpms.remirepo.net/enterprise/7/php81/httpsmirror
mirrorlist=http://cdn.remirepo.net/enterprise/7/php81/mirror
enabled=0
gpgcheck=1
gpgkey=file:///etc/pki/rpm-gpg/RPM-GPG-KEY-remi

[remi-php81-debuginfo]
name=Remi's PHP 8.1 RPM repository for Enterprise Linux 7 - $basearch - debuginfo
baseurl=http://rpms.remirepo.net/enterprise/7/debug-php81/$basearch/
enabled=0
gpgcheck=1
gpgkey=file:///etc/pki/rpm-gpg/RPM-GPG-KEY-remi

[remi-php81-test]
name=Remi's PHP 8.1 test RPM repository for Enterprise Linux 7 - $basearch
#baseurl=http://rpms.remirepo.net/enterprise/7/test81/$basearch/
#mirrorlist=https://rpms.remirepo.net/enterprise/7/test81/httpsmirror
mirrorlist=http://cdn.remirepo.net/enterprise/7/test81/mirror
enabled=0
gpgcheck=1
gpgkey=file:///etc/pki/rpm-gpg/RPM-GPG-KEY-remi

[remi-php81-test-debuginfo]
name=Remi's PHP 8.1 test RPM repository for Enterprise Linux 7 - $basearch - debuginfo
baseurl=http://rpms.remirepo.net/enterprise/7/debug-test81/$basearch/
enabled=0
gpgcheck=1
gpgkey=file:///etc/pki/rpm-gpg/RPM-GPG-KEY-remi
::::::::::::::
/etc/yum.repos.d/remi-php82.repo
::::::::::::::
# This repository only provides PHP 8.2 and its extensions
# NOTICE: common dependencies are in "remi-safe"

[remi-php82]
name=Remi's PHP 8.2 RPM repository for Enterprise Linux 7 - $basearch
#baseurl=http://rpms.remirepo.net/enterprise/7/php82/$basearch/
#mirrorlist=https://rpms.remirepo.net/enterprise/7/php82/httpsmirror
mirrorlist=http://cdn.remirepo.net/enterprise/7/php82/mirror
enabled=0
gpgcheck=1
gpgkey=file:///etc/pki/rpm-gpg/RPM-GPG-KEY-remi

[remi-php82-debuginfo]
name=Remi's PHP 8.2 RPM repository for Enterprise Linux 7 - $basearch - debuginfo
baseurl=http://rpms.remirepo.net/enterprise/7/debug-php82/$basearch/
enabled=0
gpgcheck=1
gpgkey=file:///etc/pki/rpm-gpg/RPM-GPG-KEY-remi

[remi-php82-test]
name=Remi's PHP 8.2 test RPM repository for Enterprise Linux 7 - $basearch
#baseurl=http://rpms.remirepo.net/enterprise/7/test82/$basearch/
#mirrorlist=https://rpms.remirepo.net/enterprise/7/test82/httpsmirror
mirrorlist=http://cdn.remirepo.net/enterprise/7/test82/mirror
enabled=0
gpgcheck=1
gpgkey=file:///etc/pki/rpm-gpg/RPM-GPG-KEY-remi

[remi-php82-test-debuginfo]
name=Remi's PHP 8.2 test RPM repository for Enterprise Linux 7 - $basearch - debuginfo
baseurl=http://rpms.remirepo.net/enterprise/7/debug-test82/$basearch/
enabled=0
gpgcheck=1
gpgkey=file:///etc/pki/rpm-gpg/RPM-GPG-KEY-remi
::::::::::::::
/etc/yum.repos.d/remi.repo
::::::::::::::
# Repository: http://rpms.remirepo.net/
# Blog:       http://blog.remirepo.net/
# Forum:      http://forum.remirepo.net/

[remi]
name=Remi's RPM repository for Enterprise Linux 7 - $basearch
#baseurl=http://rpms.remirepo.net/enterprise/7/remi/$basearch/
#mirrorlist=https://rpms.remirepo.net/enterprise/7/remi/httpsmirror
mirrorlist=http://cdn.remirepo.net/enterprise/7/remi/mirror
enabled=0
gpgcheck=1
gpgkey=file:///etc/pki/rpm-gpg/RPM-GPG-KEY-remi

[remi-php55]
name=Remi's PHP 5.5 RPM repository for Enterprise Linux 7 - $basearch
#baseurl=http://rpms.remirepo.net/enterprise/7/php55/$basearch/
#mirrorlist=https://rpms.remirepo.net/enterprise/7/php55/httpsmirror
mirrorlist=http://cdn.remirepo.net/enterprise/7/php55/mirror
# NOTICE: common dependencies are in "remi-safe"
enabled=0
gpgcheck=1
gpgkey=file:///etc/pki/rpm-gpg/RPM-GPG-KEY-remi

[remi-php56]
name=Remi's PHP 5.6 RPM repository for Enterprise Linux 7 - $basearch
#baseurl=http://rpms.remirepo.net/enterprise/7/php56/$basearch/
#mirrorlist=https://rpms.remirepo.net/enterprise/7/php56/httpsmirror
mirrorlist=http://cdn.remirepo.net/enterprise/7/php56/mirror
# NOTICE: common dependencies are in "remi-safe"
enabled=0
gpgcheck=1
gpgkey=file:///etc/pki/rpm-gpg/RPM-GPG-KEY-remi

[remi-test]
name=Remi's test RPM repository for Enterprise Linux 7 - $basearch
#baseurl=http://rpms.remirepo.net/enterprise/7/test/$basearch/
#mirrorlist=https://rpms.remirepo.net/enterprise/7/test/mirror
mirrorlist=http://cdn.remirepo.net/enterprise/7/test/mirror
# WARNING: If you enable this repository, you must also enable "remi"
enabled=0
gpgcheck=1
gpgkey=file:///etc/pki/rpm-gpg/RPM-GPG-KEY-remi

[remi-debuginfo]
name=Remi's RPM repository for Enterprise Linux 7 - $basearch - debuginfo
baseurl=http://rpms.remirepo.net/enterprise/7/debug-remi/$basearch/
enabled=0
gpgcheck=1
gpgkey=file:///etc/pki/rpm-gpg/RPM-GPG-KEY-remi

[remi-php55-debuginfo]
name=Remi's PHP 5.5 RPM repository for Enterprise Linux 7 - $basearch - debuginfo
baseurl=http://rpms.remirepo.net/enterprise/7/debug-php55/$basearch/
enabled=0
gpgcheck=1
gpgkey=file:///etc/pki/rpm-gpg/RPM-GPG-KEY-remi

[remi-php56-debuginfo]
name=Remi's PHP 5.6 RPM repository for Enterprise Linux 7 - $basearch - debuginfo
baseurl=http://rpms.remirepo.net/enterprise/7/debug-php56/$basearch/
enabled=0
gpgcheck=1
gpgkey=file:///etc/pki/rpm-gpg/RPM-GPG-KEY-remi

[remi-test-debuginfo]
name=Remi's test RPM repository for Enterprise Linux 7 - $basearch - debuginfo
baseurl=http://rpms.remirepo.net/enterprise/7/debug-test/$basearch/
enabled=0
gpgcheck=1
gpgkey=file:///etc/pki/rpm-gpg/RPM-GPG-KEY-remi

::::::::::::::
/etc/yum.repos.d/remi-safe.repo
::::::::::::::
# This repository is safe to use with RHEL/CentOS base repository
# it only provides additional packages for the PHP stack
# all dependencies are in base repository or in EPEL

[remi-safe]
name=Safe Remi's RPM repository for Enterprise Linux 7 - $basearch
#baseurl=http://rpms.remirepo.net/enterprise/7/safe/$basearch/
#mirrorlist=https://rpms.remirepo.net/enterprise/7/safe/httpsmirror
mirrorlist=http://cdn.remirepo.net/enterprise/7/safe/mirror
enabled=1
gpgcheck=1
gpgkey=file:///etc/pki/rpm-gpg/RPM-GPG-KEY-remi

[remi-safe-debuginfo]
name=Remi's RPM repository for Enterprise Linux 7 - $basearch - debuginfo
baseurl=http://rpms.remirepo.net/enterprise/7/debug-remi/$basearch/
enabled=0
gpgcheck=1
gpgkey=file:///etc/pki/rpm-gpg/RPM-GPG-KEY-remi
[root@server3 ~]#
2.2.4 安装Python3
准备工作目录
[root@server3 lichao]# mkdir AIGC
[root@server3 lichao]# cd AIGC/

安装Python3

安装编译环境和依赖包
[root@server3 AIGC]# yum install wget gcc openssl-devel bzip2-devel libffi-devel
[root@server3 AIGC]# yum install openssl11 openssl11-devel openssl-devel
解压源码包
[root@server3 AIGC]# tar xvf Python-3.11.9.tar.xz
[root@server3 AIGC]# cd Python-3.11.9
[root@server3 Python-3.11.9]#
设置环境变量
[root@server3 Python-3.11.9]# export CFLAGS=$(pkg-config --cflags openssl11)
[root@server3 Python-3.11.9]# export LDFLAGS=$(pkg-config --libs openssl11)
进行编译安装
[root@server3 Python-3.11.9]# mkdir -p /home/lichao/opt/python3.11.9
[root@server3 Python-3.11.9]# ./configure --prefix=/home/lichao/opt/python3.11.9
[root@server3 Python-3.11.9]# make && make install
创建软链接,用于全局访问
[root@server3 Python-3.11.9]# cd /home/lichao/opt/python3.11.9/
[root@server3 python3.11.9]# ln -s /home/lichao/opt/python3.11.9/bin/python3 /usr/bin/python3
[root@server3 python3.11.9]# ln -s /home/lichao/opt/python3.11.9/bin/pip3 /usr/bin/pip3
[root@server3 python3.11.9]# ll /usr/bin/python3
lrwxrwxrwx 1 root root 41 5月  16 08:32 /usr/bin/python3 -> /home/lichao/opt/python3.11.9/bin/python3
[root@server3 python3.11.9]# ll /usr/bin/pip3
lrwxrwxrwx 1 root root 38 5月  16 08:32 /usr/bin/pip3 -> /home/lichao/opt/python3.11.9/bin/pip3
验证测试
[root@server3 python3.11.9]# python3
Python 3.11.9 (main, May 16 2024, 08:23:00) [GCC 4.8.5 20150623 (Red Hat 4.8.5-44)] on linux
Type "help", "copyright", "credits" or "license" for more information.
>>> exit()
[root@server3 python3.11.9]#
2.2.5 安装MLNX网卡驱动
下文以CentOS7为例,详细介绍了Mellanox网卡MLNX_OFED的驱动安装和固件升级方法。
本次下载的驱动版本为:MLNX_OFED_LINUX-4.7-3.2.9.0-rhel7.6-x86_64.tgz。

把下载好的Mellanox驱动解压缩
[root@server3 ~]# tar –zxvf MLNX_OFED_LINUX-4.7-3.2.9.0-rhel7.6-x86_64.tgz
[root@server3 ~]# cd MLNX_OFED_LINUX-4.7-3.2.9.0-rhel7.6-x86_64
查看当前系统的内核版本
[root@server3 MLNX_OFED_LINUX-4.7-3.2.9.0-rhel7.6-x86_64]# uname -r
3.10.0-957.el7.x86_64
查看当前驱动所支持的内核版本
[root@server3 MLNX_OFED_LINUX-4.7-3.2.9.0-rhel7.6-x86_64]# cat .supported_kernels
3.10.0-957.el7.x86_64
注:由以上可知下载的默认驱动支持当前的内核版本
如果当前内核与支持内核不匹配,手动编译适合内核的驱动,在编译之前首先安装gcc编译环境和kernel开发包
[root@server3 MLNX_OFED_LINUX-4.7-3.2.9.0-rhel7.6-x86_64]#yum  install gcc gcc-c++
libstdc++-devel kernel-default-devel
添加针对当前内核版本的驱动
[root@server3 MLNX_OFED_LINUX-4.7-3.2.9.0-rhel7.6-x86_64]#./mlnx_add_kernel_support.sh -m /root/MLNX_OFED_LINUX-4.7-3.2.9.0-rhel7.6-x86_64  -v
注:完成后生成的驱动文件在/tmp目录下
[root@server3 MLNX_OFED_LINUX-4.7-3.2.9.0-rhel7.6-x86_64]# ls -l /tmp/MLNX_OFED_LINUX-4.7-3.2.9.0-rhel7.6-x86_64-ext.tgz
-rw-r--r-- 1 root root 282193833 Dec 23 09:49 /tmp/MLNX_OFED_LINUX-4.7-3.2.9.0-rhel7.6-x86_64-ext.tgz
安装驱动
[root@server3 tmp]# tar xzvf MLNX_OFED_LINUX-4.7-3.2.9.0-rhel7.6-x86_64-ext.tgz
[root@server3 tmp]# cd MLNX_OFED_LINUX-4.7-3.2.9.0-rhel7.6-x86_64-ext
[root@server3 tmp]# ./mlnxofedinstall
最后启动openibd服务
[root@server3 ~]#/etc/init.d/openibd start
[root@server3 ~]#chkconfig openibd on
2.3 安装GPU驱动和集合通讯库
2.3.1 安装配置
2.3.1.1 安装GPU驱动和CUDA、CUDNN
安装开始前,请根据自己的GPU型号、操作系统版本去英伟达官网下载相对应的软件包。
[root@server3 AIGC]# ll
总用量 1733448
-rw-r--r-- 1 root root 1430373861 5月 16 08:55 cudnn-local-repo-rhel7-8.9.7.29-1.0-1.x86_64.rpm
drwxr-xr-x 7 root root 141 5月 17 13:45 nccl-tests
-rwxr-xr-x 1 root root 306736632 5月 16 08:43 NVIDIA-Linux-x86_64-550.67.run
drwxrwxr-x 10 1000 1000 4096 5月 17 13:21 openmpi-4.1.6
-rw-r--r-- 1 root root 17751702 9月 30 2023 openmpi-4.1.6.tar.gz
drwxr-xr-x 17 root root 4096 5月 16 08:23 Python-3.11.9
-rw-r--r-- 1 root root 20175816 4月 2 13:11 Python-3.11.9.tar.xz
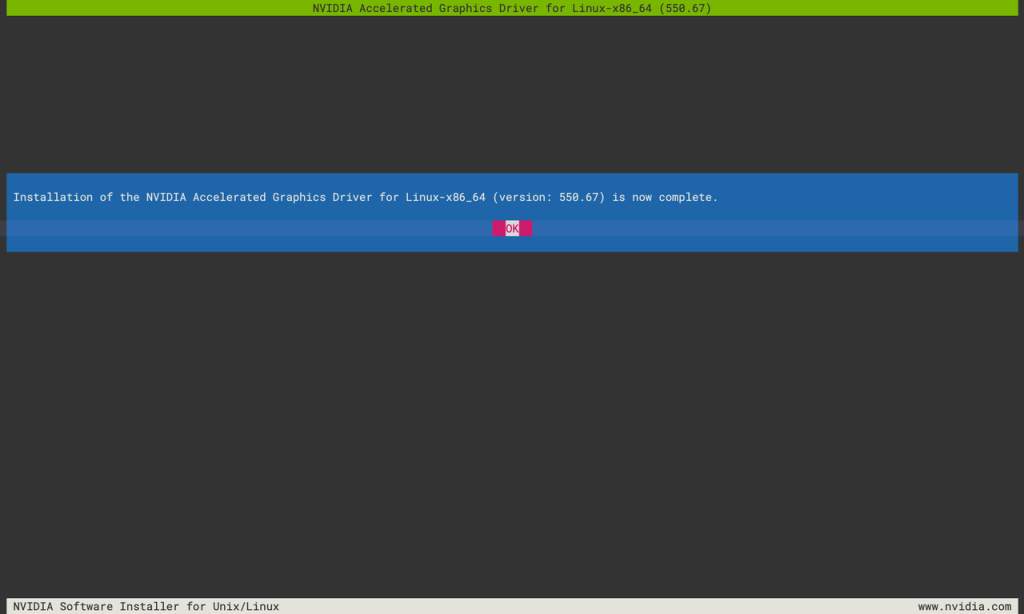
[root@server3 AIGC]# ./NVIDIA-Linux-x86_64-550.67.run
Verifying archive integrity... OK
Uncompressing NVIDIA Accelerated Graphics Driver for Linux-x86_64 550.67...................
[root@server3 AIGC]# yum-config-manager --add-repo https://developer.download.nvidia.com/compute/cuda/repos/rhel7/x86_64/cuda-rhel7.repo
已加载插件:fastestmirror, nvidia
adding repo from: https://developer.download.nvidia.com/compute/cuda/repos/rhel7/x86_64/cuda-rhel7.repo
grabbing file https://developer.download.nvidia.com/compute/cuda/repos/rhel7/x86_64/cuda-rhel7.repo to /etc/yum.repos.d/cuda-rhel7.repo
repo saved to /etc/yum.repos.d/cuda-rhel7.repo
[root@server3 AIGC]# yum install libnccl-2.21.5-1+cuda12.4 libnccl-devel-2.21.5-1+cuda12.4 libnccl-static-2.21.5-1+cuda12.4
[root@server3 AIGC]# yum install cudnn-local-repo-rhel7-8.9.7.29-1.0-1.x86_64.rpm
安装完成后,可以通过nvidia-smi查看驱动和CUDA版本。如果版本不匹配,则执行此命令行会报错。
[root@server3 AIGC]# nvidia-smi
Mon Jun  3 11:59:36 2024
+-----------------------------------------------------------------------------------------+
| NVIDIA-SMI 550.67                 Driver Version: 550.67         CUDA Version: 12.4     |
|-----------------------------------------+------------------------+----------------------+
| GPU  Name                 Persistence-M | Bus-Id          Disp.A | Volatile Uncorr. ECC |
| Fan  Temp   Perf          Pwr:Usage/Cap |           Memory-Usage | GPU-Util  Compute M. |
|                                         |                        |               MIG M. |
|=========================================+========================+======================|
|   0  NVIDIA GeForce RTX 4060 Ti     Off |   00000000:02:00.0 Off |                  N/A |
|  0%   34C    P0             27W /  165W |       1MiB /  16380MiB |      0%      Default |
|                                         |                        |                  N/A |
+-----------------------------------------+------------------------+----------------------+

+-----------------------------------------------------------------------------------------+
| Processes:                                                                              |
|  GPU   GI   CI        PID   Type   Process name                              GPU Memory |
|        ID   ID                                                               Usage      |
|=========================================================================================|
|  No running processes found                                                             |
+-----------------------------------------------------------------------------------------+
[root@server3 AIGC]#
2.3.1.2编译安装OpenMPI
[root@server3 AIGC]# tar xvf openmpi-4.1.6.tar.gz
[root@server3 openmpi-4.1.6]#
[root@server3 openmpi-4.1.6]# mkdir -p /home/lichao/lib/openmpi
[root@server3 openmpi-4.1.6]# ./configure --prefix=/home/lichao/lib/openmpi -with-cuda=/usr/local/cuda-12.4 -with-nccl=/usr/lib64

Open MPI configuration:
-----------------------
Version: 4.1.6
Build MPI C bindings: yes
Build MPI C++ bindings (deprecated): no
Build MPI Fortran bindings: mpif.h, use mpi
MPI Build Java bindings (experimental): no
Build Open SHMEM support: yes
Debug build: no
Platform file: (none)

Miscellaneous
-----------------------
CUDA support: yes
HWLOC support: internal
Libevent support: internal
Open UCC: no
PMIx support: Internal

Transports
-----------------------
Cisco usNIC: no
Cray uGNI (Gemini/Aries): no
Intel Omnipath (PSM2): no
Intel TrueScale (PSM): no
Mellanox MXM: no
Open UCX: yes
OpenFabrics OFI Libfabric: no
OpenFabrics Verbs: yes
Portals4: no
Shared memory/copy in+copy out: yes
Shared memory/Linux CMA: yes
Shared memory/Linux KNEM: no
Shared memory/XPMEM: no
TCP: yes

Resource Managers
-----------------------
Cray Alps: no
Grid Engine: no
LSF: no
Moab: no
Slurm: yes
ssh/rsh: yes
Torque: no

OMPIO File Systems
-----------------------
DDN Infinite Memory Engine: no
Generic Unix FS: yes
IBM Spectrum Scale/GPFS: no
Lustre: no
PVFS2/OrangeFS: no

[root@server3 openmpi-4.1.6]#
2.3.1.3 编译安装NCCL-Test
[root@server3 lichao]# cd AIGC/
[root@server3 AIGC]# git clone https://github.com/NVIDIA/nccl-tests.git
[root@server3 AIGC]# cd nccl-tests/
[root@server3 nccl-tests]# make clean
[root@server3 nccl-tests]# make MPI=1 MPI_HOME=/home/lichao/opt/openmpi/ CUDA_HOME=/usr/local/cuda-12.4/ NCCL_HOME=/usr/lib64/
2.3.2 集合通信性能测试方法(all_reduce)
[root@server1 lichao]# cat run_nccl-test.sh
/home/lichao/opt/openmpi/bin/mpirun --allow-run-as-root \
-np 3 \
-host "server1,server2,server3" \
-mca btl ^openib \
-x NCCL_DEBUG=INFO \
-x NCCL_ALGO=ring \
-x NCCL_IB_DISABLE=0 \
-x NCCL_IB_GID_INDEX=3 \
-x NCCL_SOCKET_IFNAME=ens11f1 \
-x NCCL_IB_HCA=mlx5_1:1 \
/home/lichao/AIGC/nccl-tests/build/all_reduce_perf -b 128 -e 8G -f 2 -g 1
[root@server1 lichao]# ./run_nccl-test.sh
# nThread 1 nGpus 1 minBytes 128 maxBytes 8589934592 step: 2(factor) warmup iters: 5 iters: 20 agg iters: 1 validation: 1 graph: 0
#
# Using devices
#  Rank  0 Group  0 Pid  18697 on    server1 device  0 [0x02] NVIDIA GeForce RTX 4060 Ti
#  Rank  1 Group  0 Pid  20893 on    server2 device  0 [0x02] NVIDIA GeForce RTX 4060 Ti
#  Rank  2 Group  0 Pid   2458 on    server3 device  0 [0x02] NVIDIA GeForce RTX 4060 Ti
#
# Reducing maxBytes to 5261099008 due to memory limitation
server1:18697:18697 [0] NCCL INFO NCCL_SOCKET_IFNAME set by environment to ens11f1
server1:18697:18697 [0] NCCL INFO Bootstrap : Using ens11f1:172.16.0.11<0>
server1:18697:18697 [0] NCCL INFO NET/Plugin: No plugin found (libnccl-net.so)
server1:18697:18697 [0] NCCL INFO NET/Plugin: Plugin load returned 2 : libnccl-net.so: cannot open shared object file: No such file or directory : when loading libnccl-net.so
server1:18697:18697 [0] NCCL INFO NET/Plugin: Using internal network plugin.
server2:20893:20893 [0] NCCL INFO cudaDriverVersion 12040
server2:20893:20893 [0] NCCL INFO NCCL_SOCKET_IFNAME set by environment to ens11f1
server2:20893:20893 [0] NCCL INFO Bootstrap : Using ens11f1:172.16.0.12<0>
server2:20893:20893 [0] NCCL INFO NET/Plugin: No plugin found (libnccl-net.so)
server2:20893:20893 [0] NCCL INFO NET/Plugin: Plugin load returned 2 : libnccl-net.so: cannot open shared object file: No such file or directory : when loading libnccl-net.so
server2:20893:20893 [0] NCCL INFO NET/Plugin: Using internal network plugin.
server1:18697:18697 [0] NCCL INFO cudaDriverVersion 12040
NCCL version 2.21.5+cuda12.4
server3:2458:2458 [0] NCCL INFO cudaDriverVersion 12040
server3:2458:2458 [0] NCCL INFO NCCL_SOCKET_IFNAME set by environment to ens11f1
server3:2458:2458 [0] NCCL INFO Bootstrap : Using ens11f1:172.16.0.13<0>
server3:2458:2458 [0] NCCL INFO NET/Plugin: No plugin found (libnccl-net.so)
server3:2458:2458 [0] NCCL INFO NET/Plugin: Plugin load returned 2 : libnccl-net.so: cannot open shared object file: No such file or directory : when loading libnccl-net.so
server3:2458:2458 [0] NCCL INFO NET/Plugin: Using internal network plugin.
server2:20893:20907 [0] NCCL INFO NCCL_IB_DISABLE set by environment to 0.
server2:20893:20907 [0] NCCL INFO NCCL_SOCKET_IFNAME set by environment to ens11f1
server2:20893:20907 [0] NCCL INFO NCCL_IB_HCA set to mlx5_1:1
server2:20893:20907 [0] NCCL INFO NET/IB : Using [0]mlx5_1:1/RoCE [RO]; OOB ens11f1:172.16.0.12<0>
server2:20893:20907 [0] NCCL INFO Using non-device net plugin version 0
server2:20893:20907 [0] NCCL INFO Using network IB
server3:2458:2473 [0] NCCL INFO NCCL_IB_DISABLE set by environment to 0.
server3:2458:2473 [0] NCCL INFO NCCL_SOCKET_IFNAME set by environment to ens11f1
server3:2458:2473 [0] NCCL INFO NCCL_IB_HCA set to mlx5_1:1
server1:18697:18712 [0] NCCL INFO NCCL_IB_DISABLE set by environment to 0.
server1:18697:18712 [0] NCCL INFO NCCL_SOCKET_IFNAME set by environment to ens11f1
server3:2458:2473 [0] NCCL INFO NET/IB : Using [0]mlx5_1:1/RoCE [RO]; OOB ens11f1:172.16.0.13<0>
server1:18697:18712 [0] NCCL INFO NCCL_IB_HCA set to mlx5_1:1
server3:2458:2473 [0] NCCL INFO Using non-device net plugin version 0
server3:2458:2473 [0] NCCL INFO Using network IB
server1:18697:18712 [0] NCCL INFO NET/IB : Using [0]mlx5_1:1/RoCE [RO]; OOB ens11f1:172.16.0.11<0>
server1:18697:18712 [0] NCCL INFO Using non-device net plugin version 0
server1:18697:18712 [0] NCCL INFO Using network IB
server1:18697:18712 [0] NCCL INFO ncclCommInitRank comm 0x23622c0 rank 0 nranks 3 cudaDev 0 nvmlDev 0 busId 2000 commId 0x35491327c8228dd0 - Init START
server3:2458:2473 [0] NCCL INFO ncclCommInitRank comm 0x346ffc0 rank 2 nranks 3 cudaDev 0 nvmlDev 0 busId 2000 commId 0x35491327c8228dd0 - Init START
server2:20893:20907 [0] NCCL INFO ncclCommInitRank comm 0x2a1af20 rank 1 nranks 3 cudaDev 0 nvmlDev 0 busId 2000 commId 0x35491327c8228dd0 - Init START
server3:2458:2473 [0] NCCL INFO Setting affinity for GPU 0 to 0f,ff000fff
server2:20893:20907 [0] NCCL INFO Setting affinity for GPU 0 to 0f,ff000fff
server1:18697:18712 [0] NCCL INFO Setting affinity for GPU 0 to 0f,ff000fff
server1:18697:18712 [0] NCCL INFO comm 0x23622c0 rank 0 nRanks 3 nNodes 3 localRanks 1 localRank 0 MNNVL 0
server1:18697:18712 [0] NCCL INFO Channel 00/02 :    0   1   2
server1:18697:18712 [0] NCCL INFO Channel 01/02 :    0   1   2
server1:18697:18712 [0] NCCL INFO Trees [0] 2/-1/-1->0->-1 [1] 2/-1/-1->0->1
server1:18697:18712 [0] NCCL INFO P2P Chunksize set to 131072
server3:2458:2473 [0] NCCL INFO comm 0x346ffc0 rank 2 nRanks 3 nNodes 3 localRanks 1 localRank 0 MNNVL 0
server2:20893:20907 [0] NCCL INFO comm 0x2a1af20 rank 1 nRanks 3 nNodes 3 localRanks 1 localRank 0 MNNVL 0
server3:2458:2473 [0] NCCL INFO Trees [0] 1/-1/-1->2->0 [1] -1/-1/-1->2->0
server3:2458:2473 [0] NCCL INFO P2P Chunksize set to 131072
server2:20893:20907 [0] NCCL INFO Trees [0] -1/-1/-1->1->2 [1] 0/-1/-1->1->-1
server2:20893:20907 [0] NCCL INFO P2P Chunksize set to 131072
server3:2458:2473 [0] NCCL INFO Channel 00/0 : 1[0] -> 2[0] [receive] via NET/IB/0
server3:2458:2473 [0] NCCL INFO Channel 01/0 : 1[0] -> 2[0] [receive] via NET/IB/0
server3:2458:2473 [0] NCCL INFO Channel 00/0 : 2[0] -> 0[0] [send] via NET/IB/0
server3:2458:2473 [0] NCCL INFO Channel 01/0 : 2[0] -> 0[0] [send] via NET/IB/0
server2:20893:20907 [0] NCCL INFO Channel 00/0 : 0[0] -> 1[0] [receive] via NET/IB/0
server2:20893:20907 [0] NCCL INFO Channel 01/0 : 0[0] -> 1[0] [receive] via NET/IB/0
server2:20893:20907 [0] NCCL INFO Channel 00/0 : 1[0] -> 2[0] [send] via NET/IB/0
server2:20893:20907 [0] NCCL INFO Channel 01/0 : 1[0] -> 2[0] [send] via NET/IB/0
server1:18697:18712 [0] NCCL INFO Channel 00/0 : 2[0] -> 0[0] [receive] via NET/IB/0
server1:18697:18712 [0] NCCL INFO Channel 01/0 : 2[0] -> 0[0] [receive] via NET/IB/0
server1:18697:18712 [0] NCCL INFO Channel 00/0 : 0[0] -> 1[0] [send] via NET/IB/0
server1:18697:18712 [0] NCCL INFO Channel 01/0 : 0[0] -> 1[0] [send] via NET/IB/0
server3:2458:2475 [0] NCCL INFO NCCL_IB_GID_INDEX set by environment to 3.
server1:18697:18714 [0] NCCL INFO NCCL_IB_GID_INDEX set by environment to 3.
server2:20893:20909 [0] NCCL INFO NCCL_IB_GID_INDEX set by environment to 3.
server1:18697:18712 [0] NCCL INFO Connected all rings
server1:18697:18712 [0] NCCL INFO Channel 01/0 : 1[0] -> 0[0] [receive] via NET/IB/0
server3:2458:2473 [0] NCCL INFO Connected all rings
server2:20893:20907 [0] NCCL INFO Connected all rings
server1:18697:18712 [0] NCCL INFO Channel 00/0 : 0[0] -> 2[0] [send] via NET/IB/0
server2:20893:20907 [0] NCCL INFO Channel 00/0 : 2[0] -> 1[0] [receive] via NET/IB/0
server1:18697:18712 [0] NCCL INFO Channel 01/0 : 0[0] -> 2[0] [send] via NET/IB/0
server3:2458:2473 [0] NCCL INFO Channel 00/0 : 0[0] -> 2[0] [receive] via NET/IB/0
server2:20893:20907 [0] NCCL INFO Channel 01/0 : 1[0] -> 0[0] [send] via NET/IB/0
server3:2458:2473 [0] NCCL INFO Channel 01/0 : 0[0] -> 2[0] [receive] via NET/IB/0
server3:2458:2473 [0] NCCL INFO Channel 00/0 : 2[0] -> 1[0] [send] via NET/IB/0
server3:2458:2473 [0] NCCL INFO Connected all trees
server1:18697:18712 [0] NCCL INFO Connected all trees
server1:18697:18712 [0] NCCL INFO NCCL_ALGO set by environment to ring
server3:2458:2473 [0] NCCL INFO NCCL_ALGO set by environment to ring
server3:2458:2473 [0] NCCL INFO threadThresholds 8/8/64 | 24/8/64 | 512 | 512
server3:2458:2473 [0] NCCL INFO 2 coll channels, 2 collnet channels, 0 nvls channels, 2 p2p channels, 2 p2p channels per peer
server2:20893:20907 [0] NCCL INFO Connected all trees
server2:20893:20907 [0] NCCL INFO NCCL_ALGO set by environment to ring
server2:20893:20907 [0] NCCL INFO threadThresholds 8/8/64 | 24/8/64 | 512 | 512
server2:20893:20907 [0] NCCL INFO 2 coll channels, 2 collnet channels, 0 nvls channels, 2 p2p channels, 2 p2p channels per peer
server1:18697:18712 [0] NCCL INFO threadThresholds 8/8/64 | 24/8/64 | 512 | 512
server1:18697:18712 [0] NCCL INFO 2 coll channels, 2 collnet channels, 0 nvls channels, 2 p2p channels, 2 p2p channels per peer
server2:20893:20907 [0] NCCL INFO TUNER/Plugin: Plugin load returned 11 : libnccl-net.so: cannot open shared object file: No such file or directory : when loading libnccl-tuner.so
server2:20893:20907 [0] NCCL INFO TUNER/Plugin: Using internal tuner plugin.
server2:20893:20907 [0] NCCL INFO ncclCommInitRank comm 0x2a1af20 rank 1 nranks 3 cudaDev 0 nvmlDev 0 busId 2000 commId 0x35491327c8228dd0 - Init COMPLETE
server3:2458:2473 [0] NCCL INFO TUNER/Plugin: Plugin load returned 11 : libnccl-net.so: cannot open shared object file: No such file or directory : when loading libnccl-tuner.so
server3:2458:2473 [0] NCCL INFO TUNER/Plugin: Using internal tuner plugin.
server3:2458:2473 [0] NCCL INFO ncclCommInitRank comm 0x346ffc0 rank 2 nranks 3 cudaDev 0 nvmlDev 0 busId 2000 commId 0x35491327c8228dd0 - Init COMPLETE
server1:18697:18712 [0] NCCL INFO TUNER/Plugin: Plugin load returned 11 : libnccl-net.so: cannot open shared object file: No such file or directory : when loading libnccl-tuner.so
server1:18697:18712 [0] NCCL INFO TUNER/Plugin: Using internal tuner plugin.
server1:18697:18712 [0] NCCL INFO ncclCommInitRank comm 0x23622c0 rank 0 nranks 3 cudaDev 0 nvmlDev 0 busId 2000 commId 0x35491327c8228dd0 - Init COMPLETE
#
#                                                              out-of-place                       in-place
#       size         count      type   redop    root     time   algbw   busbw #wrong     time   algbw   busbw #wrong
#        (B)    (elements)                               (us)  (GB/s)  (GB/s)            (us)  (GB/s)  (GB/s)
         128            32     float     sum      -1    28.39    0.00    0.01      0    27.35    0.00    0.01      0
         256            64     float     sum      -1    29.44    0.01    0.01      0    28.54    0.01    0.01      0
         512           128     float     sum      -1    29.99    0.02    0.02      0    29.66    0.02    0.02      0
        1024           256     float     sum      -1    32.89    0.03    0.04      0    30.64    0.03    0.04      0
        2048           512     float     sum      -1    34.81    0.06    0.08      0    31.87    0.06    0.09      0
        4096          1024     float     sum      -1    37.32    0.11    0.15      0    36.09    0.11    0.15      0
        8192          2048     float     sum      -1    45.11    0.18    0.24      0    43.12    0.19    0.25      0
       16384          4096     float     sum      -1    57.92    0.28    0.38      0    56.98    0.29    0.38      0
       32768          8192     float     sum      -1    72.68    0.45    0.60      0    70.79    0.46    0.62      0
       65536         16384     float     sum      -1    95.77    0.68    0.91      0    93.73    0.70    0.93      0
      131072         32768     float     sum      -1    162.7    0.81    1.07      0    161.5    0.81    1.08      0
      262144         65536     float     sum      -1    177.3    1.48    1.97      0    177.4    1.48    1.97      0
      524288        131072     float     sum      -1    301.4    1.74    2.32      0    302.0    1.74    2.31      0
     1048576        262144     float     sum      -1    557.9    1.88    2.51      0    559.2    1.88    2.50      0
     2097152        524288     float     sum      -1   1089.8    1.92    2.57      0   1092.2    1.92    2.56      0
     4194304       1048576     float     sum      -1   2165.7    1.94    2.58      0   2166.6    1.94    2.58      0
     8388608       2097152     float     sum      -1   4315.7    1.94    2.59      0   4316.1    1.94    2.59      0
    16777216       4194304     float     sum      -1   8528.8    1.97    2.62      0   8529.3    1.97    2.62      0
    33554432       8388608     float     sum      -1    16622    2.02    2.69      0    16610    2.02    2.69      0
    67108864      16777216     float     sum      -1    32602    2.06    2.74      0    32542    2.06    2.75      0
   134217728      33554432     float     sum      -1    63946    2.10    2.80      0    63831    2.10    2.80      0
   268435456      67108864     float     sum      -1   126529    2.12    2.83      0   126412    2.12    2.83      0
   536870912     134217728     float     sum      -1   251599    2.13    2.85      0   251327    2.14    2.85      0
  1073741824     268435456     float     sum      -1   500664    2.14    2.86      0   501911    2.14    2.85      0
  2147483648     536870912     float     sum      -1  1001415    2.14    2.86      0  1000178    2.15    2.86      0
  4294967296    1073741824     float     sum      -1  1999361    2.15    2.86      0  1997380    2.15    2.87      0
server1:18697:18697 [0] NCCL INFO comm 0x23622c0 rank 0 nranks 3 cudaDev 0 busId 2000 - Destroy COMPLETE
server2:20893:20893 [0] NCCL INFO comm 0x2a1af20 rank 1 nranks 3 cudaDev 0 busId 2000 - Destroy COMPLETE
server3:2458:2458 [0] NCCL INFO comm 0x346ffc0 rank 2 nranks 3 cudaDev 0 busId 2000 - Destroy COMPLETE
# Out of bounds values : 0 OK
# Avg bus bandwidth    : 1.66163
#
结果详解:
– size (B):操作处理的数据的大小,以字节为单位;
– count (elements):操作处理的元素的数量;
– type:元素的数据类型;
– redop:使用的归约操作;
– root:对于某些操作(如 reduce 和 broadcast),这列指定了根节点的编号,值是 -1 表示这个操作没有根节点(all-reduce 操作涉及到所有的节点);
– time (us):操作的执行时间,以微秒为单位;
– algbw (GB/s):算法带宽,以每秒吉字节(GB/s)为单位;
– busbw (GB/s):总线带宽,以每秒吉字节(GB/s)为单位;
– wrong:错误的数量,如果这个值不是 0,那可能表示有一些错误发生。
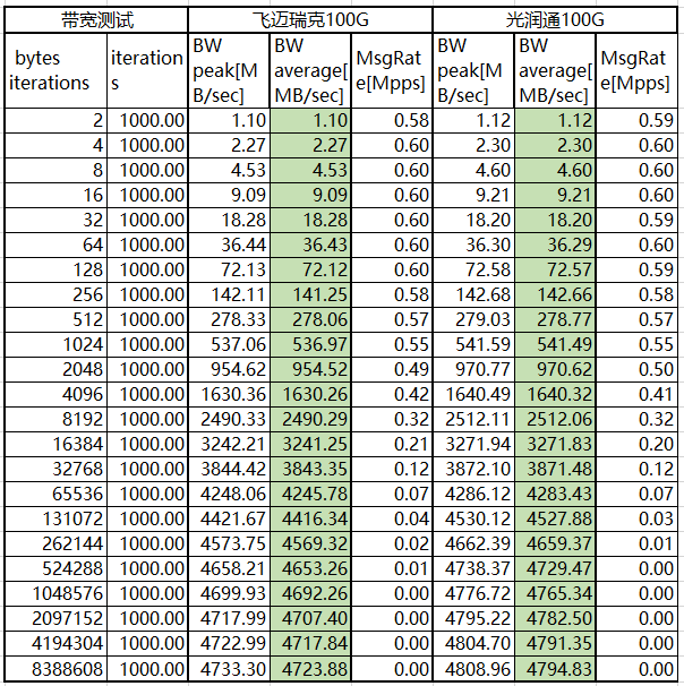
在这个例子中,你可以看到,当处理的数据量增大时,算法带宽和总线带宽都有所提高,这可能表示 NCCL 能够有效地利用大量的数据。
查看结果时,需要关注如下几点:
1. 数据量增加时,带宽是否会下降(下降明显不符合预期);
2. 更关注带宽的峰值,每次算到的带宽峰值,可以只关注 in 或者 out;
3. 平均值,在数据量递增的情况下,可能无法体现最终的结果;
4. 请确保数据量足够大,可以压到带宽上限(通过调整 b、e 或者 n 选项)。
2.3.3 常用参数及解释
– GPU 数量
– -t,–nthreads <num threads> 每个进程的线程数量配置, 默认 1;
– -g,–ngpus <GPUs per thread> 每个线程的 GPU 数量,默认 1;
– 数据大小配置
– -b,–minbytes <min size in bytes> 开始的最小数据量,默认 32M;
– -e,–maxbytes <max size in bytes> 结束的最大数据量,默认 32M;
– 数据步长设置
– -i,–stepbytes <increment size> 每次增加的数据量,默认: 1M;
– -f,–stepfactor <increment factor> 每次增加的倍数,默认禁用;
– NCCL 操作相关配置
– -o,–op <sum/prod/min/max/avg/all>指定那种操作为reduce,仅适用于Allreduce、Reduce或ReduceScatter等缩减操作。默认值为:求和(Sum);
– -d,–datatype <nccltype/all>指定使用哪种数据类型,默认 : Float;
– 性能相关配置
– -n,–iters <iteration count> 每次操作(一次发送)循环多少次,默认 : 20;
– -w,–warmup_iters <warmup iteration count> 预热迭代次数(不计时),默认:5;
– -m,–agg_iters <aggregation count> 每次迭代中要聚合在一起的操作数,默认:1;
– -a,–average <0/1/2/3> 在所有 ranks 计算均值作为最终结果 (MPI=1 only). <0=Rank0,1=Avg,2=Min,3=Max>,默认:1;
– 测试相关配置
– -p,–parallel_init <0/1> 使用线程并行初始化 NCCL,默认: 0;
– -c,–check <0/1> 检查结果的正确性。在大量GPU上可能会非常慢,默认:1;
– -z,–blocking <0/1> 使NCCL集合阻塞,即在每个集合之后让CPU等待和同步,默认:0;
– -G,–cudagraph <num graph launches> 将迭代作为CUDA图形捕获,然后重复指定的次数,默认:0;
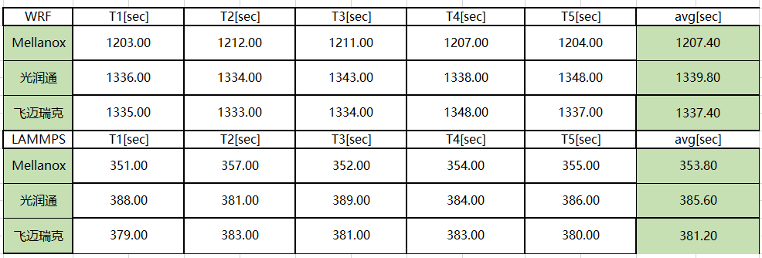
3 实验测试
完成硬件、软件的选型和配置后,下一步将进行实践测试。
3.1.1 获取LLaMA-Factory源码包
因为网络问题很难直接通过git clone命令行拉取,建议通过打包下载后自己上传的方式进行:
noone@MacBook-Air Downloads % scp LLaMA-Factory-0.8.3.zip root@10.230.1.13:/tmp

[root@server3 AIGC]# pwd
/home/lichao/AIGC
[root@server3 AIGC]# cp /tmp/LLaMA-Factory-0.8.3.zip ./
[root@server3 AIGC]# unzip LLaMA-Factory-0.8.3.zip
[root@server3 AIGC]# cd LLaMA-Factory-0.8.3
[root@server3 LLaMA-Factory-0.8.3]# ll
总用量 128
drwxr-xr-x  2 root root    83 9月  13 05:04 assets
drwxr-xr-x  2 root root   122 9月   6 08:26 cache
-rw-r--r--  1 root root  1378 7月  18 19:36 CITATION.cff
drwxr-xr-x  6 root root  4096 9月  13 05:03 data
drwxr-xr-x  4 root root    43 7月  18 19:36 docker
drwxr-xr-x  5 root root    44 7月  18 19:36 evaluation
drwxr-xr-x 10 root root   182 7月  18 19:36 examples
-rw-r--r--  1 root root 11324 7月  18 19:36 LICENSE
-rw-r--r--  1 root root   242 7月  18 19:36 Makefile
-rw-r--r--  1 root root    33 7月  18 19:36 MANIFEST.in
-rw-r--r--  1 root root   645 7月  18 19:36 pyproject.toml
-rw-r--r--  1 root root 44424 7月  18 19:36 README.md
-rw-r--r--  1 root root 44093 7月  18 19:36 README_zh.md
-rw-r--r--  1 root root   245 7月  18 19:36 requirements.txt
drwxr-xr-x  3 root root    16 9月   6 18:48 saves
drwxr-xr-x  2 root root   219 7月  18 19:36 scripts
-rw-r--r--  1 root root  3361 7月  18 19:36 setup.py
drwxr-xr-x  4 root root   101 9月   6 08:22 src
drwxr-xr-x  5 root root    43 7月  18 19:36 tests
[root@server3 LLaMA-Factory-0.8.3]#
3.1.2 安装LLaMA-Factory,并进行验证
[root@server3 LLaMA-Factory-0.8.3]# pip install -e ".[torch,metrics]"
[root@server3 LLaMA-Factory-0.8.3]# llamafactory-cli version
[2024-09-23 08:51:28,722] [INFO] [real_accelerator.py:203:get_accelerator] Setting ds_accelerator to cuda (auto detect)
----------------------------------------------------------
| Welcome to LLaMA Factory, version 0.8.3                |
|                                                        |
| Project page: https://github.com/hiyouga/LLaMA-Factory |
----------------------------------------------------------
[root@server3 LLaMA-Factory-0.8.3]#
3.1.3 下载训练时所需的预训练模型和数据集
根据当前GPU服务器所配置的GPU硬件规格,选择适合的训练方法、模型和数据集。
GPU型号:NVIDIA GeForce RTX 4060 Ti 16GB
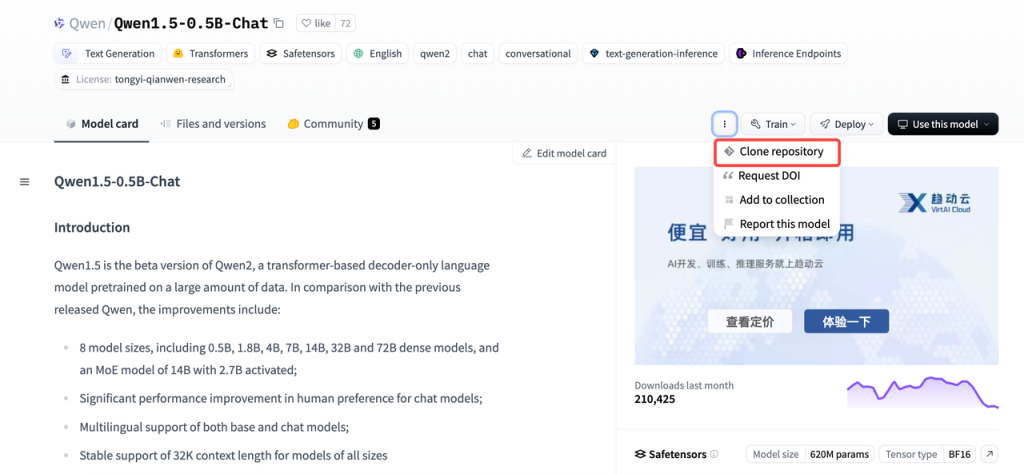
预训练模型:Qwen/Qwen1.5-0.5B-Chat
数据集:identity、alpaca_zh_demo
# Make sure you have git-lfs installed (https://git-lfs.com)
git lfs install
git clone https://hf-mirror.com/Qwen/Qwen1.5-0.5B-Chat
# If you want to clone without large files - just their pointers
GIT_LFS_SKIP_SMUDGE=1 git clone https://hf-mirror.com/Qwen/Qwen1.5-0.5B-Chat
因为网络问题通过命令行很难直接下载,这里使用huggingface的国内镜像站拉取预训练模型数据,并使用“GIT_LFS_SKIP_SMUDGE=1”变量跳过大文件,随后手工下载后再上传。
如果觉得麻烦,也可以安装使用huggingface的命令行工具,下载预训练模型和数据集。同样地,安装完成后,需要配置一些环境变量(使用镜像站hf-mirror.com)来解决网络问题。
下载预训练模型:
[root@server3 AIGC]# mkdir models
[root@server3 AIGC]# cd models/
[root@server3 models]# GIT_LFS_SKIP_SMUDGE=1 git clone https://hf-mirror.com/Qwen/Qwen1.5-0.5B-Chat
[root@server3 models]# tree -h Qwen1.5-0.5B-Chat/
Qwen1.5-0.5B-Chat/
├── [ 656]  config.json
├── [ 661]  config.json.raw
├── [ 206]  generation_config.json
├── [7.1K]  LICENSE
├── [1.6M]  merges.txt
├── [1.2G]  model.safetensors
├── [4.2K]  README.md
├── [1.3K]  tokenizer_config.json
├── [6.7M]  tokenizer.json
└── [2.6M]  vocab.json

0 directories, 10 files
[root@server3 models]#

下载数据集:默认情况下,LLaMA-Factory项目文件下的data目录,自带了一些本地数据集可直接使用。
[root@server3 LLaMA-Factory-0.8.3]# tree -h data/
data/
├── [841K]  alpaca_en_demo.json
├── [621K]  alpaca_zh_demo.json
├── [  32]  belle_multiturn
│   └── [2.7K]  belle_multiturn.py
├── [733K]  c4_demo.json
├── [ 13K]  dataset_info.json
├── [1.5M]  dpo_en_demo.json
├── [833K]  dpo_zh_demo.json
├── [722K]  glaive_toolcall_en_demo.json
├── [665K]  glaive_toolcall_zh_demo.json
├── [  27]  hh_rlhf_en
│   └── [3.3K]  hh_rlhf_en.py
├── [ 20K]  identity.json
├── [892K]  kto_en_demo.json
├── [  45]  mllm_demo_data
│   ├── [ 12K]  1.jpg
│   ├── [ 22K]  2.jpg
│   └── [ 16K]  3.jpg
├── [3.1K]  mllm_demo.json
├── [9.8K]  README.md
├── [9.2K]  README_zh.md
├── [  27]  ultra_chat
│   └── [2.3K]  ultra_chat.py
└── [1004K]  wiki_demo.txt

4 directories, 20 files
[root@server3 LLaMA-Factory-0.8.3]#
3.1.4 使用准备好的模型与数据集,在单机上进行训练测试
LLaMA-Factory支持通过WebUI微调大语言模型。在完成安装后,我们可以使用WebUI进行快速调测验证,没问题后可使用命令行工具进行多机分布式训练。
[root@server3 LLaMA-Factory-0.8.3]# llamafactory-cli webui
[2024-09-23 17:54:45,786] [INFO] [real_accelerator.py:203:get_accelerator] Setting ds_accelerator to cuda (auto detect)
Running on local URL:  http://0.0.0.0:7861

To create a public link, set `share=True` in `launch()`.
3.1.5 使用命令行运行多机分布式训练任务
1. 准备目录
[root@server3 LLaMA-Factory-0.8.3]# mkdir asterun
[root@server3 LLaMA-Factory-0.8.3]# mkdir -p asterun/saves/qwen/full/sft
2. 根据集群环境和训练任务,准备分布式训练的配置文件
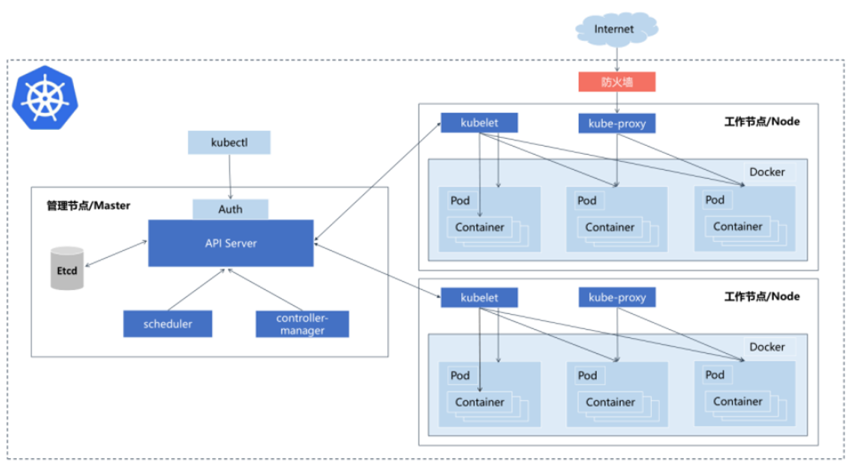
[root@server3 LLaMA-Factory-0.8.3]# cat asterun/qwen_full_sft_ds2.yaml
### model
model_name_or_path: /home/lichao/AIGC/models/Qwen1.5-0.5B-Chat
### method
stage: sft
do_train: true
finetuning_type: full
deepspeed: examples/deepspeed/ds_z2_config.json
### dataset
dataset: identity,alpaca_zh_demo
template: llama3
cutoff_len: 1024
max_samples: 1000
overwrite_cache: true
preprocessing_num_workers: 16
### output
output_dir: asterun/saves/qwen/full/sft
logging_steps: 10
save_steps: 500
plot_loss: true
overwrite_output_dir: true
report_to: tensorboard
logging_dir: asterun/saves/qwen/full/sft/runs
### train
per_device_train_batch_size: 1
gradient_accumulation_steps: 2
learning_rate: 1.0e-4
num_train_epochs: 3.0
lr_scheduler_type: cosine
warmup_ratio: 0.1
bf16: true
ddp_timeout: 180000000
### eval
val_size: 0.1
per_device_eval_batch_size: 1
eval_strategy: steps
eval_steps: 500
[root@server3 LLaMA-Factory-0.8.3]#
3. 用同样的方式,在Server1和Server2上准备运行环境
步骤略。
4. 依次在集群中的3个GPU节点上启动分布式训练任务
主节点rank0:
[root@server3 LLaMA-Factory-0.8.3]# FORCE_TORCHRUN=1 NNODES=3 RANK=0 MASTER_ADDR=172.16.0.13 MASTER_PORT=29500 llamafactory-cli train asterun/qwen_full_sft_ds2.yaml
从节点rank1:
[root@server2 LLaMA-Factory-0.8.3]# FORCE_TORCHRUN=1 NNODES=3 RANK=1 MASTER_ADDR=172.16.0.13 MASTER_PORT=29500 llamafactory-cli train asterun/qwen_full_sft_ds2.yaml
从节点rank2:
[root@server1 LLaMA-Factory-0.8.3]# FORCE_TORCHRUN=1 NNODES=3 RANK=2 MASTER_ADDR=172.16.0.13 MASTER_PORT=29500 llamafactory-cli train asterun/qwen_full_sft_ds2.yaml附件-分布式训练全流程的终端打印日志:
[root@server3 LLaMA-Factory-0.8.3]# FORCE_TORCHRUN=1 NNODES=3 RANK=0 MASTER_ADDR=172.16.0.13 MASTER_PORT=29500 llamafactory-cli train asterun/qwen_full_sft_ds2.yaml
[2024-09-23 10:01:33,036] [INFO] [real_accelerator.py:203:get_accelerator] Setting ds_accelerator to cuda (auto detect)
09/23/2024 10:01:37 - INFO - llamafactory.cli - Initializing distributed tasks at: 172.16.0.13:29500
[2024-09-23 10:01:52,891] [INFO] [real_accelerator.py:203:get_accelerator] Setting ds_accelerator to cuda (auto detect)
[2024-09-23 10:01:56,575] [INFO] [comm.py:652:init_distributed] cdb=None
[2024-09-23 10:01:56,575] [INFO] [comm.py:683:init_distributed] Initializing TorchBackend in DeepSpeed with backend nccl
09/23/2024 10:01:56 - INFO - llamafactory.hparams.parser - Process rank: 0, device: cuda:0, n_gpu: 1, distributed training: True, compute dtype: torch.bfloat16
[INFO|tokenization_utils_base.py:2267] 2024-09-23 10:01:56,613 >> loading file vocab.json
[INFO|tokenization_utils_base.py:2267] 2024-09-23 10:01:56,613 >> loading file merges.txt
[INFO|tokenization_utils_base.py:2267] 2024-09-23 10:01:56,613 >> loading file tokenizer.json
[INFO|tokenization_utils_base.py:2267] 2024-09-23 10:01:56,614 >> loading file added_tokens.json
[INFO|tokenization_utils_base.py:2267] 2024-09-23 10:01:56,614 >> loading file special_tokens_map.json
[INFO|tokenization_utils_base.py:2267] 2024-09-23 10:01:56,614 >> loading file tokenizer_config.json
[INFO|tokenization_utils_base.py:2513] 2024-09-23 10:01:56,941 >> Special tokens have been added in the vocabulary, make sure the associated word embeddings are fine-tuned or trained.
09/23/2024 10:01:56 - INFO - llamafactory.data.template - Replace eos token: <|eot_id|>
09/23/2024 10:01:56 - WARNING - llamafactory.data.template - New tokens have been added, make sure `resize_vocab` is True.
09/23/2024 10:01:56 - INFO - llamafactory.data.loader - Loading dataset identity.json...
Converting format of dataset (num_proc=16): 100%|█████████████████████████████████████████████████████████████████████████████████| 91/91 [00:00<00:00, 347.58 examples/s]
09/23/2024 10:01:58 - INFO - llamafactory.data.loader - Loading dataset alpaca_zh_demo.json...
Converting format of dataset (num_proc=16): 100%|████████████████████████████████████████████████████████████████████████████| 1000/1000 [00:00<00:00, 4042.14 examples/s]
Running tokenizer on dataset (num_proc=16): 100%|█████████████████████████████████████████████████████████████████████████████| 1091/1091 [00:02<00:00, 476.63 examples/s]
training example:
input_ids:
[27, 91, 2468, 8757, 842, 91, 29, 872, 27, 91, 408, 8757, 842, 91, 1339, 6023, 151646, 27, 91, 2468, 8757, 842, 91, 29, 77091, 27, 91, 408, 8757, 842, 91, 1339, 9707, 0, 358, 1079, 5867, 606, 38154, 458, 15235, 17847, 7881, 553, 5867, 3094, 3417, 13, 2585, 646, 358, 7789, 498, 3351, 30, 151646]
inputs:
<|start_header_id|>user<|end_header_id|>

hi<|eot_id|><|start_header_id|>assistant<|end_header_id|>

Hello! I am {{name}}, an AI assistant developed by {{author}}. How can I assist you today?<|eot_id|>
label_ids:
[-100, -100, -100, -100, -100, -100, -100, -100, -100, -100, -100, -100, -100, -100, -100, -100, -100, -100, -100, -100, -100, -100, -100, -100, -100, -100, -100, -100, -100, -100, -100, -100, 9707, 0, 358, 1079, 5867, 606, 38154, 458, 15235, 17847, 7881, 553, 5867, 3094, 3417, 13, 2585, 646, 358, 7789, 498, 3351, 30, 151646]
labels:
Hello! I am {{name}}, an AI assistant developed by {{author}}. How can I assist you today?<|eot_id|>
[INFO|configuration_utils.py:731] 2024-09-23 10:02:03,983 >> loading configuration file /home/lichao/AIGC/models/Qwen1.5-0.5B-Chat/config.json
[INFO|configuration_utils.py:800] 2024-09-23 10:02:03,986 >> Model config Qwen2Config {
  "_name_or_path": "/home/lichao/AIGC/models/Qwen1.5-0.5B-Chat",
  "architectures": [
    "Qwen2Config"
  ],
  "attention_dropout": 0.0,
  "bos_token_id": 151643,
  "eos_token_id": 151645,
  "hidden_act": "silu",
  "hidden_size": 1024,
  "initializer_range": 0.02,
  "intermediate_size": 2816,
  "max_position_embeddings": 32768,
  "max_window_layers": 21,
  "model_type": "qwen2",
  "num_attention_heads": 16,
  "num_hidden_layers": 24,
  "num_key_value_heads": 16,
  "rms_norm_eps": 1e-06,
  "rope_theta": 1000000.0,
  "sliding_window": null,
  "tie_word_embeddings": true,
  "torch_dtype": "bfloat16",
  "transformers_version": "4.45.0.dev0",
  "use_cache": true,
  "use_sliding_window": false,
  "vocab_size": 151936
}

[INFO|modeling_utils.py:3654] 2024-09-23 10:02:04,036 >> loading weights file /home/lichao/AIGC/models/Qwen1.5-0.5B-Chat/model.safetensors
[INFO|modeling_utils.py:1585] 2024-09-23 10:02:04,058 >> Instantiating Qwen2ForCausalLM model under default dtype torch.bfloat16.
[INFO|configuration_utils.py:1038] 2024-09-23 10:02:04,062 >> Generate config GenerationConfig {
  "bos_token_id": 151643,
  "eos_token_id": 151645
}

[INFO|modeling_utils.py:4489] 2024-09-23 10:02:05,417 >> All model checkpoint weights were used when initializing Qwen2ForCausalLM.

[INFO|modeling_utils.py:4497] 2024-09-23 10:02:05,417 >> All the weights of Qwen2ForCausalLM were initialized from the model checkpoint at /home/lichao/AIGC/models/Qwen1.5-0.5B-Chat.
If your task is similar to the task the model of the checkpoint was trained on, you can already use Qwen2ForCausalLM for predictions without further training.
[INFO|configuration_utils.py:991] 2024-09-23 10:02:05,421 >> loading configuration file /home/lichao/AIGC/models/Qwen1.5-0.5B-Chat/generation_config.json
[INFO|configuration_utils.py:1038] 2024-09-23 10:02:05,421 >> Generate config GenerationConfig {
  "bos_token_id": 151643,
  "do_sample": true,
  "eos_token_id": [
    151645,
    151643
  ],
  "pad_token_id": 151643,
  "repetition_penalty": 1.1,
  "top_p": 0.8
}

09/23/2024 10:02:05 - INFO - llamafactory.model.model_utils.checkpointing - Gradient checkpointing enabled.
09/23/2024 10:02:05 - INFO - llamafactory.model.model_utils.attention - Using torch SDPA for faster training and inference.
09/23/2024 10:02:05 - INFO - llamafactory.model.adapter - Upcasting trainable params to float32.
09/23/2024 10:02:05 - INFO - llamafactory.model.adapter - Fine-tuning method: Full
09/23/2024 10:02:05 - INFO - llamafactory.model.loader - trainable params: 463,987,712 || all params: 463,987,712 || trainable%: 100.0000
Detected kernel version 3.10.0, which is below the recommended minimum of 5.5.0; this can cause the process to hang. It is recommended to upgrade the kernel to the minimum version or higher.
[INFO|trainer.py:655] 2024-09-23 10:02:05,593 >> Using auto half precision backend
[2024-09-23 10:02:06,167] [INFO] [logging.py:96:log_dist] [Rank 0] DeepSpeed info: version=0.15.1, git-hash=unknown, git-branch=unknown
[2024-09-23 10:02:06,167] [INFO] [config.py:733:__init__] Config mesh_device None world_size = 3
[2024-09-23 10:02:06,406] [INFO] [logging.py:96:log_dist] [Rank 0] DeepSpeed Flops Profiler Enabled: False
[2024-09-23 10:02:06,408] [INFO] [logging.py:96:log_dist] [Rank 0] Using client Optimizer as basic optimizer
[2024-09-23 10:02:06,408] [INFO] [logging.py:96:log_dist] [Rank 0] Removing param_group that has no 'params' in the basic Optimizer
[2024-09-23 10:02:06,424] [INFO] [logging.py:96:log_dist] [Rank 0] DeepSpeed Basic Optimizer = AdamW
[2024-09-23 10:02:06,424] [INFO] [utils.py:59:is_zero_supported_optimizer] Checking ZeRO support for optimizer=AdamW type=<class 'torch.optim.adamw.AdamW'>
[2024-09-23 10:02:06,424] [INFO] [logging.py:96:log_dist] [Rank 0] Creating torch.bfloat16 ZeRO stage 2 optimizer
[2024-09-23 10:02:06,424] [INFO] [stage_1_and_2.py:148:__init__] Reduce bucket size 500000000
[2024-09-23 10:02:06,424] [INFO] [stage_1_and_2.py:149:__init__] Allgather bucket size 500000000
[2024-09-23 10:02:06,424] [INFO] [stage_1_and_2.py:150:__init__] CPU Offload: False
[2024-09-23 10:02:06,424] [INFO] [stage_1_and_2.py:151:__init__] Round robin gradient partitioning: True
[2024-09-23 10:02:08,342] [INFO] [utils.py:781:see_memory_usage] Before initializing optimizer states
[2024-09-23 10:02:08,343] [INFO] [utils.py:782:see_memory_usage] MA 1.63 GB         Max_MA 1.63 GB         CA 1.75 GB         Max_CA 2 GB
[2024-09-23 10:02:08,343] [INFO] [utils.py:789:see_memory_usage] CPU Virtual Memory:  used = 6.67 GB, percent = 5.3%
[2024-09-23 10:02:08,568] [INFO] [utils.py:781:see_memory_usage] After initializing optimizer states
[2024-09-23 10:02:08,569] [INFO] [utils.py:782:see_memory_usage] MA 1.63 GB         Max_MA 2.2 GB         CA 2.33 GB         Max_CA 2 GB
[2024-09-23 10:02:08,570] [INFO] [utils.py:789:see_memory_usage] CPU Virtual Memory:  used = 6.67 GB, percent = 5.3%
[2024-09-23 10:02:08,570] [INFO] [stage_1_and_2.py:543:__init__] optimizer state initialized
[2024-09-23 10:02:08,792] [INFO] [utils.py:781:see_memory_usage] After initializing ZeRO optimizer
[2024-09-23 10:02:08,793] [INFO] [utils.py:782:see_memory_usage] MA 1.63 GB         Max_MA 1.63 GB         CA 2.33 GB         Max_CA 2 GB
[2024-09-23 10:02:08,793] [INFO] [utils.py:789:see_memory_usage] CPU Virtual Memory:  used = 6.67 GB, percent = 5.3%
[2024-09-23 10:02:08,794] [INFO] [logging.py:96:log_dist] [Rank 0] DeepSpeed Final Optimizer = DeepSpeedZeroOptimizer
[2024-09-23 10:02:08,794] [INFO] [logging.py:96:log_dist] [Rank 0] DeepSpeed using configured LR scheduler = None
[2024-09-23 10:02:08,794] [INFO] [logging.py:96:log_dist] [Rank 0] DeepSpeed LR Scheduler = None
[2024-09-23 10:02:08,795] [INFO] [logging.py:96:log_dist] [Rank 0] step=0, skipped=0, lr=[0.0, 0.0], mom=[(0.9, 0.999), (0.9, 0.999)]
[2024-09-23 10:02:08,796] [INFO] [config.py:999:print] DeepSpeedEngine configuration:
[2024-09-23 10:02:08,796] [INFO] [config.py:1003:print]   activation_checkpointing_config  {
    "partition_activations": false,
    "contiguous_memory_optimization": false,
    "cpu_checkpointing": false,
    "number_checkpoints": null,
    "synchronize_checkpoint_boundary": false,
    "profile": false
}
[2024-09-23 10:02:08,796] [INFO] [config.py:1003:print]   aio_config ................... {'block_size': 1048576, 'queue_depth': 8, 'thread_count': 1, 'single_submit': False, 'overlap_events': True, 'use_gds': False}
[2024-09-23 10:02:08,796] [INFO] [config.py:1003:print]   amp_enabled .................. False
[2024-09-23 10:02:08,796] [INFO] [config.py:1003:print]   amp_params ................... False
[2024-09-23 10:02:08,797] [INFO] [config.py:1003:print]   autotuning_config ............ {
    "enabled": false,
    "start_step": null,
    "end_step": null,
    "metric_path": null,
    "arg_mappings": null,
    "metric": "throughput",
    "model_info": null,
    "results_dir": "autotuning_results",
    "exps_dir": "autotuning_exps",
    "overwrite": true,
    "fast": true,
    "start_profile_step": 3,
    "end_profile_step": 5,
    "tuner_type": "gridsearch",
    "tuner_early_stopping": 5,
    "tuner_num_trials": 50,
    "model_info_path": null,
    "mp_size": 1,
    "max_train_batch_size": null,
    "min_train_batch_size": 1,
    "max_train_micro_batch_size_per_gpu": 1.024000e+03,
    "min_train_micro_batch_size_per_gpu": 1,
    "num_tuning_micro_batch_sizes": 3
}
[2024-09-23 10:02:08,797] [INFO] [config.py:1003:print]   bfloat16_enabled ............. True
[2024-09-23 10:02:08,797] [INFO] [config.py:1003:print]   bfloat16_immediate_grad_update  False
[2024-09-23 10:02:08,797] [INFO] [config.py:1003:print]   checkpoint_parallel_write_pipeline  False
[2024-09-23 10:02:08,797] [INFO] [config.py:1003:print]   checkpoint_tag_validation_enabled  True
[2024-09-23 10:02:08,797] [INFO] [config.py:1003:print]   checkpoint_tag_validation_fail  False
[2024-09-23 10:02:08,797] [INFO] [config.py:1003:print]   comms_config ................. <deepspeed.comm.config.DeepSpeedCommsConfig object at 0x7f0d52b5d3d0>
[2024-09-23 10:02:08,797] [INFO] [config.py:1003:print]   communication_data_type ...... None
[2024-09-23 10:02:08,797] [INFO] [config.py:1003:print]   compression_config ........... {'weight_quantization': {'shared_parameters': {'enabled': False, 'quantizer_kernel': False, 'schedule_offset': 0, 'quantize_groups': 1, 'quantize_verbose': False, 'quantization_type': 'symmetric', 'quantize_weight_in_forward': False, 'rounding': 'nearest', 'fp16_mixed_quantize': False, 'quantize_change_ratio': 0.001}, 'different_groups': {}}, 'activation_quantization': {'shared_parameters': {'enabled': False, 'quantization_type': 'symmetric', 'range_calibration': 'dynamic', 'schedule_offset': 1000}, 'different_groups': {}}, 'sparse_pruning': {'shared_parameters': {'enabled': False, 'method': 'l1', 'schedule_offset': 1000}, 'different_groups': {}}, 'row_pruning': {'shared_parameters': {'enabled': False, 'method': 'l1', 'schedule_offset': 1000}, 'different_groups': {}}, 'head_pruning': {'shared_parameters': {'enabled': False, 'method': 'topk', 'schedule_offset': 1000}, 'different_groups': {}}, 'channel_pruning': {'shared_parameters': {'enabled': False, 'method': 'l1', 'schedule_offset': 1000}, 'different_groups': {}}, 'layer_reduction': {'enabled': False}}
[2024-09-23 10:02:08,797] [INFO] [config.py:1003:print]   curriculum_enabled_legacy .... False
[2024-09-23 10:02:08,797] [INFO] [config.py:1003:print]   curriculum_params_legacy ..... False
[2024-09-23 10:02:08,797] [INFO] [config.py:1003:print]   data_efficiency_config ....... {'enabled': False, 'seed': 1234, 'data_sampling': {'enabled': False, 'num_epochs': 1000, 'num_workers': 0, 'curriculum_learning': {'enabled': False}}, 'data_routing': {'enabled': False, 'random_ltd': {'enabled': False, 'layer_token_lr_schedule': {'enabled': False}}}}
[2024-09-23 10:02:08,797] [INFO] [config.py:1003:print]   data_efficiency_enabled ...... False
[2024-09-23 10:02:08,797] [INFO] [config.py:1003:print]   dataloader_drop_last ......... False
[2024-09-23 10:02:08,798] [INFO] [config.py:1003:print]   disable_allgather ............ False
[2024-09-23 10:02:08,798] [INFO] [config.py:1003:print]   dump_state ................... False
[2024-09-23 10:02:08,798] [INFO] [config.py:1003:print]   dynamic_loss_scale_args ...... None
[2024-09-23 10:02:08,798] [INFO] [config.py:1003:print]   eigenvalue_enabled ........... False
[2024-09-23 10:02:08,798] [INFO] [config.py:1003:print]   eigenvalue_gas_boundary_resolution  1
[2024-09-23 10:02:08,798] [INFO] [config.py:1003:print]   eigenvalue_layer_name ........ bert.encoder.layer
[2024-09-23 10:02:08,798] [INFO] [config.py:1003:print]   eigenvalue_layer_num ......... 0
[2024-09-23 10:02:08,798] [INFO] [config.py:1003:print]   eigenvalue_max_iter .......... 100
[2024-09-23 10:02:08,798] [INFO] [config.py:1003:print]   eigenvalue_stability ......... 1e-06
[2024-09-23 10:02:08,798] [INFO] [config.py:1003:print]   eigenvalue_tol ............... 0.01
[2024-09-23 10:02:08,798] [INFO] [config.py:1003:print]   eigenvalue_verbose ........... False
[2024-09-23 10:02:08,798] [INFO] [config.py:1003:print]   elasticity_enabled ........... False
[2024-09-23 10:02:08,798] [INFO] [config.py:1003:print]   flops_profiler_config ........ {
    "enabled": false,
    "recompute_fwd_factor": 0.0,
    "profile_step": 1,
    "module_depth": -1,
    "top_modules": 1,
    "detailed": true,
    "output_file": null
}
[2024-09-23 10:02:08,798] [INFO] [config.py:1003:print]   fp16_auto_cast ............... None
[2024-09-23 10:02:08,798] [INFO] [config.py:1003:print]   fp16_enabled ................. False
[2024-09-23 10:02:08,798] [INFO] [config.py:1003:print]   fp16_master_weights_and_gradients  False
[2024-09-23 10:02:08,798] [INFO] [config.py:1003:print]   global_rank .................. 0
[2024-09-23 10:02:08,798] [INFO] [config.py:1003:print]   grad_accum_dtype ............. None
[2024-09-23 10:02:08,798] [INFO] [config.py:1003:print]   gradient_accumulation_steps .. 2
[2024-09-23 10:02:08,798] [INFO] [config.py:1003:print]   gradient_clipping ............ 1.0
[2024-09-23 10:02:08,798] [INFO] [config.py:1003:print]   gradient_predivide_factor .... 1.0
[2024-09-23 10:02:08,798] [INFO] [config.py:1003:print]   graph_harvesting ............. False
[2024-09-23 10:02:08,798] [INFO] [config.py:1003:print]   hybrid_engine ................ enabled=False max_out_tokens=512 inference_tp_size=1 release_inference_cache=False pin_parameters=True tp_gather_partition_size=8
[2024-09-23 10:02:08,798] [INFO] [config.py:1003:print]   initial_dynamic_scale ........ 1
[2024-09-23 10:02:08,798] [INFO] [config.py:1003:print]   load_universal_checkpoint .... False
[2024-09-23 10:02:08,798] [INFO] [config.py:1003:print]   loss_scale ................... 1.0
[2024-09-23 10:02:08,798] [INFO] [config.py:1003:print]   memory_breakdown ............. False
[2024-09-23 10:02:08,798] [INFO] [config.py:1003:print]   mics_hierarchial_params_gather  False
[2024-09-23 10:02:08,798] [INFO] [config.py:1003:print]   mics_shard_size .............. -1
[2024-09-23 10:02:08,799] [INFO] [config.py:1003:print]   monitor_config ............... tensorboard=TensorBoardConfig(enabled=False, output_path='', job_name='DeepSpeedJobName') comet=CometConfig(enabled=False, samples_log_interval=100, project=None, workspace=None, api_key=None, experiment_name=None, experiment_key=None, online=None, mode=None) wandb=WandbConfig(enabled=False, group=None, team=None, project='deepspeed') csv_monitor=CSVConfig(enabled=False, output_path='', job_name='DeepSpeedJobName')
[2024-09-23 10:02:08,799] [INFO] [config.py:1003:print]   nebula_config ................ {
    "enabled": false,
    "persistent_storage_path": null,
    "persistent_time_interval": 100,
    "num_of_version_in_retention": 2,
    "enable_nebula_load": true,
    "load_path": null
}
[2024-09-23 10:02:08,799] [INFO] [config.py:1003:print]   optimizer_legacy_fusion ...... False
[2024-09-23 10:02:08,799] [INFO] [config.py:1003:print]   optimizer_name ............... None
[2024-09-23 10:02:08,799] [INFO] [config.py:1003:print]   optimizer_params ............. None
[2024-09-23 10:02:08,799] [INFO] [config.py:1003:print]   pipeline ..................... {'stages': 'auto', 'partition': 'best', 'seed_layers': False, 'activation_checkpoint_interval': 0, 'pipe_partitioned': True, 'grad_partitioned': True}
[2024-09-23 10:02:08,799] [INFO] [config.py:1003:print]   pld_enabled .................. False
[2024-09-23 10:02:08,799] [INFO] [config.py:1003:print]   pld_params ................... False
[2024-09-23 10:02:08,799] [INFO] [config.py:1003:print]   prescale_gradients ........... False
[2024-09-23 10:02:08,799] [INFO] [config.py:1003:print]   scheduler_name ............... None
[2024-09-23 10:02:08,799] [INFO] [config.py:1003:print]   scheduler_params ............. None
[2024-09-23 10:02:08,799] [INFO] [config.py:1003:print]   seq_parallel_communication_data_type  torch.float32
[2024-09-23 10:02:08,799] [INFO] [config.py:1003:print]   sparse_attention ............. None
[2024-09-23 10:02:08,799] [INFO] [config.py:1003:print]   sparse_gradients_enabled ..... False
[2024-09-23 10:02:08,799] [INFO] [config.py:1003:print]   steps_per_print .............. inf
[2024-09-23 10:02:08,799] [INFO] [config.py:1003:print]   timers_config ................ enabled=True synchronized=True
[2024-09-23 10:02:08,799] [INFO] [config.py:1003:print]   train_batch_size ............. 6
[2024-09-23 10:02:08,799] [INFO] [config.py:1003:print]   train_micro_batch_size_per_gpu  1
[2024-09-23 10:02:08,799] [INFO] [config.py:1003:print]   use_data_before_expert_parallel_  False
[2024-09-23 10:02:08,799] [INFO] [config.py:1003:print]   use_node_local_storage ....... False
[2024-09-23 10:02:08,799] [INFO] [config.py:1003:print]   wall_clock_breakdown ......... False
[2024-09-23 10:02:08,799] [INFO] [config.py:1003:print]   weight_quantization_config ... None
[2024-09-23 10:02:08,799] [INFO] [config.py:1003:print]   world_size ................... 3
[2024-09-23 10:02:08,799] [INFO] [config.py:1003:print]   zero_allow_untested_optimizer  True
[2024-09-23 10:02:08,799] [INFO] [config.py:1003:print]   zero_config .................. stage=2 contiguous_gradients=True reduce_scatter=True reduce_bucket_size=500000000 use_multi_rank_bucket_allreduce=True allgather_partitions=True allgather_bucket_size=500000000 overlap_comm=True load_from_fp32_weights=True elastic_checkpoint=False offload_param=None offload_optimizer=None sub_group_size=1000000000 cpu_offload_param=None cpu_offload_use_pin_memory=None cpu_offload=None prefetch_bucket_size=50000000 param_persistence_threshold=100000 model_persistence_threshold=9223372036854775807 max_live_parameters=1000000000 max_reuse_distance=1000000000 gather_16bit_weights_on_model_save=False use_all_reduce_for_fetch_params=False stage3_gather_fp16_weights_on_model_save=False ignore_unused_parameters=True legacy_stage1=False round_robin_gradients=True zero_hpz_partition_size=1 zero_quantized_weights=False zero_quantized_nontrainable_weights=False zero_quantized_gradients=False mics_shard_size=-1 mics_hierarchical_params_gather=False memory_efficient_linear=True pipeline_loading_checkpoint=False override_module_apply=True
[2024-09-23 10:02:08,799] [INFO] [config.py:1003:print]   zero_enabled ................. True
[2024-09-23 10:02:08,799] [INFO] [config.py:1003:print]   zero_force_ds_cpu_optimizer .. True
[2024-09-23 10:02:08,799] [INFO] [config.py:1003:print]   zero_optimization_stage ...... 2
[2024-09-23 10:02:08,800] [INFO] [config.py:989:print_user_config]   json = {
    "train_batch_size": 6,
    "train_micro_batch_size_per_gpu": 1,
    "gradient_accumulation_steps": 2,
    "gradient_clipping": 1.0,
    "zero_allow_untested_optimizer": true,
    "fp16": {
        "enabled": false,
        "loss_scale": 0,
        "loss_scale_window": 1000,
        "initial_scale_power": 16,
        "hysteresis": 2,
        "min_loss_scale": 1
    },
    "bf16": {
        "enabled": true
    },
    "zero_optimization": {
        "stage": 2,
        "allgather_partitions": true,
        "allgather_bucket_size": 5.000000e+08,
        "overlap_comm": true,
        "reduce_scatter": true,
        "reduce_bucket_size": 5.000000e+08,
        "contiguous_gradients": true,
        "round_robin_gradients": true
    },
    "steps_per_print": inf
}
[INFO|trainer.py:2141] 2024-09-23 10:02:08,800 >> ***** Running training *****
[INFO|trainer.py:2142] 2024-09-23 10:02:08,800 >>   Num examples = 981
[INFO|trainer.py:2143] 2024-09-23 10:02:08,800 >>   Num Epochs = 3
[INFO|trainer.py:2144] 2024-09-23 10:02:08,800 >>   Instantaneous batch size per device = 1
[INFO|trainer.py:2147] 2024-09-23 10:02:08,800 >>   Total train batch size (w. parallel, distributed & accumulation) = 6
[INFO|trainer.py:2148] 2024-09-23 10:02:08,800 >>   Gradient Accumulation steps = 2
[INFO|trainer.py:2149] 2024-09-23 10:02:08,800 >>   Total optimization steps = 489
[INFO|trainer.py:2150] 2024-09-23 10:02:08,801 >>   Number of trainable parameters = 463,987,712
  0%|                                                                                                                                             | 0/489 [00:00<?, ?it/s]/home/lichao/opt/python3.11.9/lib/python3.11/site-packages/torch/utils/checkpoint.py:295: FutureWarning: `torch.cpu.amp.autocast(args...)` is deprecated. Please use `torch.amp.autocast('cpu', args...)` instead.
  with torch.enable_grad(), device_autocast_ctx, torch.cpu.amp.autocast(**ctx.cpu_autocast_kwargs):  # type: ignore[attr-defined]
{'loss': 2.3658, 'grad_norm': 25.19988250732422, 'learning_rate': 2.0408163265306123e-05, 'epoch': 0.06}
{'loss': 2.6136, 'grad_norm': 9.38448429107666, 'learning_rate': 4.0816326530612245e-05, 'epoch': 0.12}
{'loss': 2.2796, 'grad_norm': 13.728240013122559, 'learning_rate': 6.122448979591838e-05, 'epoch': 0.18}
{'loss': 2.1511, 'grad_norm': 18.125511169433594, 'learning_rate': 8.163265306122449e-05, 'epoch': 0.24}
{'loss': 2.3712, 'grad_norm': 22.641611099243164, 'learning_rate': 9.999872552137497e-05, 'epoch': 0.31}
{'loss': 2.3982, 'grad_norm': 19.40285301208496, 'learning_rate': 9.98458666866564e-05, 'epoch': 0.37}
{'loss': 2.5063, 'grad_norm': 11.834580421447754, 'learning_rate': 9.943900474099748e-05, 'epoch': 0.43}
{'loss': 2.4219, 'grad_norm': 11.096634864807129, 'learning_rate': 9.878021295961217e-05, 'epoch': 0.49}
{'loss': 2.5318, 'grad_norm': 11.01838493347168, 'learning_rate': 9.787284839440982e-05, 'epoch': 0.55}
{'loss': 2.6357, 'grad_norm': 15.102975845336914, 'learning_rate': 9.672153476722816e-05, 'epoch': 0.61}
{'loss': 2.5858, 'grad_norm': 11.936942100524902, 'learning_rate': 9.533213890840657e-05, 'epoch': 0.67}
{'loss': 2.3013, 'grad_norm': 10.956372261047363, 'learning_rate': 9.371174086076363e-05, 'epoch': 0.73}
{'loss': 2.443, 'grad_norm': 11.979649543762207, 'learning_rate': 9.186859780132164e-05, 'epoch': 0.8}
{'loss': 2.4357, 'grad_norm': 7.360419273376465, 'learning_rate': 8.981210196462533e-05, 'epoch': 0.86}
{'loss': 2.5534, 'grad_norm': 14.005857467651367, 'learning_rate': 8.755273278206749e-05, 'epoch': 0.92}
{'loss': 2.5753, 'grad_norm': 9.832633018493652, 'learning_rate': 8.510200348110868e-05, 'epoch': 0.98}
{'loss': 1.7594, 'grad_norm': 10.028552055358887, 'learning_rate': 8.247240241650918e-05, 'epoch': 1.04}
{'loss': 1.4025, 'grad_norm': 12.267614364624023, 'learning_rate': 7.967732943253571e-05, 'epoch': 1.1}
{'loss': 1.1433, 'grad_norm': 7.551489353179932, 'learning_rate': 7.673102758042653e-05, 'epoch': 1.16}
{'loss': 1.2479, 'grad_norm': 8.397479057312012, 'learning_rate': 7.364851053906718e-05, 'epoch': 1.22}
{'loss': 1.1978, 'grad_norm': 9.697928428649902, 'learning_rate': 7.044548610872434e-05, 'epoch': 1.28}
{'loss': 1.1877, 'grad_norm': 14.016590118408203, 'learning_rate': 6.713827616769614e-05, 'epoch': 1.35}
{'loss': 1.2349, 'grad_norm': 11.697397232055664, 'learning_rate': 6.374373349976169e-05, 'epoch': 1.41}
{'loss': 1.214, 'grad_norm': 8.01415729522705, 'learning_rate': 6.027915591625804e-05, 'epoch': 1.47}
{'loss': 1.1724, 'grad_norm': 8.013666152954102, 'learning_rate': 5.6762198110398444e-05, 'epoch': 1.53}
{'loss': 1.2709, 'grad_norm': 10.372663497924805, 'learning_rate': 5.3210781693002754e-05, 'epoch': 1.59}
{'loss': 1.1069, 'grad_norm': 14.193530082702637, 'learning_rate': 4.964300386807653e-05, 'epoch': 1.65}
{'loss': 1.3013, 'grad_norm': 14.019328117370605, 'learning_rate': 4.607704521360776e-05, 'epoch': 1.71}
{'loss': 1.2138, 'grad_norm': 11.885704040527344, 'learning_rate': 4.253107703750875e-05, 'epoch': 1.77}
{'loss': 1.1027, 'grad_norm': 8.35533332824707, 'learning_rate': 3.9023168780796294e-05, 'epoch': 1.83}
{'loss': 1.1346, 'grad_norm': 12.683867454528809, 'learning_rate': 3.557119593986208e-05, 'epoch': 1.9}
{'loss': 1.0305, 'grad_norm': 7.334381580352783, 'learning_rate': 3.219274897704053e-05, 'epoch': 1.96}
{'loss': 0.9327, 'grad_norm': 4.699033737182617, 'learning_rate': 2.8905043683644872e-05, 'epoch': 2.02}
{'loss': 0.5392, 'grad_norm': 5.634421348571777, 'learning_rate': 2.5724833452240792e-05, 'epoch': 2.08}
{'loss': 0.5446, 'grad_norm': 5.442759990692139, 'learning_rate': 2.2668323905198108e-05, 'epoch': 2.14}
{'loss': 0.4084, 'grad_norm': 5.1523966789245605, 'learning_rate': 1.9751090314553878e-05, 'epoch': 2.2}
{'loss': 0.4885, 'grad_norm': 6.668193340301514, 'learning_rate': 1.698799823399628e-05, 'epoch': 2.26}
{'loss': 0.4697, 'grad_norm': 5.780378818511963, 'learning_rate': 1.4393127747410417e-05, 'epoch': 2.32}
{'loss': 0.4652, 'grad_norm': 4.824888706207275, 'learning_rate': 1.1979701719998453e-05, 'epoch': 2.39}
{'loss': 0.4356, 'grad_norm': 12.217597961425781, 'learning_rate': 9.760018417589334e-06, 'epoch': 2.45}
{'loss': 0.4252, 'grad_norm': 5.763933181762695, 'learning_rate': 7.745388837495188e-06, 'epoch': 2.51}
{'loss': 0.4486, 'grad_norm': 8.276981353759766, 'learning_rate': 5.946079070261773e-06, 'epoch': 2.57}
{'loss': 0.4308, 'grad_norm': 12.236105918884277, 'learning_rate': 4.371257986024202e-06, 'epoch': 2.63}
{'loss': 0.4139, 'grad_norm': 5.1657185554504395, 'learning_rate': 3.0289505120464743e-06, 'epoch': 2.69}
{'loss': 0.3718, 'grad_norm': 6.259467124938965, 'learning_rate': 1.925996739531577e-06, 'epoch': 2.75}
{'loss': 0.3833, 'grad_norm': 8.667612075805664, 'learning_rate': 1.0680170680846259e-06, 'epoch': 2.81}
{'loss': 0.4498, 'grad_norm': 7.922170639038086, 'learning_rate': 4.593835654447709e-07, 'epoch': 2.87}
{'loss': 0.4422, 'grad_norm': 5.631829261779785, 'learning_rate': 1.0319768843018996e-07, 'epoch': 2.94}
100%|███████████████████████████████████████████████████████████████████████████████████████████████████████████████████████████████████| 489/489 [26:28<00:00,  3.26s/it][INFO|trainer.py:3510] 2024-09-23 10:28:37,461 >> Saving model checkpoint to asterun/saves/qwen/full/sft/checkpoint-489
[INFO|configuration_utils.py:472] 2024-09-23 10:28:37,464 >> Configuration saved in asterun/saves/qwen/full/sft/checkpoint-489/config.json
[INFO|configuration_utils.py:807] 2024-09-23 10:28:37,464 >> Configuration saved in asterun/saves/qwen/full/sft/checkpoint-489/generation_config.json
[INFO|modeling_utils.py:2778] 2024-09-23 10:28:43,244 >> Model weights saved in asterun/saves/qwen/full/sft/checkpoint-489/model.safetensors
[INFO|tokenization_utils_base.py:2684] 2024-09-23 10:28:43,251 >> tokenizer config file saved in asterun/saves/qwen/full/sft/checkpoint-489/tokenizer_config.json
[INFO|tokenization_utils_base.py:2693] 2024-09-23 10:28:43,252 >> Special tokens file saved in asterun/saves/qwen/full/sft/checkpoint-489/special_tokens_map.json
[2024-09-23 10:28:43,459] [INFO] [logging.py:96:log_dist] [Rank 0] [Torch] Checkpoint global_step489 is about to be saved!
[2024-09-23 10:28:43,470] [INFO] [logging.py:96:log_dist] [Rank 0] Saving model checkpoint: asterun/saves/qwen/full/sft/checkpoint-489/global_step489/mp_rank_00_model_states.pt
[2024-09-23 10:28:43,470] [INFO] [torch_checkpoint_engine.py:21:save] [Torch] Saving asterun/saves/qwen/full/sft/checkpoint-489/global_step489/mp_rank_00_model_states.pt...
[2024-09-23 10:28:48,175] [INFO] [torch_checkpoint_engine.py:23:save] [Torch] Saved asterun/saves/qwen/full/sft/checkpoint-489/global_step489/mp_rank_00_model_states.pt.
[2024-09-23 10:28:48,178] [INFO] [torch_checkpoint_engine.py:21:save] [Torch] Saving asterun/saves/qwen/full/sft/checkpoint-489/global_step489/bf16_zero_pp_rank_0_mp_rank_00_optim_states.pt...
[2024-09-23 10:28:57,930] [INFO] [torch_checkpoint_engine.py:23:save] [Torch] Saved asterun/saves/qwen/full/sft/checkpoint-489/global_step489/bf16_zero_pp_rank_0_mp_rank_00_optim_states.pt.
[2024-09-23 10:28:57,931] [INFO] [engine.py:3536:_save_zero_checkpoint] zero checkpoint saved asterun/saves/qwen/full/sft/checkpoint-489/global_step489/bf16_zero_pp_rank_0_mp_rank_00_optim_states.pt
[2024-09-23 10:28:57,931] [INFO] [torch_checkpoint_engine.py:33:commit] [Torch] Checkpoint global_step489 is ready now!
[INFO|trainer.py:2401] 2024-09-23 10:28:57,940 >>

Training completed. Do not forget to share your model on huggingface.co/models =)


{'train_runtime': 1609.1394, 'train_samples_per_second': 1.829, 'train_steps_per_second': 0.304, 'train_loss': 1.3682080348820287, 'epoch': 2.99}
100%|███████████████████████████████████████████████████████████████████████████████████████████████████████████████████████████████████| 489/489 [26:49<00:00,  3.29s/it]
[INFO|trainer.py:3510] 2024-09-23 10:28:58,466 >> Saving model checkpoint to asterun/saves/qwen/full/sft
[INFO|configuration_utils.py:472] 2024-09-23 10:28:58,470 >> Configuration saved in asterun/saves/qwen/full/sft/config.json
[INFO|configuration_utils.py:807] 2024-09-23 10:28:58,470 >> Configuration saved in asterun/saves/qwen/full/sft/generation_config.json
[INFO|modeling_utils.py:2778] 2024-09-23 10:29:04,536 >> Model weights saved in asterun/saves/qwen/full/sft/model.safetensors
[INFO|tokenization_utils_base.py:2684] 2024-09-23 10:29:04,552 >> tokenizer config file saved in asterun/saves/qwen/full/sft/tokenizer_config.json
[INFO|tokenization_utils_base.py:2693] 2024-09-23 10:29:04,552 >> Special tokens file saved in asterun/saves/qwen/full/sft/special_tokens_map.json
***** train metrics *****
  epoch                    =     2.9908
  total_flos               =   772542GF
  train_loss               =     1.3682
  train_runtime            = 0:26:49.13
  train_samples_per_second =      1.829
  train_steps_per_second   =      0.304
Figure saved at: asterun/saves/qwen/full/sft/training_loss.png
09/23/2024 10:29:05 - WARNING - llamafactory.extras.ploting - No metric eval_loss to plot.
09/23/2024 10:29:05 - WARNING - llamafactory.extras.ploting - No metric eval_accuracy to plot.
[INFO|trainer.py:3826] 2024-09-23 10:29:05,042 >>
***** Running Evaluation *****
[INFO|trainer.py:3828] 2024-09-23 10:29:05,042 >>   Num examples = 110
[INFO|trainer.py:3831] 2024-09-23 10:29:05,042 >>   Batch size = 1
100%|█████████████████████████████████████████████████████████████████████████████████████████████████████████████████████████████████████| 37/37 [00:01<00:00, 19.78it/s]
***** eval metrics *****
  epoch                   =     2.9908
  eval_loss               =     2.7517
  eval_runtime            = 0:00:01.92
  eval_samples_per_second =     57.029
  eval_steps_per_second   =     19.182
[INFO|modelcard.py:449] 2024-09-23 10:29:06,975 >> Dropping the following result as it does not have all the necessary fields:
{'task': {'name': 'Causal Language Modeling', 'type': 'text-generation'}}
[root@server3 LLaMA-Factory-0.8.3]#
3.1.6 推理测试
安装GGUF库
下载llama.cpp源码包到服务器,解压到工作目录
[root@server3 AIGC]# unzip llama.cpp-master.zip
[root@server3 AIGC]# cd llama.cpp-master
[root@server3 llama.cpp-master]# ll
总用量 576
-rw-r--r--  1 root root  33717 9月  26 11:38 AUTHORS
drwxr-xr-x  2 root root     37 9月  26 11:38 ci
drwxr-xr-x  2 root root    164 9月  26 11:38 cmake
-rw-r--r--  1 root root   6591 9月  26 11:38 CMakeLists.txt
-rw-r--r--  1 root root   3164 9月  26 11:38 CMakePresets.json
drwxr-xr-x  3 root root   4096 9月  26 11:38 common
-rw-r--r--  1 root root   2256 9月  26 11:38 CONTRIBUTING.md
-rwxr-xr-x  1 root root 199470 9月  26 11:38 convert_hf_to_gguf.py
-rwxr-xr-x  1 root root  15993 9月  26 11:38 convert_hf_to_gguf_update.py
-rwxr-xr-x  1 root root  19106 9月  26 11:38 convert_llama_ggml_to_gguf.py
-rwxr-xr-x  1 root root  14901 9月  26 11:38 convert_lora_to_gguf.py
drwxr-xr-x  4 root root    109 9月  26 11:38 docs
drwxr-xr-x 43 root root   4096 9月  26 11:38 examples
-rw-r--r--  1 root root   1556 9月  26 11:38 flake.lock
-rw-r--r--  1 root root   7469 9月  26 11:38 flake.nix
drwxr-xr-x  5 root root     85 9月  26 11:38 ggml
drwxr-xr-x  6 root root    116 9月  26 11:38 gguf-py
drwxr-xr-x  2 root root    154 9月  26 11:38 grammars
drwxr-xr-x  2 root root     21 9月  26 11:38 include
-rw-r--r--  1 root root   1078 9月  26 11:38 LICENSE
-rw-r--r--  1 root root  50865 9月  26 11:38 Makefile
drwxr-xr-x  2 root root    163 9月  26 11:38 media
drwxr-xr-x  2 root root   4096 9月  26 11:38 models
-rw-r--r--  1 root root    163 9月  26 11:38 mypy.ini
-rw-r--r--  1 root root   2044 9月  26 11:38 Package.swift
drwxr-xr-x  3 root root     40 9月  26 11:38 pocs
-rw-r--r--  1 root root 124786 9月  26 11:38 poetry.lock
drwxr-xr-x  2 root root   4096 9月  26 11:38 prompts
-rw-r--r--  1 root root   1280 9月  26 11:38 pyproject.toml
-rw-r--r--  1 root root    528 9月  26 11:38 pyrightconfig.json
-rw-r--r--  1 root root  28481 9月  26 11:38 README.md
drwxr-xr-x  2 root root   4096 9月  26 11:38 requirements
-rw-r--r--  1 root root    505 9月  26 11:38 requirements.txt
drwxr-xr-x  2 root root   4096 9月  26 11:38 scripts
-rw-r--r--  1 root root   5090 9月  26 11:38 SECURITY.md
drwxr-xr-x  2 root root     97 9月  26 11:38 spm-headers
drwxr-xr-x  2 root root    289 9月  26 11:38 src
drwxr-xr-x  2 root root   4096 9月  26 11:38 tests
[root@server3 llama.cpp-master]#

进入gguf-py子目录,安装GGUF库
[root@server3 llama.cpp-master]# cd gguf-py
[root@server3 gguf-py]# ll
总用量 12
drwxr-xr-x 2 root root   40 9月  26 11:38 examples
drwxr-xr-x 2 root root  230 9月  26 11:38 gguf
-rw-r--r-- 1 root root 1072 9月  26 11:38 LICENSE
-rw-r--r-- 1 root root 1049 9月  26 11:38 pyproject.toml
-rw-r--r-- 1 root root 2719 9月  26 11:38 README.md
drwxr-xr-x 2 root root  151 9月  26 11:38 scripts
drwxr-xr-x 2 root root   71 9月  26 11:38 tests
[root@server3 gguf-py]# pip install --editable .
Looking in indexes: https://mirrors.aliyun.com/pypi/simple/
Obtaining file:///home/lichao/AIGC/llama.cpp-master/gguf-py
  Installing build dependencies ... done
  Checking if build backend supports build_editable ... done
  Getting requirements to build editable ... done
  Preparing editable metadata (pyproject.toml) ... done
Requirement already satisfied: numpy>=1.17 in /home/lichao/opt/python3.11.9/lib/python3.11/site-packages (from gguf==0.10.0) (1.26.4)
Requirement already satisfied: pyyaml>=5.1 in /home/lichao/opt/python3.11.9/lib/python3.11/site-packages (from gguf==0.10.0) (6.0.2)
Requirement already satisfied: sentencepiece<=0.2.0,>=0.1.98 in /home/lichao/opt/python3.11.9/lib/python3.11/site-packages (from gguf==0.10.0) (0.2.0)
Requirement already satisfied: tqdm>=4.27 in /home/lichao/opt/python3.11.9/lib/python3.11/site-packages (from gguf==0.10.0) (4.66.5)
Building wheels for collected packages: gguf
  Building editable for gguf (pyproject.toml) ... done
  Created wheel for gguf: filename=gguf-0.10.0-py3-none-any.whl size=3403 sha256=4a0851426e263076c64c9854be9dfe95493844062484d001fddb08c1be5fa2ca
  Stored in directory: /tmp/pip-ephem-wheel-cache-iiq8ofh3/wheels/80/80/9b/c6c23d750f4bd20fc0c2c75e51253d89c61a2369247fb694db
Successfully built gguf
Installing collected packages: gguf
Successfully installed gguf-0.10.0
WARNING: Running pip as the 'root' user can result in broken permissions and conflicting behaviour with the system package manager, possibly rendering your system unusable.It is recommended to use a virtual environment instead: https://pip.pypa.io/warnings/venv. Use the --root-user-action option if you know what you are doing and want to suppress this warning.
[root@server3 gguf-py]#
模型格式转换
将之前微调训练生成的safetensors格式的模型,转换为gguf格式
[root@server3 gguf-py]# cd ..
[root@server3 llama.cpp-master]# python3 convert_hf_to_gguf.py /home/lichao/AIGC/LLaMA-Factory-0.8.3/asterun/saves/qwen/full/sft
INFO:hf-to-gguf:Loading model: sft
INFO:gguf.gguf_writer:gguf: This GGUF file is for Little Endian only
INFO:hf-to-gguf:Exporting model...
INFO:hf-to-gguf:gguf: loading model part 'model.safetensors'
INFO:hf-to-gguf:output.weight,             torch.bfloat16 --> F16, shape = {1024, 151936}
INFO:hf-to-gguf:token_embd.weight,         torch.bfloat16 --> F16, shape = {1024, 151936}
INFO:hf-to-gguf:blk.0.attn_norm.weight,    torch.bfloat16 --> F32, shape = {1024}
INFO:hf-to-gguf:blk.0.ffn_down.weight,     torch.bfloat16 --> F16, shape = {2816, 1024}
INFO:hf-to-gguf:blk.0.ffn_gate.weight,     torch.bfloat16 --> F16, shape = {1024, 2816}
INFO:hf-to-gguf:blk.0.ffn_up.weight,       torch.bfloat16 --> F16, shape = {1024, 2816}
INFO:hf-to-gguf:blk.0.ffn_norm.weight,     torch.bfloat16 --> F32, shape = {1024}
INFO:hf-to-gguf:blk.0.attn_k.bias,         torch.bfloat16 --> F32, shape = {1024}
INFO:hf-to-gguf:blk.0.attn_k.weight,       torch.bfloat16 --> F16, shape = {1024, 1024}
INFO:hf-to-gguf:blk.0.attn_output.weight,  torch.bfloat16 --> F16, shape = {1024, 1024}
INFO:hf-to-gguf:blk.0.attn_q.bias,         torch.bfloat16 --> F32, shape = {1024}
INFO:hf-to-gguf:blk.0.attn_q.weight,       torch.bfloat16 --> F16, shape = {1024, 1024}
INFO:hf-to-gguf:blk.0.attn_v.bias,         torch.bfloat16 --> F32, shape = {1024}
INFO:hf-to-gguf:blk.0.attn_v.weight,       torch.bfloat16 --> F16, shape = {1024, 1024}
INFO:hf-to-gguf:blk.1.attn_norm.weight,    torch.bfloat16 --> F32, shape = {1024}
INFO:hf-to-gguf:blk.1.ffn_down.weight,     torch.bfloat16 --> F16, shape = {2816, 1024}
INFO:hf-to-gguf:blk.1.ffn_gate.weight,     torch.bfloat16 --> F16, shape = {1024, 2816}
INFO:hf-to-gguf:blk.1.ffn_up.weight,       torch.bfloat16 --> F16, shape = {1024, 2816}
INFO:hf-to-gguf:blk.1.ffn_norm.weight,     torch.bfloat16 --> F32, shape = {1024}
INFO:hf-to-gguf:blk.1.attn_k.bias,         torch.bfloat16 --> F32, shape = {1024}
INFO:hf-to-gguf:blk.1.attn_k.weight,       torch.bfloat16 --> F16, shape = {1024, 1024}
INFO:hf-to-gguf:blk.1.attn_output.weight,  torch.bfloat16 --> F16, shape = {1024, 1024}
INFO:hf-to-gguf:blk.1.attn_q.bias,         torch.bfloat16 --> F32, shape = {1024}
INFO:hf-to-gguf:blk.1.attn_q.weight,       torch.bfloat16 --> F16, shape = {1024, 1024}
INFO:hf-to-gguf:blk.1.attn_v.bias,         torch.bfloat16 --> F32, shape = {1024}
INFO:hf-to-gguf:blk.1.attn_v.weight,       torch.bfloat16 --> F16, shape = {1024, 1024}
INFO:hf-to-gguf:blk.10.attn_norm.weight,   torch.bfloat16 --> F32, shape = {1024}
INFO:hf-to-gguf:blk.10.ffn_down.weight,    torch.bfloat16 --> F16, shape = {2816, 1024}
INFO:hf-to-gguf:blk.10.ffn_gate.weight,    torch.bfloat16 --> F16, shape = {1024, 2816}
INFO:hf-to-gguf:blk.10.ffn_up.weight,      torch.bfloat16 --> F16, shape = {1024, 2816}
INFO:hf-to-gguf:blk.10.ffn_norm.weight,    torch.bfloat16 --> F32, shape = {1024}
INFO:hf-to-gguf:blk.10.attn_k.bias,        torch.bfloat16 --> F32, shape = {1024}
INFO:hf-to-gguf:blk.10.attn_k.weight,      torch.bfloat16 --> F16, shape = {1024, 1024}
INFO:hf-to-gguf:blk.10.attn_output.weight, torch.bfloat16 --> F16, shape = {1024, 1024}
INFO:hf-to-gguf:blk.10.attn_q.bias,        torch.bfloat16 --> F32, shape = {1024}
INFO:hf-to-gguf:blk.10.attn_q.weight,      torch.bfloat16 --> F16, shape = {1024, 1024}
INFO:hf-to-gguf:blk.10.attn_v.bias,        torch.bfloat16 --> F32, shape = {1024}
INFO:hf-to-gguf:blk.10.attn_v.weight,      torch.bfloat16 --> F16, shape = {1024, 1024}
INFO:hf-to-gguf:blk.11.attn_norm.weight,   torch.bfloat16 --> F32, shape = {1024}
INFO:hf-to-gguf:blk.11.ffn_down.weight,    torch.bfloat16 --> F16, shape = {2816, 1024}
INFO:hf-to-gguf:blk.11.ffn_gate.weight,    torch.bfloat16 --> F16, shape = {1024, 2816}
INFO:hf-to-gguf:blk.11.ffn_up.weight,      torch.bfloat16 --> F16, shape = {1024, 2816}
INFO:hf-to-gguf:blk.11.ffn_norm.weight,    torch.bfloat16 --> F32, shape = {1024}
INFO:hf-to-gguf:blk.11.attn_k.bias,        torch.bfloat16 --> F32, shape = {1024}
INFO:hf-to-gguf:blk.11.attn_k.weight,      torch.bfloat16 --> F16, shape = {1024, 1024}
INFO:hf-to-gguf:blk.11.attn_output.weight, torch.bfloat16 --> F16, shape = {1024, 1024}
INFO:hf-to-gguf:blk.11.attn_q.bias,        torch.bfloat16 --> F32, shape = {1024}
INFO:hf-to-gguf:blk.11.attn_q.weight,      torch.bfloat16 --> F16, shape = {1024, 1024}
INFO:hf-to-gguf:blk.11.attn_v.bias,        torch.bfloat16 --> F32, shape = {1024}
INFO:hf-to-gguf:blk.11.attn_v.weight,      torch.bfloat16 --> F16, shape = {1024, 1024}
INFO:hf-to-gguf:blk.12.attn_norm.weight,   torch.bfloat16 --> F32, shape = {1024}
INFO:hf-to-gguf:blk.12.ffn_down.weight,    torch.bfloat16 --> F16, shape = {2816, 1024}
INFO:hf-to-gguf:blk.12.ffn_gate.weight,    torch.bfloat16 --> F16, shape = {1024, 2816}
INFO:hf-to-gguf:blk.12.ffn_up.weight,      torch.bfloat16 --> F16, shape = {1024, 2816}
INFO:hf-to-gguf:blk.12.ffn_norm.weight,    torch.bfloat16 --> F32, shape = {1024}
INFO:hf-to-gguf:blk.12.attn_k.bias,        torch.bfloat16 --> F32, shape = {1024}
INFO:hf-to-gguf:blk.12.attn_k.weight,      torch.bfloat16 --> F16, shape = {1024, 1024}
INFO:hf-to-gguf:blk.12.attn_output.weight, torch.bfloat16 --> F16, shape = {1024, 1024}
INFO:hf-to-gguf:blk.12.attn_q.bias,        torch.bfloat16 --> F32, shape = {1024}
INFO:hf-to-gguf:blk.12.attn_q.weight,      torch.bfloat16 --> F16, shape = {1024, 1024}
INFO:hf-to-gguf:blk.12.attn_v.bias,        torch.bfloat16 --> F32, shape = {1024}
INFO:hf-to-gguf:blk.12.attn_v.weight,      torch.bfloat16 --> F16, shape = {1024, 1024}
INFO:hf-to-gguf:blk.13.attn_norm.weight,   torch.bfloat16 --> F32, shape = {1024}
INFO:hf-to-gguf:blk.13.ffn_down.weight,    torch.bfloat16 --> F16, shape = {2816, 1024}
INFO:hf-to-gguf:blk.13.ffn_gate.weight,    torch.bfloat16 --> F16, shape = {1024, 2816}
INFO:hf-to-gguf:blk.13.ffn_up.weight,      torch.bfloat16 --> F16, shape = {1024, 2816}
INFO:hf-to-gguf:blk.13.ffn_norm.weight,    torch.bfloat16 --> F32, shape = {1024}
INFO:hf-to-gguf:blk.13.attn_k.bias,        torch.bfloat16 --> F32, shape = {1024}
INFO:hf-to-gguf:blk.13.attn_k.weight,      torch.bfloat16 --> F16, shape = {1024, 1024}
INFO:hf-to-gguf:blk.13.attn_output.weight, torch.bfloat16 --> F16, shape = {1024, 1024}
INFO:hf-to-gguf:blk.13.attn_q.bias,        torch.bfloat16 --> F32, shape = {1024}
INFO:hf-to-gguf:blk.13.attn_q.weight,      torch.bfloat16 --> F16, shape = {1024, 1024}
INFO:hf-to-gguf:blk.13.attn_v.bias,        torch.bfloat16 --> F32, shape = {1024}
INFO:hf-to-gguf:blk.13.attn_v.weight,      torch.bfloat16 --> F16, shape = {1024, 1024}
INFO:hf-to-gguf:blk.14.attn_norm.weight,   torch.bfloat16 --> F32, shape = {1024}
INFO:hf-to-gguf:blk.14.ffn_down.weight,    torch.bfloat16 --> F16, shape = {2816, 1024}
INFO:hf-to-gguf:blk.14.ffn_gate.weight,    torch.bfloat16 --> F16, shape = {1024, 2816}
INFO:hf-to-gguf:blk.14.ffn_up.weight,      torch.bfloat16 --> F16, shape = {1024, 2816}
INFO:hf-to-gguf:blk.14.ffn_norm.weight,    torch.bfloat16 --> F32, shape = {1024}
INFO:hf-to-gguf:blk.14.attn_k.bias,        torch.bfloat16 --> F32, shape = {1024}
INFO:hf-to-gguf:blk.14.attn_k.weight,      torch.bfloat16 --> F16, shape = {1024, 1024}
INFO:hf-to-gguf:blk.14.attn_output.weight, torch.bfloat16 --> F16, shape = {1024, 1024}
INFO:hf-to-gguf:blk.14.attn_q.bias,        torch.bfloat16 --> F32, shape = {1024}
INFO:hf-to-gguf:blk.14.attn_q.weight,      torch.bfloat16 --> F16, shape = {1024, 1024}
INFO:hf-to-gguf:blk.14.attn_v.bias,        torch.bfloat16 --> F32, shape = {1024}
INFO:hf-to-gguf:blk.14.attn_v.weight,      torch.bfloat16 --> F16, shape = {1024, 1024}
INFO:hf-to-gguf:blk.15.attn_norm.weight,   torch.bfloat16 --> F32, shape = {1024}
INFO:hf-to-gguf:blk.15.ffn_down.weight,    torch.bfloat16 --> F16, shape = {2816, 1024}
INFO:hf-to-gguf:blk.15.ffn_gate.weight,    torch.bfloat16 --> F16, shape = {1024, 2816}
INFO:hf-to-gguf:blk.15.ffn_up.weight,      torch.bfloat16 --> F16, shape = {1024, 2816}
INFO:hf-to-gguf:blk.15.ffn_norm.weight,    torch.bfloat16 --> F32, shape = {1024}
INFO:hf-to-gguf:blk.15.attn_k.bias,        torch.bfloat16 --> F32, shape = {1024}
INFO:hf-to-gguf:blk.15.attn_k.weight,      torch.bfloat16 --> F16, shape = {1024, 1024}
INFO:hf-to-gguf:blk.15.attn_output.weight, torch.bfloat16 --> F16, shape = {1024, 1024}
INFO:hf-to-gguf:blk.15.attn_q.bias,        torch.bfloat16 --> F32, shape = {1024}
INFO:hf-to-gguf:blk.15.attn_q.weight,      torch.bfloat16 --> F16, shape = {1024, 1024}
INFO:hf-to-gguf:blk.15.attn_v.bias,        torch.bfloat16 --> F32, shape = {1024}
INFO:hf-to-gguf:blk.15.attn_v.weight,      torch.bfloat16 --> F16, shape = {1024, 1024}
INFO:hf-to-gguf:blk.16.attn_norm.weight,   torch.bfloat16 --> F32, shape = {1024}
INFO:hf-to-gguf:blk.16.ffn_down.weight,    torch.bfloat16 --> F16, shape = {2816, 1024}
INFO:hf-to-gguf:blk.16.ffn_gate.weight,    torch.bfloat16 --> F16, shape = {1024, 2816}
INFO:hf-to-gguf:blk.16.ffn_up.weight,      torch.bfloat16 --> F16, shape = {1024, 2816}
INFO:hf-to-gguf:blk.16.ffn_norm.weight,    torch.bfloat16 --> F32, shape = {1024}
INFO:hf-to-gguf:blk.16.attn_k.bias,        torch.bfloat16 --> F32, shape = {1024}
INFO:hf-to-gguf:blk.16.attn_k.weight,      torch.bfloat16 --> F16, shape = {1024, 1024}
INFO:hf-to-gguf:blk.16.attn_output.weight, torch.bfloat16 --> F16, shape = {1024, 1024}
INFO:hf-to-gguf:blk.16.attn_q.bias,        torch.bfloat16 --> F32, shape = {1024}
INFO:hf-to-gguf:blk.16.attn_q.weight,      torch.bfloat16 --> F16, shape = {1024, 1024}
INFO:hf-to-gguf:blk.16.attn_v.bias,        torch.bfloat16 --> F32, shape = {1024}
INFO:hf-to-gguf:blk.16.attn_v.weight,      torch.bfloat16 --> F16, shape = {1024, 1024}
INFO:hf-to-gguf:blk.17.attn_norm.weight,   torch.bfloat16 --> F32, shape = {1024}
INFO:hf-to-gguf:blk.17.ffn_down.weight,    torch.bfloat16 --> F16, shape = {2816, 1024}
INFO:hf-to-gguf:blk.17.ffn_gate.weight,    torch.bfloat16 --> F16, shape = {1024, 2816}
INFO:hf-to-gguf:blk.17.ffn_up.weight,      torch.bfloat16 --> F16, shape = {1024, 2816}
INFO:hf-to-gguf:blk.17.ffn_norm.weight,    torch.bfloat16 --> F32, shape = {1024}
INFO:hf-to-gguf:blk.17.attn_k.bias,        torch.bfloat16 --> F32, shape = {1024}
INFO:hf-to-gguf:blk.17.attn_k.weight,      torch.bfloat16 --> F16, shape = {1024, 1024}
INFO:hf-to-gguf:blk.17.attn_output.weight, torch.bfloat16 --> F16, shape = {1024, 1024}
INFO:hf-to-gguf:blk.17.attn_q.bias,        torch.bfloat16 --> F32, shape = {1024}
INFO:hf-to-gguf:blk.17.attn_q.weight,      torch.bfloat16 --> F16, shape = {1024, 1024}
INFO:hf-to-gguf:blk.17.attn_v.bias,        torch.bfloat16 --> F32, shape = {1024}
INFO:hf-to-gguf:blk.17.attn_v.weight,      torch.bfloat16 --> F16, shape = {1024, 1024}
INFO:hf-to-gguf:blk.18.attn_norm.weight,   torch.bfloat16 --> F32, shape = {1024}
INFO:hf-to-gguf:blk.18.ffn_down.weight,    torch.bfloat16 --> F16, shape = {2816, 1024}
INFO:hf-to-gguf:blk.18.ffn_gate.weight,    torch.bfloat16 --> F16, shape = {1024, 2816}
INFO:hf-to-gguf:blk.18.ffn_up.weight,      torch.bfloat16 --> F16, shape = {1024, 2816}
INFO:hf-to-gguf:blk.18.ffn_norm.weight,    torch.bfloat16 --> F32, shape = {1024}
INFO:hf-to-gguf:blk.18.attn_k.bias,        torch.bfloat16 --> F32, shape = {1024}
INFO:hf-to-gguf:blk.18.attn_k.weight,      torch.bfloat16 --> F16, shape = {1024, 1024}
INFO:hf-to-gguf:blk.18.attn_output.weight, torch.bfloat16 --> F16, shape = {1024, 1024}
INFO:hf-to-gguf:blk.18.attn_q.bias,        torch.bfloat16 --> F32, shape = {1024}
INFO:hf-to-gguf:blk.18.attn_q.weight,      torch.bfloat16 --> F16, shape = {1024, 1024}
INFO:hf-to-gguf:blk.18.attn_v.bias,        torch.bfloat16 --> F32, shape = {1024}
INFO:hf-to-gguf:blk.18.attn_v.weight,      torch.bfloat16 --> F16, shape = {1024, 1024}
INFO:hf-to-gguf:blk.19.attn_norm.weight,   torch.bfloat16 --> F32, shape = {1024}
INFO:hf-to-gguf:blk.19.ffn_down.weight,    torch.bfloat16 --> F16, shape = {2816, 1024}
INFO:hf-to-gguf:blk.19.ffn_gate.weight,    torch.bfloat16 --> F16, shape = {1024, 2816}
INFO:hf-to-gguf:blk.19.ffn_up.weight,      torch.bfloat16 --> F16, shape = {1024, 2816}
INFO:hf-to-gguf:blk.19.ffn_norm.weight,    torch.bfloat16 --> F32, shape = {1024}
INFO:hf-to-gguf:blk.19.attn_k.bias,        torch.bfloat16 --> F32, shape = {1024}
INFO:hf-to-gguf:blk.19.attn_k.weight,      torch.bfloat16 --> F16, shape = {1024, 1024}
INFO:hf-to-gguf:blk.19.attn_output.weight, torch.bfloat16 --> F16, shape = {1024, 1024}
INFO:hf-to-gguf:blk.19.attn_q.bias,        torch.bfloat16 --> F32, shape = {1024}
INFO:hf-to-gguf:blk.19.attn_q.weight,      torch.bfloat16 --> F16, shape = {1024, 1024}
INFO:hf-to-gguf:blk.19.attn_v.bias,        torch.bfloat16 --> F32, shape = {1024}
INFO:hf-to-gguf:blk.19.attn_v.weight,      torch.bfloat16 --> F16, shape = {1024, 1024}
INFO:hf-to-gguf:blk.2.attn_norm.weight,    torch.bfloat16 --> F32, shape = {1024}
INFO:hf-to-gguf:blk.2.ffn_down.weight,     torch.bfloat16 --> F16, shape = {2816, 1024}
INFO:hf-to-gguf:blk.2.ffn_gate.weight,     torch.bfloat16 --> F16, shape = {1024, 2816}
INFO:hf-to-gguf:blk.2.ffn_up.weight,       torch.bfloat16 --> F16, shape = {1024, 2816}
INFO:hf-to-gguf:blk.2.ffn_norm.weight,     torch.bfloat16 --> F32, shape = {1024}
INFO:hf-to-gguf:blk.2.attn_k.bias,         torch.bfloat16 --> F32, shape = {1024}
INFO:hf-to-gguf:blk.2.attn_k.weight,       torch.bfloat16 --> F16, shape = {1024, 1024}
INFO:hf-to-gguf:blk.2.attn_output.weight,  torch.bfloat16 --> F16, shape = {1024, 1024}
INFO:hf-to-gguf:blk.2.attn_q.bias,         torch.bfloat16 --> F32, shape = {1024}
INFO:hf-to-gguf:blk.2.attn_q.weight,       torch.bfloat16 --> F16, shape = {1024, 1024}
INFO:hf-to-gguf:blk.2.attn_v.bias,         torch.bfloat16 --> F32, shape = {1024}
INFO:hf-to-gguf:blk.2.attn_v.weight,       torch.bfloat16 --> F16, shape = {1024, 1024}
INFO:hf-to-gguf:blk.20.attn_norm.weight,   torch.bfloat16 --> F32, shape = {1024}
INFO:hf-to-gguf:blk.20.ffn_down.weight,    torch.bfloat16 --> F16, shape = {2816, 1024}
INFO:hf-to-gguf:blk.20.ffn_gate.weight,    torch.bfloat16 --> F16, shape = {1024, 2816}
INFO:hf-to-gguf:blk.20.ffn_up.weight,      torch.bfloat16 --> F16, shape = {1024, 2816}
INFO:hf-to-gguf:blk.20.ffn_norm.weight,    torch.bfloat16 --> F32, shape = {1024}
INFO:hf-to-gguf:blk.20.attn_k.bias,        torch.bfloat16 --> F32, shape = {1024}
INFO:hf-to-gguf:blk.20.attn_k.weight,      torch.bfloat16 --> F16, shape = {1024, 1024}
INFO:hf-to-gguf:blk.20.attn_output.weight, torch.bfloat16 --> F16, shape = {1024, 1024}
INFO:hf-to-gguf:blk.20.attn_q.bias,        torch.bfloat16 --> F32, shape = {1024}
INFO:hf-to-gguf:blk.20.attn_q.weight,      torch.bfloat16 --> F16, shape = {1024, 1024}
INFO:hf-to-gguf:blk.20.attn_v.bias,        torch.bfloat16 --> F32, shape = {1024}
INFO:hf-to-gguf:blk.20.attn_v.weight,      torch.bfloat16 --> F16, shape = {1024, 1024}
INFO:hf-to-gguf:blk.21.attn_norm.weight,   torch.bfloat16 --> F32, shape = {1024}
INFO:hf-to-gguf:blk.21.ffn_down.weight,    torch.bfloat16 --> F16, shape = {2816, 1024}
INFO:hf-to-gguf:blk.21.ffn_gate.weight,    torch.bfloat16 --> F16, shape = {1024, 2816}
INFO:hf-to-gguf:blk.21.ffn_up.weight,      torch.bfloat16 --> F16, shape = {1024, 2816}
INFO:hf-to-gguf:blk.21.ffn_norm.weight,    torch.bfloat16 --> F32, shape = {1024}
INFO:hf-to-gguf:blk.21.attn_k.bias,        torch.bfloat16 --> F32, shape = {1024}
INFO:hf-to-gguf:blk.21.attn_k.weight,      torch.bfloat16 --> F16, shape = {1024, 1024}
INFO:hf-to-gguf:blk.21.attn_output.weight, torch.bfloat16 --> F16, shape = {1024, 1024}
INFO:hf-to-gguf:blk.21.attn_q.bias,        torch.bfloat16 --> F32, shape = {1024}
INFO:hf-to-gguf:blk.21.attn_q.weight,      torch.bfloat16 --> F16, shape = {1024, 1024}
INFO:hf-to-gguf:blk.21.attn_v.bias,        torch.bfloat16 --> F32, shape = {1024}
INFO:hf-to-gguf:blk.21.attn_v.weight,      torch.bfloat16 --> F16, shape = {1024, 1024}
INFO:hf-to-gguf:blk.22.attn_norm.weight,   torch.bfloat16 --> F32, shape = {1024}
INFO:hf-to-gguf:blk.22.ffn_down.weight,    torch.bfloat16 --> F16, shape = {2816, 1024}
INFO:hf-to-gguf:blk.22.ffn_gate.weight,    torch.bfloat16 --> F16, shape = {1024, 2816}
INFO:hf-to-gguf:blk.22.ffn_up.weight,      torch.bfloat16 --> F16, shape = {1024, 2816}
INFO:hf-to-gguf:blk.22.ffn_norm.weight,    torch.bfloat16 --> F32, shape = {1024}
INFO:hf-to-gguf:blk.22.attn_k.bias,        torch.bfloat16 --> F32, shape = {1024}
INFO:hf-to-gguf:blk.22.attn_k.weight,      torch.bfloat16 --> F16, shape = {1024, 1024}
INFO:hf-to-gguf:blk.22.attn_output.weight, torch.bfloat16 --> F16, shape = {1024, 1024}
INFO:hf-to-gguf:blk.22.attn_q.bias,        torch.bfloat16 --> F32, shape = {1024}
INFO:hf-to-gguf:blk.22.attn_q.weight,      torch.bfloat16 --> F16, shape = {1024, 1024}
INFO:hf-to-gguf:blk.22.attn_v.bias,        torch.bfloat16 --> F32, shape = {1024}
INFO:hf-to-gguf:blk.22.attn_v.weight,      torch.bfloat16 --> F16, shape = {1024, 1024}
INFO:hf-to-gguf:blk.23.attn_norm.weight,   torch.bfloat16 --> F32, shape = {1024}
INFO:hf-to-gguf:blk.23.ffn_down.weight,    torch.bfloat16 --> F16, shape = {2816, 1024}
INFO:hf-to-gguf:blk.23.ffn_gate.weight,    torch.bfloat16 --> F16, shape = {1024, 2816}
INFO:hf-to-gguf:blk.23.ffn_up.weight,      torch.bfloat16 --> F16, shape = {1024, 2816}
INFO:hf-to-gguf:blk.23.ffn_norm.weight,    torch.bfloat16 --> F32, shape = {1024}
INFO:hf-to-gguf:blk.23.attn_k.bias,        torch.bfloat16 --> F32, shape = {1024}
INFO:hf-to-gguf:blk.23.attn_k.weight,      torch.bfloat16 --> F16, shape = {1024, 1024}
INFO:hf-to-gguf:blk.23.attn_output.weight, torch.bfloat16 --> F16, shape = {1024, 1024}
INFO:hf-to-gguf:blk.23.attn_q.bias,        torch.bfloat16 --> F32, shape = {1024}
INFO:hf-to-gguf:blk.23.attn_q.weight,      torch.bfloat16 --> F16, shape = {1024, 1024}
INFO:hf-to-gguf:blk.23.attn_v.bias,        torch.bfloat16 --> F32, shape = {1024}
INFO:hf-to-gguf:blk.23.attn_v.weight,      torch.bfloat16 --> F16, shape = {1024, 1024}
INFO:hf-to-gguf:blk.3.attn_norm.weight,    torch.bfloat16 --> F32, shape = {1024}
INFO:hf-to-gguf:blk.3.ffn_down.weight,     torch.bfloat16 --> F16, shape = {2816, 1024}
INFO:hf-to-gguf:blk.3.ffn_gate.weight,     torch.bfloat16 --> F16, shape = {1024, 2816}
INFO:hf-to-gguf:blk.3.ffn_up.weight,       torch.bfloat16 --> F16, shape = {1024, 2816}
INFO:hf-to-gguf:blk.3.ffn_norm.weight,     torch.bfloat16 --> F32, shape = {1024}
INFO:hf-to-gguf:blk.3.attn_k.bias,         torch.bfloat16 --> F32, shape = {1024}
INFO:hf-to-gguf:blk.3.attn_k.weight,       torch.bfloat16 --> F16, shape = {1024, 1024}
INFO:hf-to-gguf:blk.3.attn_output.weight,  torch.bfloat16 --> F16, shape = {1024, 1024}
INFO:hf-to-gguf:blk.3.attn_q.bias,         torch.bfloat16 --> F32, shape = {1024}
INFO:hf-to-gguf:blk.3.attn_q.weight,       torch.bfloat16 --> F16, shape = {1024, 1024}
INFO:hf-to-gguf:blk.3.attn_v.bias,         torch.bfloat16 --> F32, shape = {1024}
INFO:hf-to-gguf:blk.3.attn_v.weight,       torch.bfloat16 --> F16, shape = {1024, 1024}
INFO:hf-to-gguf:blk.4.attn_norm.weight,    torch.bfloat16 --> F32, shape = {1024}
INFO:hf-to-gguf:blk.4.ffn_down.weight,     torch.bfloat16 --> F16, shape = {2816, 1024}
INFO:hf-to-gguf:blk.4.ffn_gate.weight,     torch.bfloat16 --> F16, shape = {1024, 2816}
INFO:hf-to-gguf:blk.4.ffn_up.weight,       torch.bfloat16 --> F16, shape = {1024, 2816}
INFO:hf-to-gguf:blk.4.ffn_norm.weight,     torch.bfloat16 --> F32, shape = {1024}
INFO:hf-to-gguf:blk.4.attn_k.bias,         torch.bfloat16 --> F32, shape = {1024}
INFO:hf-to-gguf:blk.4.attn_k.weight,       torch.bfloat16 --> F16, shape = {1024, 1024}
INFO:hf-to-gguf:blk.4.attn_output.weight,  torch.bfloat16 --> F16, shape = {1024, 1024}
INFO:hf-to-gguf:blk.4.attn_q.bias,         torch.bfloat16 --> F32, shape = {1024}
INFO:hf-to-gguf:blk.4.attn_q.weight,       torch.bfloat16 --> F16, shape = {1024, 1024}
INFO:hf-to-gguf:blk.4.attn_v.bias,         torch.bfloat16 --> F32, shape = {1024}
INFO:hf-to-gguf:blk.4.attn_v.weight,       torch.bfloat16 --> F16, shape = {1024, 1024}
INFO:hf-to-gguf:blk.5.attn_norm.weight,    torch.bfloat16 --> F32, shape = {1024}
INFO:hf-to-gguf:blk.5.ffn_down.weight,     torch.bfloat16 --> F16, shape = {2816, 1024}
INFO:hf-to-gguf:blk.5.ffn_gate.weight,     torch.bfloat16 --> F16, shape = {1024, 2816}
INFO:hf-to-gguf:blk.5.ffn_up.weight,       torch.bfloat16 --> F16, shape = {1024, 2816}
INFO:hf-to-gguf:blk.5.ffn_norm.weight,     torch.bfloat16 --> F32, shape = {1024}
INFO:hf-to-gguf:blk.5.attn_k.bias,         torch.bfloat16 --> F32, shape = {1024}
INFO:hf-to-gguf:blk.5.attn_k.weight,       torch.bfloat16 --> F16, shape = {1024, 1024}
INFO:hf-to-gguf:blk.5.attn_output.weight,  torch.bfloat16 --> F16, shape = {1024, 1024}
INFO:hf-to-gguf:blk.5.attn_q.bias,         torch.bfloat16 --> F32, shape = {1024}
INFO:hf-to-gguf:blk.5.attn_q.weight,       torch.bfloat16 --> F16, shape = {1024, 1024}
INFO:hf-to-gguf:blk.5.attn_v.bias,         torch.bfloat16 --> F32, shape = {1024}
INFO:hf-to-gguf:blk.5.attn_v.weight,       torch.bfloat16 --> F16, shape = {1024, 1024}
INFO:hf-to-gguf:blk.6.attn_norm.weight,    torch.bfloat16 --> F32, shape = {1024}
INFO:hf-to-gguf:blk.6.ffn_down.weight,     torch.bfloat16 --> F16, shape = {2816, 1024}
INFO:hf-to-gguf:blk.6.ffn_gate.weight,     torch.bfloat16 --> F16, shape = {1024, 2816}
INFO:hf-to-gguf:blk.6.ffn_up.weight,       torch.bfloat16 --> F16, shape = {1024, 2816}
INFO:hf-to-gguf:blk.6.ffn_norm.weight,     torch.bfloat16 --> F32, shape = {1024}
INFO:hf-to-gguf:blk.6.attn_k.bias,         torch.bfloat16 --> F32, shape = {1024}
INFO:hf-to-gguf:blk.6.attn_k.weight,       torch.bfloat16 --> F16, shape = {1024, 1024}
INFO:hf-to-gguf:blk.6.attn_output.weight,  torch.bfloat16 --> F16, shape = {1024, 1024}
INFO:hf-to-gguf:blk.6.attn_q.bias,         torch.bfloat16 --> F32, shape = {1024}
INFO:hf-to-gguf:blk.6.attn_q.weight,       torch.bfloat16 --> F16, shape = {1024, 1024}
INFO:hf-to-gguf:blk.6.attn_v.bias,         torch.bfloat16 --> F32, shape = {1024}
INFO:hf-to-gguf:blk.6.attn_v.weight,       torch.bfloat16 --> F16, shape = {1024, 1024}
INFO:hf-to-gguf:blk.7.attn_norm.weight,    torch.bfloat16 --> F32, shape = {1024}
INFO:hf-to-gguf:blk.7.ffn_down.weight,     torch.bfloat16 --> F16, shape = {2816, 1024}
INFO:hf-to-gguf:blk.7.ffn_gate.weight,     torch.bfloat16 --> F16, shape = {1024, 2816}
INFO:hf-to-gguf:blk.7.ffn_up.weight,       torch.bfloat16 --> F16, shape = {1024, 2816}
INFO:hf-to-gguf:blk.7.ffn_norm.weight,     torch.bfloat16 --> F32, shape = {1024}
INFO:hf-to-gguf:blk.7.attn_k.bias,         torch.bfloat16 --> F32, shape = {1024}
INFO:hf-to-gguf:blk.7.attn_k.weight,       torch.bfloat16 --> F16, shape = {1024, 1024}
INFO:hf-to-gguf:blk.7.attn_output.weight,  torch.bfloat16 --> F16, shape = {1024, 1024}
INFO:hf-to-gguf:blk.7.attn_q.bias,         torch.bfloat16 --> F32, shape = {1024}
INFO:hf-to-gguf:blk.7.attn_q.weight,       torch.bfloat16 --> F16, shape = {1024, 1024}
INFO:hf-to-gguf:blk.7.attn_v.bias,         torch.bfloat16 --> F32, shape = {1024}
INFO:hf-to-gguf:blk.7.attn_v.weight,       torch.bfloat16 --> F16, shape = {1024, 1024}
INFO:hf-to-gguf:blk.8.attn_norm.weight,    torch.bfloat16 --> F32, shape = {1024}
INFO:hf-to-gguf:blk.8.ffn_down.weight,     torch.bfloat16 --> F16, shape = {2816, 1024}
INFO:hf-to-gguf:blk.8.ffn_gate.weight,     torch.bfloat16 --> F16, shape = {1024, 2816}
INFO:hf-to-gguf:blk.8.ffn_up.weight,       torch.bfloat16 --> F16, shape = {1024, 2816}
INFO:hf-to-gguf:blk.8.ffn_norm.weight,     torch.bfloat16 --> F32, shape = {1024}
INFO:hf-to-gguf:blk.8.attn_k.bias,         torch.bfloat16 --> F32, shape = {1024}
INFO:hf-to-gguf:blk.8.attn_k.weight,       torch.bfloat16 --> F16, shape = {1024, 1024}
INFO:hf-to-gguf:blk.8.attn_output.weight,  torch.bfloat16 --> F16, shape = {1024, 1024}
INFO:hf-to-gguf:blk.8.attn_q.bias,         torch.bfloat16 --> F32, shape = {1024}
INFO:hf-to-gguf:blk.8.attn_q.weight,       torch.bfloat16 --> F16, shape = {1024, 1024}
INFO:hf-to-gguf:blk.8.attn_v.bias,         torch.bfloat16 --> F32, shape = {1024}
INFO:hf-to-gguf:blk.8.attn_v.weight,       torch.bfloat16 --> F16, shape = {1024, 1024}
INFO:hf-to-gguf:blk.9.attn_norm.weight,    torch.bfloat16 --> F32, shape = {1024}
INFO:hf-to-gguf:blk.9.ffn_down.weight,     torch.bfloat16 --> F16, shape = {2816, 1024}
INFO:hf-to-gguf:blk.9.ffn_gate.weight,     torch.bfloat16 --> F16, shape = {1024, 2816}
INFO:hf-to-gguf:blk.9.ffn_up.weight,       torch.bfloat16 --> F16, shape = {1024, 2816}
INFO:hf-to-gguf:blk.9.ffn_norm.weight,     torch.bfloat16 --> F32, shape = {1024}
INFO:hf-to-gguf:blk.9.attn_k.bias,         torch.bfloat16 --> F32, shape = {1024}
INFO:hf-to-gguf:blk.9.attn_k.weight,       torch.bfloat16 --> F16, shape = {1024, 1024}
INFO:hf-to-gguf:blk.9.attn_output.weight,  torch.bfloat16 --> F16, shape = {1024, 1024}
INFO:hf-to-gguf:blk.9.attn_q.bias,         torch.bfloat16 --> F32, shape = {1024}
INFO:hf-to-gguf:blk.9.attn_q.weight,       torch.bfloat16 --> F16, shape = {1024, 1024}
INFO:hf-to-gguf:blk.9.attn_v.bias,         torch.bfloat16 --> F32, shape = {1024}
INFO:hf-to-gguf:blk.9.attn_v.weight,       torch.bfloat16 --> F16, shape = {1024, 1024}
INFO:hf-to-gguf:output_norm.weight,        torch.bfloat16 --> F32, shape = {1024}
INFO:hf-to-gguf:Set meta model
INFO:hf-to-gguf:Set model parameters
INFO:hf-to-gguf:gguf: context length = 32768
INFO:hf-to-gguf:gguf: embedding length = 1024
INFO:hf-to-gguf:gguf: feed forward length = 2816
INFO:hf-to-gguf:gguf: head count = 16
INFO:hf-to-gguf:gguf: key-value head count = 16
INFO:hf-to-gguf:gguf: rope theta = 1000000.0
INFO:hf-to-gguf:gguf: rms norm epsilon = 1e-06
INFO:hf-to-gguf:gguf: file type = 1
INFO:hf-to-gguf:Set model tokenizer
INFO:gguf.vocab:Adding 151387 merge(s).
INFO:gguf.vocab:Setting special token type eos to 151646
INFO:gguf.vocab:Setting special token type pad to 151643
INFO:gguf.vocab:Setting special token type bos to 151643
INFO:gguf.vocab:Setting chat_template to {% if messages[0]['role'] == 'system' %}{% set system_message = messages[0]['content'] %}{% endif %}{% if system_message is defined %}{{ '<|start_header_id|>system<|end_header_id|>

' + system_message + '<|eot_id|>' }}{% endif %}{% for message in messages %}{% set content = message['content'] %}{% if message['role'] == 'user' %}{{ '<|start_header_id|>user<|end_header_id|>

' + content + '<|eot_id|><|start_header_id|>assistant<|end_header_id|>

' }}{% elif message['role'] == 'assistant' %}{{ content + '<|eot_id|>' }}{% endif %}{% endfor %}
INFO:hf-to-gguf:Set model quantization version
INFO:gguf.gguf_writer:Writing the following files:
INFO:gguf.gguf_writer:/home/lichao/AIGC/LLaMA-Factory-0.8.3/asterun/saves/qwen/full/sft/Sft-620M-F16.gguf: n_tensors = 291, total_size = 1.2G
Writing: 100%|████████████████████████████████████████████████████████████████████████████████████████████████████████████████████| 1.24G/1.24G [00:03<00:00, 338Mbyte/s]
INFO:hf-to-gguf:Model successfully exported to /home/lichao/AIGC/LLaMA-Factory-0.8.3/asterun/saves/qwen/full/sft/Sft-620M-F16.gguf
[root@server3 llama.cpp-master]# cd /home/lichao/AIGC/LLaMA-Factory-0.8.3/asterun/saves/qwen/full/sft
转换成功后,修改gguf格式的模型名称,方便后需使用辨认
[root@server3 sft]# ll
总用量 2883588
-rw-r--r-- 1 root root        104 9月  23 10:29 added_tokens.json
-rw-r--r-- 1 root root        358 9月  23 10:29 all_results.json
drwxr-xr-x 3 root root       4096 9月  19 09:59 checkpoint-1000
drwxr-xr-x 3 root root       4096 9月  19 10:05 checkpoint-1470
drwxr-xr-x 3 root root       4096 9月  13 11:02 checkpoint-489
drwxr-xr-x 3 root root       4096 9月  19 09:51 checkpoint-500
-rw-r--r-- 1 root root        731 9月  23 10:28 config.json
-rw-r--r-- 1 root root        175 9月  23 10:29 eval_results.json
-rw-r--r-- 1 root root        210 9月  23 10:28 generation_config.json
-rw-r--r-- 1 root root    1671853 9月  23 10:29 merges.txt
-rw-r--r-- 1 root root 1239173352 9月  23 10:28 model.safetensors
-rw-r--r-- 1 root root       1398 9月  23 10:29 README.md
drwxr-xr-x 2 root root        222 9月  23 10:29 runs
-rw-r--r-- 1 root root 1245334112 9月  26 11:58 Sft-620M-F16.gguf
-rw-r--r-- 1 root root        367 9月  23 10:29 special_tokens_map.json
-rw-r--r-- 1 root root       1720 9月  23 10:29 tokenizer_config.json
-rw-r--r-- 1 root root    7028230 9月  23 10:29 tokenizer.json
-rw-r--r-- 1 root root      11984 9月  23 10:28 trainer_log.jsonl
-rw-r--r-- 1 root root       9284 9月  23 10:29 trainer_state.json
-rw-r--r-- 1 root root       6584 9月  23 10:29 training_args.bin
-rw-r--r-- 1 root root      38333 9月  19 10:06 training_eval_loss.png
-rw-r--r-- 1 root root      37022 9月  23 10:29 training_loss.png
-rw-r--r-- 1 root root        218 9月  23 10:29 train_results.json
-rw-r--r-- 1 root root    2776833 9月  23 10:29 vocab.json
[root@server3 sft]# mv Sft-620M-F16.gguf qwen-sft-620M-F16.gguf
安装Ollama
下载ollama源码包到服务器,解压到工作目录
[root@server3 AIGC]# tar -C /usr -xzf ollama-linux-amd64.tgz
通过命令行方式启动ollama服务
[root@server3 AIGC]# ollama serve
Couldn't find '/root/.ollama/id_ed25519'. Generating new private key.
Your new public key is:

ssh-ed25519 AAAAC3NzaC1lZDI1NTE5AAAAILZVS+rUG5x5wd6issBvGuj3YYzMnPUUOmVbEz4iZFCt

2024/09/26 12:04:20 routes.go:1153: INFO server config env="map[CUDA_VISIBLE_DEVICES: GPU_DEVICE_ORDINAL: HIP_VISIBLE_DEVICES: HSA_OVERRIDE_GFX_VERSION: HTTPS_PROXY: HTTP_PROXY: NO_PROXY: OLLAMA_DEBUG:false OLLAMA_FLASH_ATTENTION:false OLLAMA_GPU_OVERHEAD:0 OLLAMA_HOST:http://127.0.0.1:11434 OLLAMA_INTEL_GPU:false OLLAMA_KEEP_ALIVE:5m0s OLLAMA_LLM_LIBRARY: OLLAMA_LOAD_TIMEOUT:5m0s OLLAMA_MAX_LOADED_MODELS:0 OLLAMA_MAX_QUEUE:512 OLLAMA_MODELS:/root/.ollama/models OLLAMA_NOHISTORY:false OLLAMA_NOPRUNE:false OLLAMA_NUM_PARALLEL:0 OLLAMA_ORIGINS:[http://localhost https://localhost http://localhost:* https://localhost:* http://127.0.0.1 https://127.0.0.1 http://127.0.0.1:* https://127.0.0.1:* http://0.0.0.0 https://0.0.0.0 http://0.0.0.0:* https://0.0.0.0:* app://* file://* tauri://*] OLLAMA_SCHED_SPREAD:false OLLAMA_TMPDIR: ROCR_VISIBLE_DEVICES: http_proxy: https_proxy: no_proxy:]"
time=2024-09-26T12:04:20.753+02:00 level=INFO source=images.go:753 msg="total blobs: 0"
time=2024-09-26T12:04:20.754+02:00 level=INFO source=images.go:760 msg="total unused blobs removed: 0"
time=2024-09-26T12:04:20.754+02:00 level=INFO source=routes.go:1200 msg="Listening on 127.0.0.1:11434 (version 0.3.12)"
time=2024-09-26T12:04:20.755+02:00 level=INFO source=common.go:135 msg="extracting embedded files" dir=/tmp/ollama316805737/runners
time=2024-09-26T12:04:39.145+02:00 level=INFO source=common.go:49 msg="Dynamic LLM libraries" runners="[cpu cpu_avx cpu_avx2 cuda_v11 cuda_v12 rocm_v60102]"
time=2024-09-26T12:04:39.145+02:00 level=INFO source=gpu.go:199 msg="looking for compatible GPUs"
time=2024-09-26T12:04:39.283+02:00 level=INFO source=types.go:107 msg="inference compute" id=GPU-2d337ad0-020d-0464-2d00-715b0d00c7ba library=cuda variant=v12 compute=8.9 driver=12.4 name="NVIDIA GeForce RTX 4060 Ti" total="15.7 GiB" available="15.6 GiB"

注册模型
打开一个新的terminal
[root@server3 AIGC]# cd LLaMA-Factory-0.8.3/asterun/
[root@server3 asterun]# ll
总用量 4
-rw-r--r-- 1 root root 817 9月  19 09:33 qwen_full_sft_ds2.yaml
drwxr-xr-x 3 root root  18 9月  13 10:28 saves
创建模型的Modelfile文件
[root@server3 asterun]# touch qwen_full_sft_ds2.ollama.Modelfile
[root@server3 asterun]# vim qwen_full_sft_ds2.ollama.Modelfile
[root@server3 asterun]# cat qwen_full_sft_ds2.ollama.Modelfile
FROM /home/lichao/AIGC/LLaMA-Factory-0.8.3/asterun/saves/qwen/full/sft/qwen-sft-620M-F16.gguf
[root@server3 asterun]# cd ../..
使用Modelfile注册模型
[root@server3 AIGC]# ollama create qwen-full-sft -f ./LLaMA-Factory-0.8.3/asterun/qwen_full_sft_ds2.ollama.Modelfile
transferring model data 100%
using existing layer sha256:19d794be57081c1a5aa7e03c4045a0fdc5b8a40f080f0c550ab38033cf0d5d58
creating new layer sha256:c33681b055686143e7d6e0bb0f1054c9910c05c3f4ab16932fbc567a8961929a
writing manifest
success
[root@server3 AIGC]#
推理测试
使用注册好的模型运行推理服务
[root@server3 AIGC]# ollama run qwen-full-sft
>>> who are you?
<|im_end|>
我是 {{name}},一个由 {{author}} 开发的人工智能助手,我可以帮助用户查询信息、安排日程、提供建议等。

>>> can you speak english?
 I am an AI assistant developed by {{author}}.

>>> 好吧,用中文交流吧。
没问题。

>>> 你喜欢中国哪个城市?
每个城市都有其独特的魅力,各具特色,比如:
成都:美食之都,生活悠闲。
北京:历史悠久,文化丰富。
杭州:风景优美,以西湖闻名。
上海:现代化大都市,经济繁荣。

>>> 感谢,再见
好的,我是个人工智能助手,很高兴见到您。

>>> exit
[root@server3 AIGC]#
至此,已完成分布式计算环境的搭建与测试。
4 部署与使用相关Q&A
- 问题1:
使用如下参数单机运行nccl-test测试任务,会提示“No OpenFabrics connection schemes reported that they were able to be used on a specific port. As such, the openib BTL (OpenFabrics support) will be disabled for this port.”,测试任务能够正常进行下去,暂不清楚会有什么影响。
[root@server3 ~]# /home/lichao/opt/openmpi/bin/mpirun --allow-run-as-root -np 1 /home/lichao/AIGC/nccl-tests/build/all_reduce_perf -b 512 -e 8G -f 2 -g 1
--------------------------------------------------------------------------
No OpenFabrics connection schemes reported that they were able to be
used on a specific port.  As such, the openib BTL (OpenFabrics
support) will be disabled for this port.

  Local host:           server3
  Local device:         mlx5_0
  Local port:           1
  CPCs attempted:       rdmacm, udcm
--------------------------------------------------------------------------
# nThread 1 nGpus 1 minBytes 512 maxBytes 8589934592 step: 2(factor) warmup iters: 5 iters: 20 agg iters: 1 validation: 1 graph: 0
#
# Using devices
#  Rank  0 Group  0 Pid   8080 on    server3 device  0 [0x02] NVIDIA GeForce RTX 4060 Ti
#
# Reducing maxBytes to 5261099008 due to memory limitation
#
#                                                              out-of-place                       in-place
#       size         count      type   redop    root     time   algbw   busbw #wrong     time   algbw   busbw #wrong
#        (B)    (elements)                               (us)  (GB/s)  (GB/s)            (us)  (GB/s)  (GB/s)
         512           128     float     sum      -1     3.77    0.14    0.00      0     0.34    1.50    0.00      0
        1024           256     float     sum      -1     3.96    0.26    0.00      0     0.34    3.04    0.00      0
        2048           512     float     sum      -1     3.63    0.56    0.00      0     0.34    6.03    0.00      0
        4096          1024     float     sum      -1     3.63    1.13    0.00      0     0.34   12.06    0.00      0
        8192          2048     float     sum      -1     3.65    2.25    0.00      0     0.34   24.17    0.00      0
       16384          4096     float     sum      -1     3.63    4.51    0.00      0     0.34   48.23    0.00      0
       32768          8192     float     sum      -1     3.61    9.08    0.00      0     0.34   97.21    0.00      0
       65536         16384     float     sum      -1     3.60   18.18    0.00      0     0.34  193.52    0.00      0
      131072         32768     float     sum      -1     3.67   35.72    0.00      0     0.34  389.86    0.00      0
      262144         65536     float     sum      -1     3.66   71.54    0.00      0     0.35  757.97    0.00      0
      524288        131072     float     sum      -1     4.38  119.60    0.00      0     0.34  1542.25    0.00      0
     1048576        262144     float     sum      -1     6.66  157.41    0.00      0     0.33  3164.08    0.00      0
     2097152        524288     float     sum      -1    15.73  133.29    0.00      0     0.34  6233.18    0.00      0
     4194304       1048576     float     sum      -1    31.38  133.66    0.00      0     0.34  12457.10    0.00      0
     8388608       2097152     float     sum      -1    65.34  128.37    0.00      0     0.34  24467.28    0.00      0
    16777216       4194304     float     sum      -1    132.4  126.70    0.00      0     0.34  49156.80    0.00      0
    33554432       8388608     float     sum      -1    275.5  121.81    0.00      0     0.34  99258.78    0.00      0
    67108864      16777216     float     sum      -1    549.5  122.13    0.00      0     0.34  199728.76    0.00      0
   134217728      33554432     float     sum      -1   1101.8  121.81    0.00      0     0.34  398863.98    0.00      0
   268435456      67108864     float     sum      -1   2203.6  121.81    0.00      0     0.34  785128.56    0.00      0
   536870912     134217728     float     sum      -1   4414.9  121.60    0.00      0     0.34  1567735.18    0.00      0
  1073741824     268435456     float     sum      -1   8819.1  121.75    0.00      0     0.34  3121342.51    0.00      0
  2147483648     536870912     float     sum      -1    17639  121.75    0.00      0     0.35  6218281.88    0.00      0
  4294967296    1073741824     float     sum      -1    35280  121.74    0.00      0     0.30  14144466.64    0.00      0
# Out of bounds values : 0 OK
# Avg bus bandwidth    : 0
#

[server3:08076] 1 more process has sent help message help-mpi-btl-openib-cpc-base.txt / no cpcs for port
[server3:08076] Set MCA parameter "orte_base_help_aggregate" to 0 to see all help / error messages
[root@server3 ~]# 原因分析/解决方法
在mpirun命令行中,增加参数“-mca btl ‘^openib’”指定BTL的value为’^openib’,可解决。
[root@server3 ~]# /home/lichao/opt/openmpi/bin/mpirun --allow-run-as-root -np 1 -mca btl '^openib' /home/lichao/AIGC/nccl-tests/build/all_reduce_perf -b 512 -e 8G -f 2 -g 1
# nThread 1 nGpus 1 minBytes 512 maxBytes 8589934592 step: 2(factor) warmup iters: 5 iters: 20 agg iters: 1 validation: 1 graph: 0
#
# Using devices
#  Rank  0 Group  0 Pid   8106 on    server3 device  0 [0x02] NVIDIA GeForce RTX 4060 Ti
#
# Reducing maxBytes to 5261099008 due to memory limitation
#
#                                                              out-of-place                       in-place
#       size         count      type   redop    root     time   algbw   busbw #wrong     time   algbw   busbw #wrong
#        (B)    (elements)                               (us)  (GB/s)  (GB/s)            (us)  (GB/s)  (GB/s)
         512           128     float     sum      -1     3.43    0.15    0.00      0     0.31    1.64    0.00      0
        1024           256     float     sum      -1     6.29    0.16    0.00      0     0.30    3.39    0.00      0
        2048           512     float     sum      -1     4.07    0.50    0.00      0     0.32    6.36    0.00      0
        4096          1024     float     sum      -1     4.00    1.02    0.00      0     0.33   12.59    0.00      0
        8192          2048     float     sum      -1     3.97    2.06    0.00      0     0.32   25.24    0.00      0
       16384          4096     float     sum      -1     3.97    4.13    0.00      0     0.30   54.30    0.00      0
       32768          8192     float     sum      -1     4.00    8.20    0.00      0     0.30  108.49    0.00      0
       65536         16384     float     sum      -1     3.94   16.64    0.00      0     0.30  215.22    0.00      0
      131072         32768     float     sum      -1     4.64   28.23    0.00      0     0.31  424.32    0.00      0
      262144         65536     float     sum      -1     4.12   63.65    0.00      0     0.31  848.09    0.00      0
      524288        131072     float     sum      -1     4.36  120.27    0.00      0     0.30  1719.26    0.00      0
     1048576        262144     float     sum      -1     6.44  162.86    0.00      0     0.30  3451.53    0.00      0
     2097152        524288     float     sum      -1    15.74  133.21    0.00      0     0.30  6880.42    0.00      0
     4194304       1048576     float     sum      -1    31.58  132.83    0.00      0     0.31  13688.98    0.00      0
     8388608       2097152     float     sum      -1    64.95  129.15    0.00      0     0.30  27799.86    0.00      0
    16777216       4194304     float     sum      -1    132.0  127.09    0.00      0     0.30  55849.59    0.00      0
    33554432       8388608     float     sum      -1    274.4  122.29    0.00      0     0.31  109834.47    0.00      0
    67108864      16777216     float     sum      -1    550.3  121.94    0.00      0     0.31  218845.15    0.00      0
   134217728      33554432     float     sum      -1   1101.1  121.89    0.00      0     0.31  439409.82    0.00      0
   268435456      67108864     float     sum      -1   2204.8  121.75    0.00      0     0.31  867459.87    0.00      0
   536870912     134217728     float     sum      -1   4411.4  121.70    0.00      0     0.31  1728774.47    0.00      0
  1073741824     268435456     float     sum      -1   8822.3  121.71    0.00      0     0.31  3515278.52    0.00      0
  2147483648     536870912     float     sum      -1    17639  121.75    0.00      0     0.31  6842388.56    0.00      0
  4294967296    1073741824     float     sum      -1    35284  121.73    0.00      0     0.31  13942435.63    0.00      0
# Out of bounds values : 0 OK
# Avg bus bandwidth    : 0
#

[root@server3 ~]#
参考文档:
https://www.open-mpi.org/video/internals/Sandia_BrianBarrett-1up.pdf
https://github.com/open-mpi/ompi/issues/11063
https://www.open-mpi.org/doc/v4.1/man1/mpirun.1.php
- 问题2:
三节点运行多机nccl-test,会提示路由相关的错误,卡在初始阶段无法继续进行。
[root@server1 lichao]# ./run_nccl-test.sh
--------------------------------------------------------------------------
No OpenFabrics connection schemes reported that they were able to be
used on a specific port.  As such, the openib BTL (OpenFabrics
support) will be disabled for this port.

  Local host:           server1
  Local device:         mlx5_1
  Local port:           1
  CPCs attempted:       rdmacm, udcm
--------------------------------------------------------------------------
[1716789553.453110] [server1:7255 :0] sock.c:325 UCX ERROR connect(fd=54, dest_addr=200.200.0.2:49112) failed: No route to host原因分析/解决方法
排查三个节点上的网络配置,发现是server3多启用了一个mlnx接口并配置了200.200.0.0网段的地址,用于nccl-test的IP地址段是172.16.0.0,所以导致任务初始化阶段在server1和2上找不到200的路由进而通信测试失败。
添加参数指定网口“-x NCCL_SOCKET_IFNAME=ens11f1 -x NCCL_IB_HCA=mlx5_1:1”,不能解决,仍旧提示无法找到200网段的路由。最终关闭ens11f0接口,重新测试,恢复正常。
[root@server3 ~]# ibdev2netdev
mlx5_0 port 1 ==> ens11f0 (Up)
mlx5_1 port 1 ==> ens11f1 (Up)
[root@server3 ~]# ip a
1: lo: <LOOPBACK,UP,LOWER_UP> mtu 65536 qdisc noqueue state UNKNOWN group default qlen 1000
    link/loopback 00:00:00:00:00:00 brd 00:00:00:00:00:00
    inet 127.0.0.1/8 scope host lo
       valid_lft forever preferred_lft forever
    inet6 ::1/128 scope host
       valid_lft forever preferred_lft forever
2: eno1: <BROADCAST,MULTICAST,UP,LOWER_UP> mtu 1500 qdisc mq state UP group default qlen 1000
    link/ether ac:1f:6b:dd:1b:f2 brd ff:ff:ff:ff:ff:ff
    inet 10.230.1.13/24 brd 10.230.1.255 scope global eno1
       valid_lft forever preferred_lft forever
    inet6 fe80::ae1f:6bff:fedd:1bf2/64 scope link
       valid_lft forever preferred_lft forever
3: eno2: <BROADCAST,MULTICAST> mtu 1500 qdisc noop state DOWN group default qlen 1000
    link/ether ac:1f:6b:dd:1b:f3 brd ff:ff:ff:ff:ff:ff
6: ens11f0: <BROADCAST,MULTICAST,UP,LOWER_UP> mtu 1500 qdisc mq state UP group default qlen 1000
    link/ether b8:59:9f:3b:57:b6 brd ff:ff:ff:ff:ff:ff
    inet 200.200.0.2/30 brd 200.200.0.3 scope global ens11f0
       valid_lft forever preferred_lft forever
    inet6 fe80::ba59:9fff:fe3b:57b6/64 scope link
       valid_lft forever preferred_lft forever
7: ens11f1: <BROADCAST,MULTICAST,UP,LOWER_UP> mtu 1500 qdisc mq state UP group default qlen 1000
    link/ether b8:59:9f:3b:57:b7 brd ff:ff:ff:ff:ff:ff
    inet 172.16.0.13/24 brd 172.16.0.255 scope global ens11f1
       valid_lft forever preferred_lft forever
    inet6 fe80::ba59:9fff:fe3b:57b7/64 scope link
       valid_lft forever preferred_lft forever
[root@server3 ~]# - 问题3:
提示“NET/Plugin: No plugin found (libnccl-net.so)”。
server1:41185:41185 [0] NCCL INFO NCCL_SOCKET_IFNAME set by environment to ens11f1
server1:41185:41185 [0] NCCL INFO Bootstrap : Using ens11f1:172.16.0.11<0>
server1:41185:41185 [0] NCCL INFO NET/Plugin: No plugin found (libnccl-net.so)
server1:41185:41185 [0] NCCL INFO NET/Plugin: Plugin load returned 2 : libnccl-net.so: cannot open shared object file: No such file or directory : when loading libnccl-net.so
server1:41185:41185 [0] NCCL INFO NET/Plugin: Using internal network plugin.
server1:41185:41185 [0] NCCL INFO cudaDriverVersion 12040
NCCL version 2.21.5+cuda12.4原因分析/解决方法
这个是正常行为,因为 NCCL 中新增了外部网络插件支持。它允许第三方厂商创建自己的外部网络传输插件供 NCCL 使用,例如:https://github.com/aws/aws-ofi-nccl。这个提示是不影响正常运行的。
在该消息之后,会看到另一条 INFO 消息“NET/Plugin: Using internal network plugin”,这表示 NCCL 已退回到使用其内部网络传输的状态。
参考文档:
https://github.com/NVIDIA/nccl/issues/162。
- 问题4:
GPU驱动和相关加速库安装好后,nvidia工具和nccl-test集合通信测试一切正常,但是重启服务器后,运行nvidia-smi提示驱动/库的版本不匹配。
[root@server3 ~]# nvidia-smi
Failed to initialize NVML: Driver/library version mismatch
NVML library version: 550.67
[root@server3 ~]# 原因分析/解决方法
按照工具给出的错误提示,应该就是某个组件,在后续安装其他应用时,被覆盖了版本。
逐一排查,发现GPU驱动确实存在一个通过yum安装的版本“nvidia-driver-latest-dkms-NVML 550.54.15-1.el7”,和提示的版本不匹配“NVML library version: 550.67”。删除后重新通过二进制包安装驱动,恢复正常。
[root@server3 ~]# yum remove nvidia* libnvidia*
已加载插件:fastestmirror, nvidia
参数 libnvidia* 没有匹配
正在解决依赖关系
--> 正在检查事务
---> 软件包 nvidia-driver-latest-dkms.x86_64.3.550.54.15-1.el7 将被 删除
---> 软件包 nvidia-driver-latest-dkms-NVML.x86_64.3.550.54.15-1.el7 将被 删除
---> 软件包 nvidia-driver-latest-dkms-NvFBCOpenGL.x86_64.3.550.54.15-1.el7 将被 删除
---> 软件包 nvidia-driver-latest-dkms-cuda.x86_64.3.550.54.15-1.el7 将被 删除
---> 软件包 nvidia-driver-latest-dkms-cuda-libs.x86_64.3.550.54.15-1.el7 将被 删除
---> 软件包 nvidia-driver-latest-dkms-devel.x86_64.3.550.54.15-1.el7 将被 删除
---> 软件包 nvidia-driver-latest-dkms-libs.x86_64.3.550.54.15-1.el7 将被 删除
---> 软件包 nvidia-kmod-common.x86_64.3.550.54.15-1.el7 将被 删除
--> 正在处理依赖关系 nvidia-kmod-common = 3:550.54.15,它被软件包 3:kmod-nvidia-open-dkms-550.54.15-1.el7.x86_64 需要
--> 正在处理依赖关系 nvidia-kmod-common = 3:550.54.15,它被软件包 3:kmod-nvidia-open-dkms-550.54.15-1.el7.x86_64 需要
---> 软件包 nvidia-modprobe-latest-dkms.x86_64.3.550.54.15-1.el7 将被 删除
---> 软件包 nvidia-persistenced-latest-dkms.x86_64.3.550.54.15-1.el7 将被 删除
---> 软件包 nvidia-xconfig-latest-dkms.x86_64.3.550.54.15-1.el7 将被 删除
--> 正在检查事务
---> 软件包 kmod-nvidia-open-dkms.x86_64.3.550.54.15-1.el7 将被 删除
--> 解决依赖关系完成

依赖关系解决

==========================================================================================================================================================
 Package                                               架构                   版本                               源                                  大小
==========================================================================================================================================================
正在删除:
 nvidia-driver-latest-dkms                             x86_64                 3:550.54.15-1.el7                  @cuda-rhel7-x86_64                 175 M
 nvidia-driver-latest-dkms-NVML                        x86_64                 3:550.54.15-1.el7                  @cuda-rhel7-x86_64                 2.0 M
 nvidia-driver-latest-dkms-NvFBCOpenGL                 x86_64                 3:550.54.15-1.el7                  @cuda-rhel7-x86_64                 135 k
 nvidia-driver-latest-dkms-cuda                        x86_64                 3:550.54.15-1.el7                  @cuda-rhel7-x86_64                 1.3 M
 nvidia-driver-latest-dkms-cuda-libs                   x86_64                 3:550.54.15-1.el7                  @cuda-rhel7-x86_64                 222 M
 nvidia-driver-latest-dkms-devel                       x86_64                 3:550.54.15-1.el7                  @cuda-rhel7-x86_64                 0.0
 nvidia-driver-latest-dkms-libs                        x86_64                 3:550.54.15-1.el7                  @cuda-rhel7-x86_64                 305 M
 nvidia-kmod-common                                    x86_64                 3:550.54.15-1.el7                  @cuda-rhel7-x86_64                 1.3 k
 nvidia-modprobe-latest-dkms                           x86_64                 3:550.54.15-1.el7                  @cuda-rhel7-x86_64                  70 k
 nvidia-persistenced-latest-dkms                       x86_64                 3:550.54.15-1.el7                  @cuda-rhel7-x86_64                  65 k
 nvidia-xconfig-latest-dkms                            x86_64                 3:550.54.15-1.el7                  @cuda-rhel7-x86_64                 222 k
为依赖而移除:
 kmod-nvidia-open-dkms                                 x86_64                 3:550.54.15-1.el7                  @cuda-rhel7-x86_64                  21 M

事务概要
==========================================================================================================================================================
移除  11 软件包 (+1 依赖软件包)

安装大小:727 M
是否继续?[y/N]:y

[root@server3 ~]# cd /home/lichao/AIGC/
[root@server3 AIGC]# sh NVIDIA-Linux-x86_64-550.67.run
Verifying archive integrity... OK
Uncompressing NVIDIA Accelerated Graphics Driver for Linux-x86_64 550.67........................................................................................................................................................................................................................................................................................................................................................................................................................................................................................................................................................................................................................................................................................................................................................................................................................................................................................................................................................................................................................................................................................................................................................................
[root@server3 AIGC]# nvidia-smi
Thu May 16 09:28:11 2024
+-----------------------------------------------------------------------------------------+
| NVIDIA-SMI 550.67                 Driver Version: 550.67         CUDA Version: 12.4     |
|-----------------------------------------+------------------------+----------------------+
| GPU  Name                 Persistence-M | Bus-Id          Disp.A | Volatile Uncorr. ECC |
| Fan  Temp   Perf          Pwr:Usage/Cap |           Memory-Usage | GPU-Util  Compute M. |
|                                         |                        |               MIG M. |
|=========================================+========================+======================|
|   0  NVIDIA GeForce RTX 4060 Ti     Off |   00000000:02:00.0 Off |                  N/A |
|  0%   36C    P8              5W /  165W |       2MiB /  16380MiB |      0%      Default |
|                                         |                        |                  N/A |
+-----------------------------------------+------------------------+----------------------+

+-----------------------------------------------------------------------------------------+
| Processes:                                                                              |
|  GPU   GI   CI        PID   Type   Process name                              GPU Memory |
|        ID   ID                                                               Usage      |
|=========================================================================================|
|  No running processes found                                                             |
+-----------------------------------------------------------------------------------------+
[root@server3 AIGC]# 


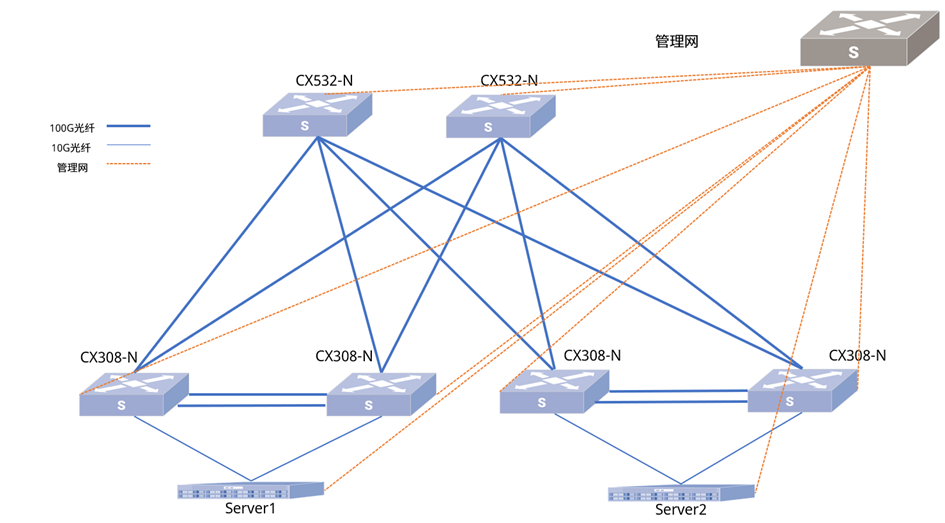
 [root@server ~]# ethtool -i ens1f2
[root@server ~]# ethtool -i ens1f3
[root@server ~]# ethtool -i ens1f2
[root@server ~]# ethtool -i ens1f3
 [root@sever ~]# ethtool --set-priv-flags ens1f2 disable-fw-lldp on
[root@sever ~]# ethtool --set-priv-flags ens1f3 disable-fw-lldp on
[root@sever ~]# ethtool --set-priv-flags ens1f2 disable-fw-lldp on
[root@sever ~]# ethtool --set-priv-flags ens1f3 disable-fw-lldp on Spine2# show lldp neighbor summary
 Leaf1#show lldp neighbor summary
 Leaf2#show lldp neighbor summary
 Leaf3#show lldp neighbor summary
 Leaf4#show lldp neighbor summary